
Graphics Design
28.Exploring the Basics and Benefits of Image Manipulation
Exploring the Basics and Benefits of Image Manipulation
Here’s an overview:
- Introduction to Image Manipulation
- Key Techniques
- Tools and Software
- Applications
- Essential Tools for Image Manipulation
- Software Tools
- Hardware Tools
- Additional Tools
- Software Solutions for Advanced Image Editing
- Adobe Photoshop
- CorelDRAW Graphics Suite
- GIMP (GNU Image Manipulation Program)
- Affinity Photo
- Capture One
- Conclusion
Introduction to Exploring the basics and benefits of image manipulation
Exploring the basics and benefits of image manipulation is a very interesting domain area allowing a person to change or improve photographs and other kinds of information displaying. The picture that is captured can be masked and manipulated to certain standards using the available softwae to meet the intended use of the specific image. This process may extend from a basic tool such as cutting out an image to remove unwanted regions to fusing several images to make a new composit piece.
Key Techniques
Exploring the basics and benefits of image manipulation encompasses several techniques, each serving different purposes:Image manipulation encompasses several techniques, each serving different purposes:
Color Correction
The process of exploring the basics and benefits of image manipulation the hue, saturation and brightness to successfully enhance the image.
Adjusting the contrast between different colors that the eyes can detect in order to come up with natural looking image.
Retouching
Exploring the basics and benefits of image manipulation in particular, this can refer to the methods of pore cleansing, the removal of pimples, wrinkles, and other skin defects.
Wrinkle and beautifying facial structures in pictures with focus on portraits.
Cropping and Resizing
Crop and resize: modifying the size of the image to work on various formats.
This involves cropping with a view of erasing out unnecessary portions that do not serve the intended idea.
Filters and Effects
Exploring the basics and benefits of image manipulation adjusting the PAC settings which contributes to the looks of the image by applying artistic filters.
Other simple enhancements that could be performed were applying the blurs or the sharpen to bring in focus or details.
Compositing
Exploring the basics and benefits of image manipulation compositing which refers to the process of combining two or more images into a single image depicting a single image.
Superimposing objects with the help of layers and masks for creating smooth adjustments between two or more objects.
Tools and Software
Exploring the basics and benefits of image manipulation there are several tools that are used commonly to manipulate images. Some of the most popular ones include:Some of the most popular ones include:
Adobe Photoshop
A very reliable product that comes with an extensive list of functionalities one would expect in an industrial tool.
Exploring the basics and benefits of image manipulation it can be used by both beginners who are trying to discover the basics of making money online and experienced marketers who already are engaged in internet marketing and find out how to make more profits.
This option is an application that helps in making and modifying images and its name is GIMP which stands for GNU Image Manipulation Program.
Free and open-source alternative.
They are quite heavy weighed tools similar to the best commercial software available in the market.
Corel PaintShop Pro
Convenient and friendly application with a great set of editing tools.
Suitable for intermediate users.
Applications
The applications of image manipulation stretch across numerous fields, such as:The applications of image manipulation stretch across numerous fields, such as:
Advertising
Developing attractive ad content that appeal to viewers’ attention and stimulate an interest in the promoted product.
Photography
Improving the preservation of the photo and Erasing or improving shortcomings of the photo.
Art and Design
Designing diversified arts and graphics for the design purposes.
Exploring the basics and benefits of image manipulation learning simple image manipulation skills paves way to prowess and creativity useful in various disciplines, not just design but medical, manufacturing. Through practice of all these techniques, an ordinary photo is turned into an over-whelming visual event of analysis.
Essential Tools for Image Manipulation

Exploring the basics and benefits of image manipulation therefore quite an achievement and a testimony of the usefulness of having good tools at your disposal as far as image manipulation is a concern. ORGANIZED TOOLS Useful programs and devices help to do that and do not allow me to be distracted by tools and techniques aspect.
Software Tools
Adobe Photoshop
Exploring the basics and benefits of image manipulation a very adaptive and strong PA that enable diverse operations on images. It has applications in areas such as color correcting, image cloning, and complex modifying. Their abundance and the great choice of tools and plugins makes it inpossible to work without it.
is a raster graphics editor using as a base the technology of GNU Image Processing System, as the name suggest.
Exploring the basics and benefits of image manipulation it is an open source tool similar to Photoshop with many of the features of photoshop, available freely for use. Which is great for anybody that requires potent editing tools that are not available in the paid versions.
Affinity Photo
While being relatively new in the market for sending out emails, it has quickly gained popularity due to the cheap cost and the wide range of features that it offers. Above all, I think that the whole format is rather convenient and easy to work in.
Canva
Canva is an ideal app for those who need to make some adjustments to pictures and create designs in a hurry since it provides hundreds of templates and rather simple to use editing tools. I still use it for simple items, such as social media posts, banners, and other basic elements.
Hardware Tools
Graphics Tablet
Exploring the basics and benefits of image manipulation this accessory is most handy for intricate works since it is almost impossible to do detail work with mouse. As for me the best tablet is a Wacom tablet as it is accurate and it gives an excellent drawing feel.
High-Resolution Monitor
Exploring the basics and benefits of image manipulation an important characteristics of any image in editing are the exact reproduction of colors and a high level of detail. They mentioned that I work with a 4K monitor because I need to capture all details of my decisions.
Powerful Computer
This paper focuses on how the performance aspect of the different equipment that may be used in a business environment determines the degree of effectiveness in the organization’s operations. That is why I have a computer with high-speed processor, large memory, and graphics video card for quickly working with high-loaded applications.
Additional Tools
Color Calibration Device
Exploring the basics and benefits of image manipulation for the purpose of resetting the colors and making sure that the color is as accurate as possible, I employ the service of a color calibrator. It sets the colors on my monitor to truthful tones, to achieve the same RGBs as other screens I have seen including photographs.
External Storage
Working with big images creates additional issues related to the storage of these files. I use External SSDs because of its fast and thus efficient in file transfer and easy to backup.
These tools all together help optimize image manipulation as well as the quality of my work in achieving the desired final output.
Software Solutions for Advanced Image Editing

Now let’s discuss what applications I use for further image improvement and refining to reach professional level work. They provide strong set of actions ranging from simple swizzling to very complex shuffles.
Adobe Photoshop
Adobe Photoshop is a specific program, and it is probably recognizable for most specialists in the sphere. Thus, it can be employed in all kinds of writing as it offers a myriad of options that can be valuable for most genres and styles. Key functionalities include:
Layers: The fact of layer work makes it possible to carry out secondary processing without creating a new copy.
Filters: It becomes very easy to apply a whole bunch of different filters and come up with most unexpected visual results.
Masking: Sophisticated techniques in masking assist in achieving a level of selectivity when selecting the targets of this algorithm.
Automation: Minimizing unnecessary steps: Logging and automating repetitive actions bring efficiency to the process.
CorelDRAW Graphics Suite
Another is CorelDRAW, this tool is also quite comprehensive, but the software is particularly famous for its work with VECTOR GRAPHIC. I use it for tasks such as:I use it for tasks such as:
Vector Illustration: Generate clear, easily reproducible visuals.
Layout Design: To create big, elaborate and detailed layouts.
Typography: An advanced text editor initially designed and used for typography.
Bitmap-to-Vector Tracing: Exploring the basics and benefits of image manipulation converting bitmap images to the vector format for the purpose of using the images in various scales, including zoom-ins.
GIMP (GNU Image Manipulation Program)
Exploring the basics and benefits of image manipulation as for those users, who lookup open source version of Adobe, then GIMP can be regarded as a very worthy substitute. Here’s why I often recommend it:Here’s why I often recommend it:
Flexibility: Open source solutions are free to customize to organizational needs due to their flexibility.
Plugins: Regarding plugins, virtually any feature can be extended by a vast array of plugins.
Cost-Effective: That is free for use and therefore it is suitable for amateurs and businesses persons.
Community Support: Large community favoring troubleshooting and tutorials when it comes to the design of a product.
Affinity Photo
While being the newcomer to the market, this particular software has earned my respect due to the features it provides. This software excels in:
Real-time Performance: In the case of tuberculous meningitis, for example, it is possible to make swift, real-time changes to management rather than waiting for the report of a CSF culture.
Compatibility: It also supports PSD files and other formats, like JPEG, PNG, TIFF, BMP etc.
Precision Tools: Specialized techniques in concert with artificial or natural selection, definition, and enhancement.
Asset Management: Identification of individual assets and specific projects where they can be deployed:
Capture One
Exploring the basics and benefits of image manipulation capture One is another tool that is critical and useful for any dedicated photographer. Known for its powerful RAW processing capabilities, I’ve found it especially useful for:Known for its powerful RAW processing capabilities, I’ve found it especially useful for:
Color Grading: Premium color grading tools tightly integrated with fine-tuning abilities.
Tethered Shooting: Full control of the camera through the application’s software interface.
Detail Enhancement: Best for highlights and enlargements; better signal-to-noise ratio.
Session Workflow: Logistics for session management within the studio context of shooting.
Exploring the basics and benefits of image manipulation although both software solutions have the potential of containing useful features, each of them has its advantages. That is why only knowing the characteristics of such software I am able to choose the most suitable one taking into consideration the needs of a certain project and producing more effective results in the sphere of advanced image editing.
Conclusion
Exploring the basics and benefits of image manipulation as I was going through the process of the steps involved in image manipulation, the following facts about it were realized. With software such as Adobe Photoshop and GIMP that users can utilize, the interaction lets them accomplish numerous things with ease which range from simple editing to advanced alterations. It allows me to protect specific aesthetic goals that can greatly improve the worth and utility of projects that I design.
The first thing I found useful in Photoshop was the possibilities to edit images and make corrections if needed. Regardless of whether you are fixing exposure or color, whether you are erasing the spots or pimples, these are convenient, thus making this job efficient. It is therefore possible that such enhancements can greatly improve the quality of the styling in the visual content being created to suit a variety of purposes.
Also exploring the basics and benefits of image manipulation helps to be creative. Using several images or synchronizing with additional graphics, I can achieve a different meaning and context and/or present a narrative with a strong narrative or bring out a different form of communication. It is valuable since it is a characteristic that can be applied in various areas as is the case with marketing, website designing, and the media industries.
Exploring the basics and benefits of image manipulation in addition, understanding the means of image manipulation will lead directly to broadening the opportunities in the labor market. Strengthening this area of specialization is beneficial in various field assignments, for instance, developing adverts, writing or illustrating articles, and website designs. Versatility in this realm is always a key selling point in a highly contested employment market.
There are also exploring the basics and benefits of image manipulation ethical issues involved in distorting the pictures in question. The tools are truly game changers when it comes to meeting and developing your target niche, but they must be wielded responsibly. This way, the specific intention of image manipulation is clearly seen and distinction between the fake and true image is maintained which is very crucial especially in areas of news issuance and publications.
In conclusion, I am happy to share that my experiences with the concept of image manipulation have demonstrated a great deal more than just physical improvement to a picture. For both private and business purposes, learning these appear to empower me with the ability of provide the audience with a convincing and professional message through dazzling pictures.
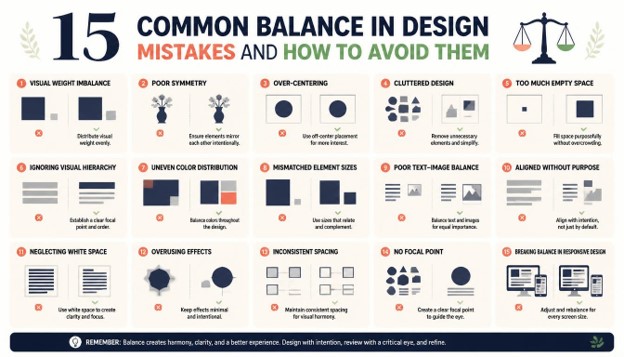
15 Common Balance in Design Mistakes and How to Avoid Them
Every visually pleasing website, poster, app interface, or printed brochure shares one quiet ingredient that most viewers never consciously notice, yet instantly feel when it is missing: balance. Balance in Design is the invisible architecture that holds a composition together, guiding the eye, distributing visual weight, and giving a layout a sense of stability and calm. When this visual equilibrium is handled well, a page feels effortless to look at. When it is mishandled, something feels “off,” even if the viewer cannot articulate exactly why. This is precisely the trap that catches so many designers, from beginners building their first portfolio piece to seasoned professionals rushing through a deadline.
In this comprehensive guide, we are going to walk through fifteen of the most common mistakes designers make when it comes to Balance in Design, and more importantly, how you can identify and fix each one in your own work. Whether you are designing a website, a mobile app, a logo, a poster, or a full brand identity, understanding this concept will elevate your work from merely “good enough” to genuinely professional and polished. We will also explore practical techniques, real-world examples, and simple checklists you can apply immediately to your next project so that Balance in Design becomes second nature rather than an afterthought.
Let’s dive into the fifteen mistakes that quietly sabotage Balance in Design, and the fixes that will help you avoid them for good.
1. Ignoring Visual Weight When Distributing Elements
One of the most fundamental mistakes designers make is ignoring visual weight entirely. Visual weight refers to how much a particular element draws the eye based on its size, color, contrast, texture, and position. A tiny, brightly colored icon can carry as much visual weight as a large block of muted gray text. Many beginners assume that Balance in Design simply means placing objects of similar physical size across a layout, but this overlooks how color saturation, contrast, and even shape complexity affect how “heavy” an element feels to the viewer. A small red button on a mostly white page can dominate the composition, while a massive pale gray shape might barely register. When designers fail to account for this nuance, their compositions end up lopsided even though the actual pixel dimensions of each element appear evenly distributed.
To avoid this mistake, train your eye to squint at your composition, or better yet, convert it to grayscale temporarily. This trick strips away color and reveals the true visual weight of each shape and block of content, based purely on tone and contrast. If one corner of your design still feels heavier than the rest once color is removed, you have found a genuine Balance in Design issue rather than a superficial one. Practicing this exercise regularly will sharpen your instincts and help you achieve Balance in Design that holds up regardless of screen brightness, print quality, or colorblind viewers.
2. Overcrowding One Side of the Composition
A frequent and easily avoidable error is stacking too many elements on one side of a layout while leaving the opposite side sparse and empty. This typically happens when designers add content incrementally, dropping in a new image here, an extra paragraph there, without stepping back to evaluate the composition as a whole. The result is a layout that visually tips over to one direction, forcing the viewer’s eye to work harder to find a resting point. This is one of the clearest violations of Balance in Design because it creates an obvious, uncomfortable asymmetry that even non-designers notice immediately, even if they cannot name the specific issue.
The fix is to regularly zoom out and view your entire canvas at a reduced size, which helps reveal the overall silhouette of your composition rather than getting lost in individual details. Group your elements into visual “zones” and mentally weigh each zone against the others. If your left side has three images, a headline, and a call-to-action button, while your right side only has a single line of text, you have a genuine problem with Balance in Design that needs immediate correction. Consider redistributing content, resizing key elements, or introducing new visual anchors on the lighter side to restore harmony to the page.
3. Poor Color Balance Across the Layout

Color plays an enormous role in Balance in Design, yet it is one of the most commonly mismanaged aspects of any composition. A common mistake is clustering all the bold, saturated colors in one section of a design while leaving the rest of the page pale and lifeless. This creates an unintentional focal imbalance where the eye is magnetically drawn to one area and essentially ignores everything else. Another version of this mistake involves using too many competing bright colors without any neutral space to let the eye rest, resulting in a chaotic, visually exhausting experience for the viewer.
Achieving proper color balance requires thinking of your palette as a set of weights on a scale. Warm colors like red, orange, and yellow tend to feel heavier and more attention-grabbing than cool colors like blue, green, or purple. Distribute your most saturated, high-contrast colors thoughtfully throughout the composition rather than clumping them together. A well-balanced palette often uses a dominant neutral tone as the foundation, with smaller, strategically placed accent colors to guide the eye across the entire page rather than trapping it in one corner. Mastering this concept is essential if you want true Balance in Design that feels intentional rather than accidental.
4. Inconsistent Spacing and White Space Usage

Inconsistent spacing is a subtle but damaging mistake that undermines Balance in Design in ways that are often hard to pinpoint. When margins, padding, and gaps between elements vary unpredictably throughout a layout, the composition starts to feel disorganized and unstable, even if every individual element looks fine on its own. This is especially common in websites and apps built by teams where multiple people work on different sections without a shared spacing system, leading to a patchwork of inconsistent gaps that quietly erode the reader’s sense of order.
The solution lies in establishing a consistent spacing scale, often based on a simple multiplier system such as 8px, 16px, 24px, 32px, and so on. Applying this scale rigorously across every margin, padding value, and gap in your design ensures a rhythmic consistency that supports Balance in Design at a structural level. White space is not empty or wasted space; it is an active design element that gives content room to breathe and helps establish visual hierarchy. Treat your white space with the same intentionality as your colors and typography, and you will notice an immediate improvement in how balanced and professional your layouts feel.
5. Uneven Typography Hierarchy
Typography is often treated as a purely functional element, but it carries significant visual weight that directly impacts Balance in Design. A common mistake is using font sizes and weights inconsistently, resulting in headlines that compete with subheadings for attention, or body text that is either too bold or too light relative to the rest of the page. When typographic hierarchy is unclear, viewers struggle to understand which information matters most, and the overall composition feels unbalanced because the eye cannot establish a clear path through the content.
To correct this, establish a clear and limited type scale with distinct levels for headlines, subheadings, body copy, and captions. Each level should have enough contrast in size or weight compared to the others that the hierarchy is immediately obvious, while still feeling proportionate to the overall composition. Pay close attention to how much visual weight bold or heavy text carries compared to lighter weights, and distribute these weights thoughtfully across the page rather than clustering all your bold text in a single area. Strong typographic hierarchy is one of the fastest ways to achieve better Balance in Design, since text often makes up the majority of content on any given page.
Line length, line height, and letter spacing also contribute to how balanced a block of text feels within its surrounding layout. Paragraphs that stretch too wide across the page become tiring to read and can make a text-heavy section feel disproportionately heavy compared to the imagery around it, while overly narrow columns can leave excessive white space on either side, creating an awkward, unbalanced gap. Aim for line lengths of roughly sixty to eighty characters for body copy, and adjust line height so that paragraphs feel comfortably spaced rather than cramped or overly loose. These smaller typographic details compound to have a significant effect on the perceived balance of an entire page.
6. Neglecting Symmetrical Balance Where It Is Needed

While asymmetry can create dynamic, modern compositions, there are many contexts, such as formal branding, luxury products, or traditional institutions, where symmetrical balance is exactly what the design calls for. A common mistake is avoiding symmetry altogether in an attempt to seem more “creative” or “contemporary,” even when the project genuinely calls for the order and formality that symmetrical Balance in Design provides. Wedding invitations, legal documents, government websites, and premium product packaging often benefit enormously from centered, mirrored layouts that convey trust, stability, and elegance.
Before deciding on an asymmetrical approach by default, consider the brand personality and the emotional tone you want to convey. If the goal is to communicate reliability, tradition, or formality, a symmetrical approach is often the more appropriate and effective choice. Building a perfectly symmetrical layout requires careful attention to identical margins, matching element sizes, and centered alignment, but the payoff is a composition that feels grounded, authoritative, and calm. Do not dismiss symmetry as boring; instead, treat it as one of several tools available for achieving Balance in Design depending on the project’s needs.
7. Overusing Radial Balance Incorrectly
Radial balance, where elements radiate outward from a central point, is a powerful but frequently misapplied technique. A common mistake occurs when designers use a radial arrangement without a strong enough focal center, resulting in a composition that feels scattered rather than unified. Another version of this error happens when the radiating elements vary too wildly in size or style, breaking the sense of rotational harmony that radial balance is supposed to create. Without a clear anchor point, radial layouts can quickly become confusing rather than compelling.
To use radial balance effectively, always start with a strong, well-defined central element, whether it is a logo, a product photo, or a key piece of text. Every other element should relate proportionally to this center, maintaining consistent spacing and scaling as they radiate outward. Consistency in style, color, and size among the radiating elements is essential for maintaining true Balance in Design in this format. Radial balance works particularly well for badges, icons, and circular layouts, but it requires more precision than simple grid-based designs, so take extra care when attempting it.
8. Not Considering Scale and Proportion
Scale and proportion mistakes are among the most visually jarring Balance in Design errors because they immediately signal that something is wrong, even to untrained eyes. This happens when an element is either too large relative to its importance, overwhelming everything else on the page, or too small, making it feel insignificant despite being a critical piece of information. A giant logo paired with tiny, unreadable body text, or an oversized decorative graphic that dwarfs the actual product photo, are both classic examples of proportion mistakes that damage the overall composition.
The fix begins with establishing a clear priority list for your content before you even start designing. Ask yourself what the single most important element on the page is, and size everything else in proportion to that priority. A helpful technique is to use consistent scaling ratios, such as the golden ratio or simple halving and doubling, to ensure that size relationships feel intentional rather than arbitrary. Regularly stepping back from your work and asking “does the size of this element match its actual importance” will help you catch proportion issues before they undermine your overall Balance in Design.
It also helps to compare your composition against similar, well-regarded work in your industry. Study how competitors or admired brands scale their hero images relative to their navigation bars, or how their pull quotes compare in size to their surrounding paragraphs. This kind of comparative research is not about copying, but about calibrating your instincts for what proportion actually feels appropriate within a given context. A children’s product page might call for oversized, playful imagery, while a financial services website might call for smaller, more restrained visuals paired with generous text. Proportion is always relative to purpose and audience expectation, never an absolute rule applied identically to every project.
9. Poor Grid Alignment

Misaligned elements are one of the most common and most fixable mistakes affecting Balance in Design. When images, text blocks, and buttons do not line up along consistent vertical or horizontal axes, the entire composition feels sloppy and unplanned, no matter how good the individual elements look. This often happens when designers eyeball placement instead of using a proper grid system, or when content is added at different stages of a project without checking it against the established grid.
Using a structured grid system, whether a simple twelve-column layout for web design or a modular grid for print, gives every element a clear position to align with. Turning on grid guides in your design software and enabling snapping features can drastically reduce alignment errors. Beyond just columns, pay attention to baseline alignment for text and optical alignment for icons and shapes, since mathematically centered elements do not always look centered to the human eye. Consistent alignment is one of the fastest wins available for improving Balance in Design across any project, and it costs very little extra effort once you build the habit.
It also helps to periodically zoom in on your design at very high magnification and drag a ruler or guide across supposedly aligned edges to confirm they truly match, since small one or two pixel discrepancies are easy to introduce accidentally when moving elements by hand. These tiny misalignments are often invisible at a glance but register subconsciously as untidiness, subtly eroding trust in the overall quality of the work. Building alignment checks into your final review process, alongside spelling and color checks, ensures that this easily overlooked detail never slips through to a finished, published piece.
10. Ignoring Negative Space as a Design Element
Negative space, or the empty area surrounding your primary content, is frequently misunderstood as wasted real estate rather than an active contributor to Balance in Design. A common mistake is trying to fill every available inch of a layout with content, images, or decorative elements out of a fear that empty space looks incomplete. This overstuffed approach creates visual clutter and prevents the eye from resting anywhere, ultimately making the entire composition feel chaotic and overwhelming rather than balanced.
Embracing negative space intentionally is one of the most effective ways to create sophisticated, premium-feeling designs. Luxury brands in particular rely heavily on generous negative space to convey exclusivity and confidence. When you leave breathing room around your key elements, you naturally draw more attention to them, which reinforces hierarchy and clarity simultaneously. Treat negative space as a deliberate design choice rather than a leftover byproduct, and you will find that achieving Balance in Design becomes significantly easier because you are working with, rather than against, the empty areas of your canvas.
A useful exercise is to deliberately remove one non-essential element from a crowded layout and observe how much clearer the remaining content becomes. Many designers are surprised to discover that a composition with fewer elements, but more generous spacing, communicates its message far more effectively than a denser version packed with additional graphics or text. Clients and stakeholders sometimes push back against empty space, assuming it represents a missed opportunity to include more information, but part of a designer’s job is to advocate for restraint and explain how strategic emptiness actually strengthens the overall impact of the piece.
11. Mismatched Element Sizes Within the Same Category
Another subtle mistake that disrupts Balance in Design occurs when elements that should logically match in size do not, such as product cards on an e-commerce page or icons within a feature list. When one card is noticeably larger or smaller than its neighbors without a clear reason, it creates an unintentional hierarchy that confuses users about which item is actually more important. This mistake is especially common when content is populated dynamically, such as user-generated images of varying dimensions, without proper cropping or containment rules in place.
The solution is to establish strict sizing rules for repeated element categories and enforce them programmatically wherever possible, particularly on websites and apps where content may be added by multiple contributors over time. Use fixed aspect ratios, consistent container dimensions, and cropping guidelines to ensure that all cards, icons, or thumbnails within the same category maintain visual parity. This consistency reinforces a sense of order and reliability, both of which are essential ingredients of strong Balance in Design, especially in interfaces where users are comparing multiple options side by side.
Design systems and component libraries are particularly useful tools for enforcing this kind of consistency at scale, since they document the exact dimensions, padding, and image-cropping rules that every card, button, or icon in a category must follow. Teams that skip this documentation often find that inconsistencies creep back in every time a new team member joins the project or a new feature is shipped under time pressure, so investing early in a clear, shared reference library pays dividends throughout the life of the product.
12. Overloading With Too Many Focal Points
A composition can only effectively guide the eye toward one or two focal points at a time. A widespread mistake is including too many competing elements, each vying for attention through bright colors, bold typography, or dramatic imagery, resulting in a tug-of-war where no single element actually wins. This is especially common in marketing materials where multiple stakeholders each insist on making “their” section stand out, leading to a design with five or six equally loud focal points fighting for the viewer’s attention.
Restoring visual harmony in this scenario requires ruthless prioritization. Identify the single most important message or element on the page and commit to making it the clear visual hero, while intentionally toning down everything else to a supporting role. This might mean reducing the size of secondary elements, muting their colors, or simplifying their typography so they recede slightly into the background. A well-balanced composition typically has one dominant focal point, one or two secondary points of interest, and everything else acting as supportive context. Resisting the urge to make everything equally important is one of the hardest but most valuable skills for mastering Balance in Design.
13. Ignoring Contrast Balance
Contrast, referring to the difference between light and dark, bold and thin, or busy and simple areas of a composition, plays a critical role in Balance in Design that is often overlooked in favor of color alone. A common mistake is creating a design where contrast levels are uniform throughout, resulting in a flat, monotonous composition that fails to guide the eye anywhere in particular. Alternatively, some designs suffer from contrast that is too extreme in every area simultaneously, creating visual fatigue because there is no calmer section for the eye to rest.
The key to effective contrast balance is variation with purpose. High-contrast areas should be reserved for your most important content, such as headlines or calls-to-action, while lower-contrast areas can house supporting text and background elements. This variation creates a natural visual rhythm that helps establish hierarchy and guides viewers through the composition in a logical order. When evaluating your work, ask whether the contrast levels across your layout tell a coherent story about what matters most, since inconsistent or flat contrast is a frequently overlooked barrier to achieving genuine Balance in Design.
14. Failing to Test Responsive Balance Across Devices
In modern digital design, Balance in Design cannot be evaluated on a single screen size alone. A frequent mistake is perfecting a layout on a large desktop monitor without checking how the same composition holds up on tablets or smartphones, where elements often reflow, stack, or resize in ways that disrupt the original careful balance. A layout that felt perfectly weighted at a wide desktop resolution might become top-heavy, cramped, or oddly empty once compressed into a narrow mobile viewport, especially if images and text blocks do not scale proportionally.
To avoid this mistake, test your designs across a range of device sizes throughout the design process rather than treating responsive adjustments as an afterthought. Pay particular attention to how your visual hierarchy, spacing, and focal points hold up when the layout switches from multiple columns to a single stacked column on mobile devices. Sometimes achieving Balance in Design responsively requires rethinking the entire composition rather than simply shrinking elements uniformly, since what looks balanced in a wide format may need a completely different arrangement to feel balanced in a narrow one. Building with a mobile-first mindset often makes this process considerably smoother.
15. Failing to Balance Branding Elements With Content
The final common mistake involves letting branding elements, such as logos, brand colors, or decorative patterns, overwhelm the actual content and functionality of a design. This often happens when companies insist on oversized logos, heavy-handed brand color usage, or excessive decorative flourishes that compete with the practical information users actually came for. While consistent branding is important, sacrificing usability and clarity for the sake of brand visibility ultimately damages both the user experience and the overall Balance in Design of the piece.
The solution is to treat branding as one contributing element within the overall composition rather than the dominant force overriding everything else. A logo should be appropriately sized to establish recognition without overpowering the headline or call-to-action that the user actually needs to see. Brand colors should be used strategically as accents rather than saturating the entire page. When branding and content work together harmoniously rather than competing for dominance, you achieve a mature, professional sense of Balance in Design that serves both the business and the end user simultaneously.
Why Balance in Design Affects User Experience and Business Results
It is worth pausing to explain why so much attention should be paid to a principle that many people outside the design world have never even heard of by name. The truth is that visitors to a website or readers of a printed piece do not need to know the terminology to be affected by it. A poorly balanced layout creates subtle friction: the eye does not know where to look first, important calls-to-action get lost among competing visual noise, and the overall impression of the brand suffers, even if the individual photography, copywriting, and color choices are each excellent on their own. Poor balance is rarely blamed by name, but it is very often the underlying reason a visitor leaves a page within seconds or fails to complete a purchase.
On the other hand, a composition with proper balance reduces the cognitive load placed on the viewer. Instead of consciously or unconsciously sorting through visual chaos, the audience is guided naturally through a logical sequence: headline, supporting image, explanation, and call-to-action. This smoother journey through the page tends to correlate with lower bounce rates, longer time on page, and higher conversion rates in commercial contexts. Search engines have also increasingly begun rewarding pages that keep users engaged longer and that provide a strong overall user experience, meaning that getting the fundamentals of composition right can indirectly support search rankings as well as direct business outcomes. Investing time in mastering this principle, therefore, is never purely an aesthetic exercise. It is a practical business and communication decision with measurable downstream effects.
Quick Checklist for Achieving Balance in Design
Before finalizing any project, run through this simple checklist to confirm your composition reflects strong Balance in Design principles. Convert your layout to grayscale and check whether visual weight is evenly distributed. Step back and view the entire canvas at a reduced size to spot overcrowded areas. Confirm your color palette is spread thoughtfully rather than clustered in one corner. Verify consistent spacing using a defined scale, and check that your typographic hierarchy is clear and intentional. Decide deliberately between symmetrical and asymmetrical approaches based on brand tone, and always test your work across multiple screen sizes before calling it finished. Following this checklist consistently will make Balance in Design an ingrained habit rather than a final-stage correction.
Conclusion
Balance in Design is far more than an abstract art-school concept; it is a practical, learnable skill that directly impacts how effectively your work communicates, converts, and connects with an audience. The fifteen mistakes outlined above, from ignoring visual weight and overcrowding one side of a composition, to neglecting responsive testing and letting branding overpower content, are all common pitfalls that even experienced designers occasionally fall into. The good news is that every single one of these mistakes is entirely avoidable once you know what to look for and build the right habits into your workflow.
By treating Balance in Design as an active, ongoing consideration throughout every stage of your process, rather than a final polish applied at the end, you will naturally produce work that feels more professional, more trustworthy, and more effective at achieving its intended goals. Whether you are designing a simple flyer or a complex multi-page website, returning again and again to the core principles covered here, visual weight, color distribution, spacing consistency, typographic hierarchy, and thoughtful scale, will consistently elevate the quality of your output. Make these checks a permanent part of your design routine, and Balance in Design will stop being something you have to think hard about and start being something that simply shows up naturally in everything you create.
Frequently Asked Questions
What exactly does Balance in Design mean? Balance in Design refers to the even distribution of visual weight across a composition, achieved through the thoughtful placement of color, size, contrast, texture, and space so that no single area overwhelms the rest of the layout.
Why is Balance in Design important for websites? Websites with strong Balance in Design feel more trustworthy, professional, and easy to navigate, which improves user experience, reduces bounce rates, and helps visitors focus on the content or actions that matter most.
What is the difference between symmetrical and asymmetrical balance? Symmetrical balance mirrors elements evenly on either side of a central axis, creating a formal and stable feel, while asymmetrical balance distributes different elements of varying visual weight to create a more dynamic, modern composition while still achieving overall equilibrium.
How can beginners practice improving Balance in Design? Beginners can practice by converting their designs to grayscale to check visual weight, using grid systems for alignment, studying well-balanced designs from established brands, and regularly stepping back to view their work as a whole rather than focusing only on individual elements.
Does Balance in Design apply to mobile app interfaces too? Yes, Balance in Design is just as critical for mobile app interfaces as it is for websites or print materials, since users expect intuitive, visually comfortable layouts regardless of screen size, and poor balance on mobile can significantly hurt usability and engagement.
Can too much negative space hurt Balance in Design? While negative space is essential, using excessive amounts without purpose can make a layout feel empty or unfinished, so the goal is to use negative space intentionally to support hierarchy rather than simply leaving large unused areas without reason.

25 Inspiring Examples of White Space in Design You Can Learn From
White space in design is one of the most underrated tools a designer can master, and yet it is the single element that separates a cluttered, amateur layout from a polished, professional one. When people first start learning design, they often assume that filling every inch of a canvas with color, text, and imagery is the way to impress an audience. In reality, the opposite is true. Empty, unmarked areas of a composition are not wasted space — they are a deliberate, functional part of the layout that guides the eye, creates hierarchy, and gives every other element room to breathe. In this article, we are going to walk through twenty five inspiring examples of white space in design that you can learn from, study, and apply to your own projects, whether you are building a website, designing a mobile app, laying out a magazine spread, or crafting a logo. Along the way we will explain why each example works, what principles it demonstrates, and how you can borrow those lessons for your own creative work.
Before we dive into the examples, it helps to understand why this concept matters so much in the first place. Good use of open, breathing space improves readability, because text and images that are surrounded by generous margins are easier for the human eye to process. It also improves perceived quality, because brands that use generous negative space are often associated with luxury, confidence, and clarity, while brands that cram everything together can feel cheap or overwhelming. Thoughtful spacing additionally helps create visual hierarchy, drawing attention to the most important elements on a page by isolating them from competing content. Finally, careful use of empty areas supports usability, because in digital products, clean layouts with ample spacing reduce cognitive load and help users complete tasks faster. With that foundation in mind, let’s explore the examples.
What Is White Space in Design?
White space in design refers to the areas of a layout that are left unmarked — the gaps between text, images, buttons, and other elements. It does not have to be literally white; it can be any color, texture, or pattern, as long as it is free of competing content. The term originated in print design, where designers noticed that the blank margins and gutters of a page were just as important as the ink itself. Today, this principle is a core concept taught in every design discipline, from graphic design to user experience design to architecture. Some designers separate empty areas into two categories: micro space, which refers to the small gaps between lines of text, icons, or buttons, and macro space, which refers to the larger margins and gaps between major sections of a layout. Both types work together to create a composition that feels balanced and intentional rather than accidental.
It’s also worth noting that this is a relative concept — what counts as generous spacing in one context might feel sparse in another. A children’s app and a luxury jewelry website will use very different amounts of breathing room, yet both can be considered well designed if the spacing matches the tone, audience, and purpose of the product. Learning to calibrate this instinct is part of what separates a junior designer from a senior one.
Why White Space in Design Matters for Modern Websites
In the era of mobile browsing and shrinking attention spans, this design principle has become even more critical. Studies on user behavior consistently show that readers skim rather than read every word, and a page that leaves generous gaps between sections makes skimming easier by breaking content into digestible chunks. Search engines like Google also reward websites that provide a good user experience, and page layout is part of that experience. A site that feels cluttered and hard to navigate will often have higher bounce rates, which can indirectly hurt search rankings. By contrast, a site that uses this principle thoughtfully tends to keep visitors engaged longer, which is a signal that search engines interpret positively. This is why so many of the top-ranking websites in competitive industries, from finance to technology to fashion, have adopted clean, spacious layouts as their default design language.
There is also a practical performance argument. Pages with fewer competing visual elements often load faster, since there are fewer heavy images, animations, and decorative assets fighting for attention. Faster load times are themselves a ranking factor, so a spacious, simplified layout can indirectly support technical SEO goals as well as aesthetic ones. Mobile responsiveness benefits too: a layout built around generous margins tends to reflow more gracefully across different screen sizes than one that was densely packed to begin with.

1. Apple’s Product Pages
Apple is perhaps the most frequently cited example when people discuss white space in design, and for good reason. Apple’s product pages use enormous amounts of empty space around a single product photo, with minimal text and a restrained color palette. This approach forces the viewer’s attention onto the product itself, making it feel premium and desirable. The lesson here is that generous spacing can be used strategically to elevate a product’s perceived value, and that restraint often communicates more confidence than abundance.
2. Google’s Search Homepage
Google’s homepage has remained remarkably simple for over two decades, and it remains one of the best examples of white space in design in the digital world. A single search bar sits in the center of an otherwise blank page, with the logo above it. This example teaches us that when a product has one primary function, an open layout can be used to eliminate distractions and focus the user entirely on that function.
3. Muji’s Branding and Packaging
Muji, the Japanese lifestyle brand, has built its entire identity around minimalism, and this approach plays a central role in that identity. Their packaging, in-store signage, and website all use soft, neutral backgrounds with plenty of empty space around product photography. This teaches designers that a spacious visual language can become a signature brand trait, instantly recognizable and consistently applied across every touchpoint.
4. The New York Times’ Longform Articles
Editorial design has long relied on breathing room to make dense text approachable. The New York Times’ longform feature articles use wide margins, generous line spacing, and large pull quotes surrounded by empty space. This shows how white space in design can be used in text-heavy layouts to prevent reader fatigue and encourage longer engagement with an article.

5. Airbnb’s Search Results Interface
Airbnb’s platform balances a huge amount of information, including photos, prices, ratings, and filters, yet it never feels overwhelming. This is because the interface uses consistent padding and generous gaps between each listing card, creating clear separation without needing visible borders or dividers. Designers can learn from this that open space can substitute for heavy-handed visual separators like lines and boxes.
6. Nike’s Seasonal Campaign Pages
Nike frequently builds campaign landing pages that pair bold typography with vast empty backgrounds. The brand’s confidence in its message allows it to use this technique to let a single sentence or a single image command the entire screen. This is a lesson in trusting your content: if your message is strong enough, you do not need supporting clutter to reinforce it.
7. The Absolut Vodka Bottle Advertisements
One of the most celebrated print campaigns in advertising history, the Absolut Vodka series, used empty space as a literal creative device, framing the bottle within blank backgrounds decorated with minimal graphic elements. This example demonstrates how white space in design itself can become part of the storytelling, rather than simply framing the story.
8. Negative Space Logos
Many of the world’s most iconic logos use unmarked areas not just around the mark, but within it. Clever negative space techniques create hidden shapes, letters, or images inside the gaps of a logo, turning empty space into a secondary message. This teaches designers that this kind of spacing does not have to be passive; it can be an active, intentional part of the visual form itself.

9. Stripe’s Developer Documentation
Stripe is well known in the tech industry for documentation that is both comprehensive and easy to read, and a large part of that success comes down to careful spacing. Code blocks, explanatory text, and navigation menus are all separated by consistent gaps, which helps developers scan technical content quickly without feeling lost. This shows that white space in design is just as valuable in technical and functional interfaces as it is in purely visual branding.
10. Kinfolk Magazine’s Editorial Spreads
Kinfolk built an entire aesthetic movement around slow living and simplicity, and its magazine layouts reflect that philosophy through generous open space. Photos are given room to sit alone on a page, and text blocks are short and centered within large margins. This is a strong example of how a minimalist layout can reinforce a brand’s underlying values and mood.
11. Dropbox’s Onboarding Screens
Dropbox’s onboarding flow introduces new users to the product one step at a time, using large amounts of open space around simple illustrations and short instructional text. This prevents new users from feeling overwhelmed during a critical first impression. The lesson for app designers is that this technique can reduce anxiety and increase completion rates during onboarding.
12. Braun’s Product Design Legacy
Dieter Rams, the legendary designer behind Braun’s product line, was a pioneer of the “less but better” philosophy, and his physical product designs used the same restraint even outside of two-dimensional layouts. Clean surfaces, minimal buttons, and restrained color choices all reflect the same instinct that governs white space in design more broadly: remove anything that does not serve a clear purpose.

13. Medium’s Reading Interface
Medium, the popular blogging platform, strips away nearly all visual noise from its article pages, leaving wide margins, large fonts, and generous line spacing. This heavy reliance on open, breathing layout is a major reason why so many writers and readers prefer Medium’s reading experience over more cluttered blogging platforms.
14. COS Fashion Brand Website
COS, the fashion retailer, uses expansive white backgrounds throughout its website, allowing clothing photography to stand out without competing against busy backgrounds or heavy text blocks. This is a textbook example of how white space in design supports e-commerce by keeping the customer’s focus on the product.
15. The Helvetica Typeface Movement
The rise of Swiss design and the Helvetica typeface in the mid-twentieth century was built on principles of clarity, grid systems, and open space. Posters and signage from this era used generous margins to let clean typography do all the communicating, without decorative elements getting in the way.
16. Slack’s Marketing Pages
Slack’s marketing website uses playful illustrations paired with large sections of empty space, creating a friendly but uncluttered first impression for potential customers. This shows that white space in design does not have to feel cold or corporate; it can coexist with warmth and personality when balanced correctly.

17. Issey Miyake’s Print Advertisements
Fashion advertising has long used generous negative space to convey luxury and exclusivity. Issey Miyake’s print ads often isolate a single garment or model against a plain backdrop, using scale and space to communicate sophistication without any additional text or graphics.
18. Notion’s Landing Page
Notion, the productivity software company, structures its homepage with clear sections separated by large vertical gaps, allowing visitors to focus on one feature at a time as they scroll. This is an example of how white space in design can be used to pace a story, giving each idea its own moment before introducing the next.
19. The Bauhaus Design Movement
The Bauhaus school, one of the most influential design movements of the twentieth century, championed functional simplicity, and many of its posters and typographic works relied heavily on open composition to emphasize geometric shapes and bold color blocks without unnecessary decoration.
20. Squarespace Template Designs
Squarespace has built its reputation on templates that make even amateur designers look professional, and a major part of that success is the platform’s default use of consistent spacing between blocks, images, and navigation menus. This demonstrates how white space in design can be systematized into templates and design systems for consistent results at scale.

21. Chanel No. 5 Advertising Campaigns
Perfume advertising has traditionally relied on emotion and atmosphere rather than dense information, and Chanel’s campaigns are a masterclass in restrained composition, often showing a single bottle or a single face against a softly lit, nearly empty background. The restraint signals timeless elegance.
22. The Financial Times’ App Interface
The Financial Times redesigned its mobile app with a strong emphasis on readability, using generous gaps to separate headlines, bylines, and article previews so that users scanning the news feed can quickly identify what interests them without visual fatigue.
23. Muuto’s Furniture Catalog
Muuto, the Scandinavian furniture brand, photographs its products against plain, softly colored backgrounds with large amounts of surrounding space. This is consistent with Scandinavian design philosophy more broadly, which treats open, uncluttered space as essential to achieving a calm aesthetic.

24. Google’s Material Design Guidelines
Google’s own Material Design system, used across Android and countless apps, explicitly codifies rules for spacing, padding, and margins. This is one of the clearest examples of how white space in design has been formalized into a rigorous, documented system that thousands of designers reference every day when building digital products.
25. Personal Portfolio Websites of Award-Winning Designers
Many award-winning designers showcase their own portfolios using stripped-back, minimal layouts that let their project images and case studies take center stage. Reviewing sites recognized by organizations like Awwwards consistently reveals a pattern: nearly every winning portfolio uses generous spacing as its primary structural tool, proving that even in a highly creative and competitive field, restraint continues to win.
How to Apply White Space in Design to Your Own Projects
Now that we have reviewed twenty five examples, it is worth discussing practical steps for applying this principle in your own work. Start by identifying the single most important element on any given page or screen, and then build space around it rather than filling that space with secondary content. Use a consistent spacing system, often based on multiples of a base unit like eight pixels, so that your layout feels intentional rather than random. Avoid the temptation to fill empty areas just because they are available; remember that these unmarked regions are doing work even when they appear to be doing nothing.
Pay attention to both micro spacing, such as the gap between a headline and a paragraph, and macro spacing, such as the margin around an entire section. A useful exercise is to design a page, then remove one element at a time and observe whether the composition improves. If removing an element makes the layout feel calmer without losing meaning, it was likely unnecessary clutter to begin with. Finally, test your designs with real users when possible, since what feels spacious to a designer can sometimes feel sparse or unfinished to a client, so aligning expectations early in the process is important. Presenting before-and-after comparisons, or referencing well-known brands that use similar restraint, can help clients feel confident about embracing a cleaner direction rather than assuming empty areas are unfinished work.
Common Mistakes Designers Make with White Space in Design
Even experienced designers sometimes misuse this principle, and it helps to know what pitfalls to avoid. One common mistake is using inconsistent spacing throughout a layout, which makes a design feel unbalanced even if each individual section looks fine in isolation. Another mistake is confusing generous spacing with simply making a page shorter; removing content is not the same as arranging it thoughtfully. Some designers also make the error of assuming that more empty area is always better, when in reality the right amount depends entirely on context, audience, and platform. A children’s educational app, for example, may need more visual density than a luxury fashion website.
Many beginners also underestimate how much white space in design contributes to accessibility, forgetting that adequate spacing around text and interactive elements helps users with visual or motor impairments navigate a page more easily. Buttons placed too close together, for instance, can be difficult for users with limited fine motor control to tap accurately on a touchscreen, while dense blocks of text without paragraph breaks can be genuinely difficult for users with certain cognitive or reading disabilities to process. Treating spacing as an accessibility feature, not just a stylistic preference, leads to more inclusive design outcomes overall.

The Psychological Impact of White Space in Design
There is also a psychological dimension to why this approach works so well. Human brains are naturally drawn to contrast, and empty space creates contrast against the elements that remain on a page, making those elements feel more important. Additionally, cluttered environments, whether physical or digital, have been shown in various studies to increase stress and reduce focus, while open, uncluttered spaces tend to have a calming effect. This is why brands trying to convey trust, luxury, or simplicity so often turn to generous spacing as their primary tool. It is not just an aesthetic choice; it is a psychological one that shapes how audiences feel about a brand before they even read a single word of copy.
This psychological effect also extends to perceived expertise. Viewers tend to associate confident, uncluttered layouts with confident, capable creators, while dense, chaotic layouts can unconsciously signal disorganization, even if the underlying content is high quality. In other words, the way a message is framed spatially can shape how much an audience trusts the message itself, which is a powerful argument for taking spacing seriously at every stage of a project.
White Space in Design Across Different Industries
While much of this article has focused on technology, fashion, and editorial examples, this principle plays a role across nearly every industry imaginable. In architecture, negative space between structures creates a sense of openness and flow, allowing buildings to feel monumental rather than cramped against their neighbors. In interior design, empty floor space allows furniture and decor to stand out rather than compete with one another, and many high-end hospitality brands intentionally under-furnish rooms to create a sense of calm luxury.
In advertising, restrained composition gives a single message room to resonate rather than getting lost among five other competing calls to action. Even in software engineering, the concept translates into the idea of clean, well-commented code with logical spacing, which is easier for other developers to read and maintain. Understanding that white space in design is a universal principle, not just a web design trend, can help you apply it more creatively across whatever medium you are working in, whether that medium is a smartphone screen, a printed billboard, or a physical retail space.
Tools and Techniques for Mastering Spacing in Your Layouts
If you want to get better at using open space intentionally, there are a few concrete techniques worth practicing. Grid systems, common in tools like Figma, Sketch, and Adobe XD, allow designers to set consistent column widths and gutters so that spacing remains uniform across an entire project. Establishing a type scale, where each font size and corresponding line height is predefined, also helps keep vertical spacing consistent between headings and body copy. Many design systems additionally define a spacing scale, a fixed set of values such as four, eight, sixteen, twenty four, and thirty two pixels, so that every margin and padding decision pulls from the same limited palette rather than being decided arbitrarily on a case-by-case basis.
Beyond software tools, simply studying physical print design can sharpen your instincts. Flipping through a well-designed magazine or annual report and noticing exactly how much air surrounds each photo, headline, and caption trains your eye in a way that staring at a screen alone cannot. Many senior designers recommend printing out digital layouts at actual size occasionally, since spacing that looks fine on a bright monitor can sometimes feel cramped or excessive once viewed on paper.
Final Thoughts on White Space in Design
The twenty five examples covered in this article show that white space in design is not a single trend confined to one era or one industry. It has appeared consistently across advertising, editorial publishing, product design, branding, and modern user interfaces for decades, and it continues to be one of the most reliable ways to create a design that feels professional, trustworthy, and easy to use. Whether you are a beginner building your first website or an experienced designer refining a client’s brand identity, studying how the best examples of open, breathing layouts have been used historically and today will help you develop a stronger instinct for when to add and when to hold back. The next time you sit down to design anything, remember that the empty space around your content is not wasted; it is one of your most powerful design tools, and mastering it is often what separates good design from truly great design.
White Space in Design for Print vs Digital Media
The worth pausing to compare how white space in design behaves differently in print media versus digital media, since the two contexts come with different constraints. In print, white space in design is fixed once a piece goes to press; a brochure, poster, or book page has a set physical size, and the designer must plan every margin and gutter in advance, knowing it can never be adjusted after production. This encourages print designers to be extremely deliberate, since there is no opportunity to fix spacing issues after the fact. Digital media, by contrast, is fluid: a webpage might be viewed on a large desktop monitor, a tablet, or a small phone screen, so white space in design online has to be responsive, expanding or contracting depending on the device. This is why modern web design relies so heavily on flexible grid systems and relative units, rather than fixed pixel measurements, to keep spacing proportionate across every screen size.
Another difference is that digital white space in design often has to account for interactivity. A button needs enough surrounding space not just for visual clarity, but so that a user’s finger or cursor can accurately select it without also triggering a neighboring element. In print, there is no such concern, since the reader is not clicking or tapping anything. This means that digital designers must think about white space in design as both an aesthetic and a functional requirement, whereas print designers can focus almost entirely on visual composition and reading flow.
Case Study: Redesigning a Cluttered Homepage with White Space in Design
To make these ideas more concrete, imagine a small business homepage that currently crams a logo, five navigation items, a hero image, three separate promotional banners, and a full footer all above the fold, with barely any gaps between them. A redesign focused on white space in design might begin by identifying the single most important call to action, such as booking a consultation, and removing everything else from that first screen. The navigation would be simplified to three or four items, the promotional banners would be moved further down the page or removed entirely, and the remaining hero section would be given wide margins on either side along with generous vertical spacing above and below the headline.
The result of applying white space in design in this scenario is a homepage that feels calmer and more trustworthy at first glance, even though it technically contains less visible information. Visitors are more likely to understand what the business does and what action they should take within the first few seconds, rather than feeling forced to parse a wall of competing offers. This kind of practical exercise illustrates why white space in design is often the very first recommendation professional designers make when asked to improve an underperforming website, since it usually delivers a noticeable improvement in clarity without requiring a complete visual overhaul.
Building a Personal Design Habit Around White Space in Design
For designers who want to build white space in design into their everyday habits rather than treating it as an afterthought, it helps to make spacing decisions early in the design process rather than late. Many designers make the mistake of building a layout with content packed tightly together, planning to “clean it up later,” but this approach often results in white space in design being treated as a final polish step rather than a foundational structural decision. Instead, sketching a layout with placeholder blocks and generous gaps from the very first wireframe encourages a mindset where spacing is part of the plan from day one.
Reviewing your own past projects with fresh eyes is another useful habit. Come back to a design you finished months ago and ask whether the white space in design still feels appropriate, or whether newer instincts would lead you to open things up further. Design trends shift over time, and many industries have moved toward increasingly spacious, minimal layouts over the last decade, so revisiting older work can be a useful benchmark for how your own sense of white space in design has evolved.
Bringing It All Together
If there is one takeaway to carry forward from these twenty five examples, it is that restraint is a skill, not a limitation. Every brand and designer featured in this article could have chosen to add more: more text, more color, more competing calls to action. Instead, each one made a deliberate choice to hold back, trusting that a single strong idea, given enough room to stand on its own, communicates more effectively than a page trying to say everything at once. That trust is the real lesson behind white space in design, and it applies whether you are designing a global tech brand’s homepage or a single flyer for a neighborhood event. Start small: pick one project you are currently working on, remove one unnecessary element, widen one margin, and notice how the composition changes. Over time, these small decisions compound into an instinct that will serve you across every future design you create.
Frequently Asked Questions About White Space in Design
What is white space in design? White space in design refers to the unmarked areas of a layout, including margins, gaps between elements, and padding around text or images. It is not always literally white, but rather any area free of competing visual content.
Why is white space in design important for websites? It improves readability, creates visual hierarchy, and helps users navigate a page more easily. It also contributes to a sense of professionalism and can improve user engagement, which indirectly benefits search engine rankings.
What is the difference between micro and macro spacing? Micro spacing refers to small gaps, such as the space between lines of text or icons, while macro spacing refers to larger areas, such as the margins around an entire section or page layout. Both fall under the umbrella of white space in design.
Can too much white space in design hurt a layout? Yes, excessive empty space without clear purpose can make a page feel unfinished or disconnected. The right balance depends on the content, audience, and platform being designed for.
How can beginners practice using white space in design? Beginners can practice by studying real examples like the ones listed in this article, using consistent spacing systems in their own projects, and resisting the urge to fill every available area with content or decoration.
Does white space in design affect SEO? While it is not a direct search engine ranking factor, it improves user experience metrics such as time on page and bounce rate, which can indirectly influence how search engines evaluate a website’s quality.
Is white space in design only relevant to digital products? No, it applies across many industries, including print advertising, architecture, interior design, packaging, and even software code readability, making it a universal design principle rather than a purely digital one.
How to Create Strong Visual Hierarchy in Graphic Design
Every great design tells the eye where to look first, where to look next, and where to rest last. This invisible roadmap is called Visual Hierarchy, and it is one of the most important skills any designer can master. Whether you are designing a poster, a website, a mobile app, a brochure, or a full brand identity, understanding how this ordering system works will completely change how your audience experiences your work.
In this guide, we will explore what this concept really means, why it matters so much in every branch of design, and exactly how you can build a strong, intentional structure of importance in your own projects, step by step. By the end, you will have a complete, practical framework you can apply immediately to your next design, no matter what software or medium you work in.
If you have ever looked at a design and felt confused about where to start reading, or noticed yourself skipping over important information without realizing it, you have experienced poor ordering of importance firsthand. On the other hand, when a design feels effortless to scan, understand, and act on, that is the sign of a thoughtful structure at work behind the scenes. This article is written for beginners taking their first steps into design, as well as experienced professionals who want to sharpen their instincts and refine how they organize information visually.
Design is, at its core, a form of communication, and communication only works when the message arrives in the right order. A headline that gets lost among smaller text, a button that blends into the background, or a page so cluttered that nothing stands out are all symptoms of the same underlying problem: a lack of intentional structure. Learning to fix this is one of the highest-leverage skills you can develop as a creative professional.
What Is Visual Hierarchy?

Visual Hierarchy refers to the arrangement or presentation of design elements in a way that clearly implies importance. It is the system designers use to guide a viewer’s eye through a composition in a specific, intentional order, rather than leaving the audience to guess what matters most. A strong version of this system tells people exactly where to look first, second, and third, simply through visual cues like size, color, contrast, spacing, and placement.
Think about a newspaper front page. The biggest headline draws your attention first, followed by a large photo, then a subheading, and finally the smaller body copy underneath. This layered structure is a textbook example of intentional ordering in action. Without it, every element would compete equally for attention, and the reader would have no clear starting point at all.
This ordering system is not just about aesthetics; it is fundamentally about communication. A design can be visually beautiful, but if it lacks a clear sense of priority, it fails at its most basic job, which is helping the viewer understand information quickly and comfortably. This is why the concept is considered one of the foundational principles of graphic design, sitting right alongside balance, contrast, unity, and alignment.
Designers create this sense of order using several visual tools, including:
- Size and scale of elements
- Color and contrast
- Typography and font weight
- Placement and alignment
- Whitespace and spacing
- Repetition and pattern
- Direction and visual flow
Each of these tools plays a distinct role in shaping how the eye moves across a page, screen, or layout. When used together thoughtfully, they combine to create Visual Hierarchy that feels natural, almost invisible, yet remains incredibly effective at directing attention exactly where it needs to go.
Why Visual Hierarchy Matters in Design

Every design has a purpose, whether it is to sell a product, share information, tell a story, or guide someone through an application. A clear structure of importance is what makes that purpose achievable. Without it, even the most creative ideas can fall flat because the audience simply does not know where to focus their attention first.
Here are some of the key reasons this concept matters so much in modern design work.
It improves readability and comprehension. A clear order of importance breaks down complex information into digestible pieces, making it easier for people to read and understand content quickly. This matters enormously in a world where attention spans are short and most people skim rather than read every single word on a page.
It guides user behavior. In web design and app design, Visual Hierarchy is directly tied to conversion rates and engagement metrics. A call-to-action button that stands out because of thoughtful size and color choices is far more likely to get clicked than one that blends quietly into the background of the page.
It creates emotional impact. The order in which someone processes a design affects how they feel about it overall. A strong sense of priority can build anticipation, highlight emotion, or emphasize urgency, all of which shape the viewer’s emotional response to the finished piece.
It builds trust and professionalism. Cluttered, confusing designs with a weak sense of order often feel unprofessional or untrustworthy, even when the underlying content is genuinely solid. A clean, organized structure signals competence and care, which in turn builds credibility with an audience.
It saves the viewer’s time and energy. People do not want to work hard to understand a design. A well-planned Visual Hierarchy does the thinking for them, presenting information in the most logical and efficient order possible so the viewer can absorb it effortlessly.
Because of all these benefits, a strong ordering system is not an optional nice-to-have; it is a core requirement for effective design across every medium, from print advertising to mobile interfaces and everything in between.
Core Principles That Build Visual Hierarchy
To create a strong Visual Hierarchy, you need to understand the individual tools and principles designers use to establish order and importance. Let’s break down each one in detail, with practical guidance you can apply right away.
1. Size and Scale

Size is one of the most powerful and immediate ways to establish order in a composition. Larger elements naturally draw more attention than smaller ones, which is why headlines are bigger than body text, and hero images are bigger than thumbnails. When building this kind of structure through size, think carefully about which element truly deserves to be the largest on the page. It should be the single most important message or focal point in the entire design.
Scale also works in relative terms, not just in absolute numbers. It is not simply about making one thing big; it is about the size relationship between every element on the page. A strong structure uses a clear, consistent scale system, sometimes based on a type scale or an underlying grid, so that size differences feel deliberate rather than random or accidental.
2. Color and Contrast

Color is another major driver of importance in a layout. Bright, saturated, or warm colors tend to attract more attention than muted or cool tones. Contrast, meanwhile, refers to the difference between elements, such as a dark button set against a light background. High contrast naturally draws the eye and reinforces the intended order by making key elements pop against their surroundings.
When designers want to create strong Visual Hierarchy using color, they often reserve their boldest, most saturated color for the single most important action or message on the page, while keeping the rest of the palette more subdued and quiet. This selective, disciplined use of color keeps the composition clean and prevents visual competition between elements that should not be fighting for the same level of attention.
3. Typography and Font Weight

Typography plays an enormous role in establishing a clear order of importance, especially in text-heavy designs like websites, reports, and editorial layouts. Font size, weight, style, and even letter spacing all contribute to how important a piece of text feels to the reader. A bold, large headline signals top-level importance, while lighter, smaller text signals supporting or secondary information further down the ladder.
A well-designed structure typically uses no more than two or three font weights and sizes across headings, subheadings, and body copy. Keeping the typographic system consistent helps reinforce the overall Visual Hierarchy without overwhelming the viewer with too many competing styles fighting for attention at once.
4. Alignment and Placement

Where you place an element on a page has a direct impact on how important it feels. Elements positioned at the top, center, or along natural eye-scanning paths, such as the familiar F-pattern or Z-pattern, tend to be noticed first. Designers use alignment, grids, and strategic placement to control the exact order in which the eye discovers information, reinforcing the intended structure of the piece.
Consistent alignment also creates a sense of order and stability, which subtly strengthens the overall Visual Hierarchy by making the layout feel organized and easy to follow rather than chaotic or accidental.
5. Proximity and Grouping

The principle of proximity states that elements placed close together are perceived as related, while elements spaced further apart are seen as separate or unrelated. This grouping behavior directly supports a clear ordering system because it helps viewers quickly understand which pieces of information belong together, and which stand alone as more important, standalone messages worth noticing on their own.
For example, a price and a product name grouped tightly together read as a single unit, while a call-to-action button placed with generous space around it reads as a separate, more prominent action, strengthening the overall sense of priority across the page.
6. Whitespace and Breathing Room
Whitespace, or negative space, is the empty area around and between elements. Far from being wasted space, whitespace is a critical tool for building strong Visual Hierarchy. Generous whitespace around an element makes it stand out and feel more important, while cramped, tight spacing can bury even the boldest design choices under visual noise.
Minimalist designs often rely heavily on whitespace to create a clean, confident sense of order where every element has room to breathe and be noticed clearly on its own terms, without distraction.
7. Repetition and Consistency
Repetition of certain visual elements, such as consistent button styles, heading treatments, or color coding, helps train the viewer’s eye to recognize patterns over time. This consistency reinforces the structure of importance across multiple pages or screens, so users always know exactly where to look for specific types of information, such as navigation, headings, or calls to action.
8. Direction and Visual Flow
Lines, arrows, the gaze direction of people in photographs, and even the natural reading pattern of a language all influence how the eye moves through a design. Designers can guide attention deliberately by using directional cues that lead the viewer toward the next important element, further reinforcing a strong, deliberate order from start to finish across the entire piece.
How to Create Strong Visual Hierarchy: A Step-by-Step Process
Now that we have covered the core principles, let’s walk through a practical, step-by-step process for building strong Visual Hierarchy into your own design projects, from the very first sketch to the final polished file.
Step 1: Define Your Priority Order
Before opening any design software, list out every element that needs to appear in your design and rank them by importance. What is the single most important message? What comes second? What is merely supporting information that can sit quietly in the background? This priority list becomes the blueprint for your entire structure, and skipping this step is one of the most common reasons designs end up feeling flat, confusing, or directionless.
Step 2: Choose a Focal Point
Every strong composition needs one clear focal point, the element that captures attention first. This could be a headline, a hero image, or a key call-to-action button. Make sure only one element holds this top position; if everything is competing to be the focal point, your overall sense of order will collapse into visual noise that exhausts the viewer.
Step 3: Establish a Size and Type Scale
Create a scale system for your text and design elements, from largest to smallest, that mirrors your priority list from Step 1. This scale becomes the backbone of your Visual Hierarchy, ensuring size differences feel deliberate and proportionate rather than arbitrary or inconsistent across the design.
Step 4: Apply Strategic Color and Contrast
Decide which colors will represent high-priority elements versus supporting elements. Reserve your most vibrant or contrasting color for the top of your structure, and use muted tones for lower-priority content further down the page. This selective approach keeps the composition clear and prevents color from becoming a distracting, confusing element in its own right.
Step 5: Use Grids and Alignment
Set up a grid system to organize your layout from the very beginning. Consistent alignment along this grid reinforces order and structure, which strengthens your design by making the entire composition feel intentional, calm, and easy to scan at a glance.
Step 6: Group Related Elements with Proximity
Review your layout carefully and make sure related items are grouped closely together, while unrelated or more important standalone elements have extra space around them. This spacing strategy is essential for a clean, readable structure that respects the viewer’s time and attention.
Step 7: Add Whitespace Generously
Resist the urge to fill every empty space on the page. Generous whitespace around your most important elements will make your Visual Hierarchy feel more premium, confident, and easy to navigate, rather than cluttered, cramped, and overwhelming to look at.
Step 8: Try the Squint Test
A classic technique used by professional designers to evaluate their layout is the squint test. Squint your eyes while looking at your design; the blurred shapes and contrasts that remain visible should reveal your intended priority order clearly. If the wrong elements stand out during this quick test, your structure needs further adjustment before moving forward.
Step 9: Get Feedback and Iterate
Show your design to someone unfamiliar with the project and simply ask what they notice first, second, and third, without giving them any hints. Their honest answers will tell you whether your Visual Hierarchy is working as intended, or whether certain elements need to be resized, recolored, or repositioned before final delivery.
Step 10: Refine for Different Devices and Contexts
If your design will appear across multiple platforms, such as desktop, mobile, or print, make sure your structure adapts appropriately to each context. What works as a size-based order on a large poster may need to rely more heavily on color and contrast on a small mobile screen where space is limited and every pixel counts.
Visual Hierarchy Across Different Design Disciplines

This ordering principle applies across nearly every design discipline, though the specific tools used may vary slightly depending on the medium and the audience.
In web and UI design, Visual Hierarchy is critical for guiding users toward conversion goals, such as signing up, purchasing a product, or clicking a specific call-to-action. Designers rely heavily on button color, generous whitespace, and typographic scale to build an order that feels intuitive and reduces unnecessary user friction along the way.
In print design, including posters, brochures, and packaging, this same principle often depends more on size, contrast, and composition since there is no scrolling or interactivity for the viewer to rely on. Everything must be communicated within a single static view, making a strong sense of order absolutely essential to the design’s success.
In branding and identity design, Visual Hierarchy helps establish which elements of a logo or brand system should stand out most, whether that is a wordmark, a symbol, or a tagline, ensuring instant brand recognition happens within seconds of first contact.
In editorial and publication design, this structure organizes complex information such as articles, headlines, pull quotes, and captions into a system readers can navigate comfortably, even across dozens or hundreds of pages in a single publication.
In advertising design, a strong sense of order ensures that the core selling message or offer is the very first thing a viewer notices, even in a crowded, distraction-filled environment like a busy social media feed or a cluttered city street.
Common Mistakes That Weaken Visual Hierarchy
Even experienced designers can fall into habits that quietly damage their layout’s sense of order. Here are some of the most common mistakes worth watching for in your own work.
Too many focal points. When everything on the page is bold, colorful, or oversized, nothing truly stands out, and the entire structure breaks down completely under the weight of competing elements.
Inconsistent typography. Using too many font sizes, weights, or styles at once confuses the reader and weakens the intended order the designer was trying to create in the first place.
Ignoring whitespace. Cramming too many elements together without breathing room makes it hard for any single piece to stand out, flattening the entire sense of priority across the page.
Poor color contrast. Low contrast between important and unimportant elements makes it difficult for viewers to distinguish priority at a glance, undermining the whole system of order.
Lack of a clear grid. Random placement without an underlying structure creates visual confusion and prevents a coherent, readable order from ever forming properly.
Designing without a priority list. Jumping straight into visuals without first deciding what matters most is one of the fastest ways to end up with weak, confusing Visual Hierarchy in the final piece.
Tools That Help You Build Visual Hierarchy

Several design tools can help you plan, test, and refine your sense of order throughout a project. Grid and layout tools in software like Adobe InDesign, Illustrator, and Figma allow you to set up consistent alignment systems from the very first draft. Typography scale generators help you establish proportional font sizes for a clean, readable structure. Color contrast checkers ensure your color choices remain accessible and effective at reinforcing importance across different screens and devices. Additionally, simple techniques like grayscale previews and the squint test remain some of the most reliable, tool-free ways to evaluate whether your Visual Hierarchy is genuinely working before you ship the final file.
Real-World Examples of Strong Visual Hierarchy

Think about the homepage of a major technology company. The headline is large and bold, the supporting text is smaller and lighter, and a single, brightly colored button invites you to take action, all classic signs of a deliberate, well-planned structure. Or consider a movie poster, where the title looms large across the top, the lead actor’s face draws the eye toward the center, and the release date sits quietly at the bottom, each element carefully placed to create a clear order that tells a complete story in just a few seconds. These everyday examples show just how universal and essential a strong sense of Visual Hierarchy really is, across every corner of visual communication.
A restaurant menu offers another familiar example. Well-designed menus often highlight a handful of signature dishes with larger text, a small icon, or a boxed border, while the rest of the offerings sit in a quieter, more uniform list below. This selective emphasis is not accidental; it is a deliberate ordering choice designed to nudge diners toward specific, often higher-margin items without them even realizing they are being guided.
Mobile banking apps rely on a similarly disciplined structure. Your account balance usually appears in the largest, boldest text on the screen, since it is the single piece of information most users open the app to check. Secondary actions, such as transferring money or viewing recent transactions, are typically smaller or placed in a row of icons beneath the balance, while settings and less-frequently used features are tucked away in a menu the user has to actively seek out. This layered approach ensures that even a complex financial app feels simple and approachable at a glance.
Visual Hierarchy vs Other Design Principles
It helps to understand how this concept relates to other fundamental design principles like balance, unity, and rhythm. Balance is about distributing visual weight evenly across a composition, while Visual Hierarchy is specifically about establishing an order of importance among elements. A design can be perfectly balanced yet still lack clear priority, leaving the viewer unsure where to look first. Unity, meanwhile, refers to how well all the elements feel like they belong to the same family of design choices, which supports a strong structure but is not the same thing as it.
Rhythm, created through repeated patterns and spacing, can also reinforce a sense of order by establishing predictable visual beats that a viewer’s eye can follow naturally. When all of these principles work together, alongside a deliberate structure of importance, the result is a composition that feels both cohesive and easy to navigate. Understanding these relationships helps designers avoid treating Visual Hierarchy as an isolated technique and instead see it as one thread in a larger, interconnected system of design decisions.
The Business Case for Strong Visual Hierarchy
Beyond aesthetics, there is a genuine business argument for investing time in a strong sense of order within your designs. Companies that prioritize clear structure in their marketing materials, websites, and product interfaces consistently see better engagement, lower bounce rates, and higher conversion numbers. A landing page with confused priorities forces visitors to work harder to find what they need, and many will simply leave rather than search for the answer themselves.
For freelancers and agencies, being able to explain and demonstrate strong Visual Hierarchy to clients is also a valuable communication skill. Clients often cannot articulate why a design feels “off,” but a designer who can point to specific issues, such as competing focal points or inconsistent typography, and offer a clear fix builds trust and credibility much faster. In this sense, mastering this principle is not just a creative exercise; it is a practical business advantage that pays off across client relationships, portfolio quality, and long-term career growth.
A Quick Checklist for Reviewing Your Visual Hierarchy
Before you finalize any design, it helps to run through a short checklist to confirm your structure is working the way you intended. Ask yourself whether there is exactly one clear focal point, whether your size and type scale reflects the true priority of each element, and whether your color choices reinforce or accidentally distract from that priority. Check that related items are grouped closely through proximity, that whitespace is generous around your most important content, and that your grid and alignment feel consistent throughout the entire layout.
It also helps to step back from the screen entirely and view the design at actual size, from a normal viewing distance, rather than zoomed in on your monitor. Many issues with Visual Hierarchy only become obvious once you view a design the way a real audience will encounter it, whether that is a phone held at arm’s length, a poster viewed from across a room, or a webpage seen on a laptop during a quick scroll. Running through this checklist regularly, especially before sending final files to a client or pushing a design live, will help you catch weak spots before they ever reach your audience.
Finally, keep a personal reference library of designs you admire and study why their sense of order works so well. Screenshot landing pages, posters, and app screens that catch your attention effectively, and take a few minutes to break down exactly how size, color, typography, and spacing are being used together. Over time, this habit will sharpen your instincts and make building strong Visual Hierarchy feel far more natural and automatic in your own work.
Conclusion
Mastering Visual Hierarchy is one of the most valuable skills any designer can develop over the course of their career. It transforms a simple collection of shapes, colors, and text into a clear, purposeful story that guides the viewer exactly where they need to go, without confusion or wasted effort. By understanding the core principles, size, color, typography, alignment, proximity, whitespace, repetition, and direction, and by following a structured process to prioritize and test your work at every stage, you can build a genuinely strong sense of order into every design you create from now on. Whether you are designing a website, a poster, a mobile app, or a complete brand identity, a thoughtful, well-executed structure of importance will always make your work more effective, more professional, and far more memorable to the people who see it.
FAQs About Visual Hierarchy
- What is Visual Hierarchy in simple terms? It is the arrangement of design elements in order of importance, using tools like size, color, and spacing to guide the viewer’s eye through a composition in a specific sequence.
- Why is Visual Hierarchy important in graphic design? This structure helps viewers quickly understand what matters most in a design, improving readability, guiding user behavior, and making the overall composition feel professional and easy to navigate.
- What are the main elements used to create Visual Hierarchy? The main elements include size and scale, color and contrast, typography, alignment, proximity, whitespace, repetition, and directional flow across the page.
- How does color affect this kind of ordering? Bright, saturated, or high-contrast colors draw more attention, so designers use color strategically to highlight the most important elements and support a clear overall structure.
- Can this principle be applied to web design and apps? Yes, Visual Hierarchy is essential in web and app design, where it guides users toward key actions like clicking a button, signing up, or completing a purchase.
- What is the squint test used for? The squint test involves blurring your vision while looking at a design to see which shapes and contrasts remain visible, helping you evaluate whether your Visual Hierarchy is working as intended.
- What are common mistakes that ruin this kind of structure? Common mistakes include having too many competing focal points, inconsistent typography, poor use of whitespace, low color contrast, and designing without a clear priority order from the start.
- How many levels should a strong structure have? While there is no fixed rule, most effective designs use around three to five levels of importance, such as primary, secondary, and tertiary elements, to avoid overwhelming the viewer.
- Does this matter in print design as much as digital design? Yes, Visual Hierarchy is just as important in print design, where designers rely more heavily on size, contrast, and layout since there is no scrolling or interactivity to guide the viewer along.
- How can beginners practice building better structure into their work? Beginners can practice by listing design priorities before starting a project, studying real-world examples closely, and using the squint test to check whether their Visual Hierarchy successfully highlights the most important elements first.
-

 Graphics Design2 years ago
7.Exploring the Importance of Color Theory Charts
-

 Graphics Design1 year ago
Top 10 Best Graphic Design Tools for Beginners in 2025 (Free & Paid)
-

 Graphics Design2 years ago
10 Stunning Gradient Design Trends You Need to Know in 2024
-

 Graphics Design12 months ago
15 Freelance Graphic Design Tips to Boost Your Career in 2025
-

 Graphics Design2 years ago
29.Retro Design Is Making a Comeback in Modern Spaces
-

 Graphics Design1 year ago
Best Laptops for Graphic Designers – 2025 Buying Guide
-

 Graphics Design1 year ago
2025 Logo Design Trends: What’s In, What’s Out?
-

 Graphics Design2 years ago
15.The Importance of Effective Flyer Design in Marketing
Disposable Email Address
August 12, 2024 at 9:36 pm
certainly like your website but you need to take a look at the spelling on quite a few of your posts Many of them are rife with spelling problems and I find it very troublesome to inform the reality nevertheless I will definitely come back again.
Muhammad Ubaid
August 13, 2024 at 8:52 am
Okay
Techarp
September 10, 2024 at 6:28 pm
Techarp Pretty! This has been a really wonderful post. Many thanks for providing these details.
Muhammad Ubaid
September 10, 2024 at 7:16 pm
Thank you