
Graphics Design
35.Parallax Scrolling Revolutionizing Web Design

Parallax Scrolling Revolutionizing Web Design
Parallax scrolling revolutionizing Web design is very non-stationary, new trends appear and disappear rather quickly, but some of them are truly revolutionary. Some of these are parallax scrolling which has greatly impacted on the design aspect of the website. This article focuses on giving readers more information about parallax scrolling; how it started, how it works, why it is good to incorporate it in website design and some dos and don’ts when using it.
Origins of Parallax Scrolling

Parallax scrolling revolutionizing web design It dates back to the world of video games where it was initially applied to give a concept of the depth to 2D games. The technique combines a number of images or backgrounds where one moves slower than the other to create the illusion of a three dimensional screen. It was later taken up by web designers to enable improve the experience of the users through making the sites more attractive and interesting.
Understanding Parallax Scrolling
In other words, parallax scrolling revolutionizing web design is a background movement technique that established slower speed for background images than for foreground ones and produces an impression of depth on the screen. This technique is based on the principle on the perception of motion parallax whereby objects near appear to move faster than objects that are far. Thus, parallax scrolling imitates one of the most natural phenomena from the viewpoint of perception, making the results more interesting and engaging for the users.
Benefits of Parallax Scrolling

Parallax scrolling revolutionizing web design offers numerous benefits, making it a popular choice among web designers:Parallax scrolling offers numerous benefits, making it a popular choice among web designers:
- Enhanced User Experience: Parallax scrolling revolutionizing web design is a great tool for making a website more entertaining as it involves using a feature that guides the audiences and follows them while scrolling the page.
- Visual Appeal: Parallax scrolling revolutionizing web design through depth and motion can make the website more attractive which is a great advantage and can make more of an impression.
- Storytelling: Parallax scrolling revolutionizing web design is a great technique for the narration because it gives the designer an ability to lead the user throughout the story at the page.
- Increased Engagement: As one of the examples of an engaging form of web design that entails the user’s active participation, parallax scrolling can help the website cut down their bounce rates and extend the time of users’ stays on the page.
- Brand Differentiation: When done properly, the parallax web design provides a brand’s website with enough distinction from its competition, coupled with creativeness and innovation.
Implementing Parallax Scrolling
Parallax scrolling revolutionizing web design technique with simplicity that can only be achieved if the designer understands it alongside with the web developers. Here are some key considerations for successful implementation: Here are some key considerations for successful implementation:
Design Considerations
- Purpose: Parallax scrolling revolutionizing web design determine the goals of employing parallax scrolling on your Web site. It should complement all the other design objectives and should not be planned merely to have a flashy look.
- Layering: Parallax scrolling revolutionizing web design it is possible to use more layers to give depth for parallax. It is recommended that the background layer is to be in the slowest motion as compared to the other layers and the foreground layer is to be in the fastest motion. This difference in motion generates the required depth of the element.
- Simplicity: Parallax scrolling revolutionizing web design do not over do it with too many layers, or too many animations on the page. As it has been observed, the extent of system and design complexity should be checked to some extent because simple and effective designs provide uninterrupted fun to the users.
- Consistency: Parallax scrolling revolutionizing web design make sure the parallax effect is compatible with all device with different display sizes. Use the design on as many platforms as possible to check the level of interconnection.
Technical Considerations

- HTML and CSS: HTML and CSS are enough to create the most basic versions of parallax scrolling. The actual operation of creating a basic parallax effect can be done by using different background images and managing the speed of their movement with the help of basic CSS properties.
- JavaScript: For more complex forms of parallax effects, such as a background that moves slower than the actual content of the site, you will require use of JavaScript libraries, of which the most common is Parallax. Updatable text can be created using options of jQuery or the ScrollMagic library can be used. Such libraries provide more customization and direct manipulating of animations and the related interactions of other parts.
- Performance: It can also be rather time-consuming which means it requires more use of website resources and therefore affects the performance of the site. Minimize image sizes, make proper coding, and use cache to improve the Web site’s response speed.
- SEO and Accessibility: There should not be any problems with the SEO or the accessibility of the site caused by the parallax design. Semantic HTML should be used , images should have proper alt tags and the page should be compliant with Screen reader.
Working Strategies for the Use of Parallax Scrolling
To maximize the benefits of parallax scrolling, consider the following best practices:To maximize the benefits of parallax scrolling, consider the following best practices:
- Purposeful Design: Here is where parallax scrolling can be used to advance on the story or highlight some of the features. It should have a definite functional application and enhance the usage experience of the User.
- Performance Optimization: Parallax scrolling revolutionizing web design make sure that the users do not complain of the slow running of the website due to the parallax effect: The parallax effect should be optimized through proper coding and smaller images. Ensure that when the page is loading, half of the images and large scripts are not loaded at the same time, this is known as lazy loading.
- User Control: Parallax scrolling revolutionizing web design give the users the ability to control the scrolling. Do not set, for instance, scrolling automatically or have too many intricate animation aspects which are tiring a user out.
- Mobile Compatibility: Parallax scrolling revolutionizing web design make sure that the parallax effect is properly responsive or works well on any mobile phone. If the developers plan to launch the application for mobile devices, then it would be wise to use this parallax design in one of the simplified forms in order to guarantee the stability and usability in portable devices.
- Accessibility: Parallax scrolling revolutionizing web design ensure that you maintain the parallax design but it should be navigable to persons with a disability. Offer other means that the user may use to navigate through the site in case he is not in a position to deal with the aspect of parallax.
Some of the Website that apply Parallax Scrolling Properly

There is a number of websites that can serve as the examples of the efficient use of parallax scrolling for making theUsers experience more impressive. Here are a few notable examples:Here are a few notable examples:
- Apple’s iPhone Page: Parallax scrolling revolutionizing web design the iPhone product pages on Apple’s website incorporate parallax scrolling to present features and the appearance of the phone. The effect gives the audience or buyers a seem of three-dimensionality, thus making the presentation of the product more prominent.
- Spotify’s Year in Music: Currently, Spotify’s Year in Music page adopts the feature of parallax scrolling to navigate the users through an immersive experience of their music throughout the year. This is because the user – interaction element of the designs adds to the narrative.
- Nike’s Better World: Nike has used parallax scrolling on their Better World website to introduce company’s sustainability activities. Thus the effect of scrolling is apt at the same passing the message concerning the brand’s Environmental friendly stand.
Future of Parallax Scrolling
While parallax scrolling revolutionizing web design is associated with web design, the advances in the given sphere will cause the techniques and technologies connected with it to develop as well. As development frameworks in the web field improve and the computing devices become faster, parallax effects can be even more complex and nearly perfect. Furthermore, with the main user expectations rising and focusing on interactivity and the site’s ability to deliver an engaging experience, parallax scrolling might stay as a useful method in a web designer’s toolbox.
Nevertheless, it is possible to achieve the ostentatious and at the same time the functionality as a tool. As with any technique, the overuse of parallax effects or improper implementation of parallax can seriously turn users off, meaning it should be used sparingly and to the best of one’s ability.
Conclusion
Nonetheless, parallax scrolling can be considered as one of the most significant innovations in the sphere of web design, which aims to maximize the website’s entertaining impact and visual appeal. Knowledge about how it works, the advantages of such approach and its proper usage makes designers able to enhance website aesthetics and usability by applying disclosed technique. Again, similar to any general design trend, it is pivotal to implement them correctly and focus on creating a designing experience that is beneficial for the users. When used with diligence and as part of a strategy, parallax scrolling is capable of turning a website from a single view into a journey.
Color Theory for Designers – A Beginner’s Guide to Smart Color Choices
Color plays a powerful role in graphic design. Whether you’re creating a logo, website, social media post, or t-shirt design, understanding color theory for designers helps you make smart, strategic decisions.
Color influences mood, brand perception, and even buying behavior. If you want your designs to look professional and communicate clearly, mastering color theory is essential.
In this beginner’s guide, you’ll learn the basics of the color wheel, color harmony, emotional color meanings, and the best tools to create stunning color palettes.
Why Color Theory Is Essential in Design
Color theory is the foundation of visual communication. It helps designers:
- Create visually balanced compositions
- Build strong brand identities
- Trigger emotional responses
- Improve readability and accessibility
- Increase conversions and engagement
For example, brands like use red to create excitement and energy, while uses blue to build trust and reliability.
When you understand color psychology and harmony, you design with intention—not guesswork.
The Color Wheel Basics
The color wheel is a circular diagram that organizes colors based on their relationships.
It was first developed by in the 17th century. The modern color wheel helps designers understand how colors interact with each other.
There are three main categories on the color wheel:
- Warm colors (Red, Orange, Yellow)
- Cool colors (Blue, Green, Purple)
- Neutral colors (Black, White, Gray, Brown)
Warm colors feel energetic and bold. Cool colors feel calm and professional.
Understanding the color wheel is the first step to mastering color harmony.
Primary, Secondary, and Tertiary Colors
1. Primary Colors
Primary colors cannot be created by mixing other colors.
- Red
- Blue
- Yellow
These are the base of all other colors.
2. Secondary Colors
Secondary colors are made by mixing two primary colors.
- Red + Blue = Purple
- Blue + Yellow = Green
- Red + Yellow = Orange
3. Tertiary Colors
Tertiary colors are created by mixing a primary and a secondary color.
Examples:
- Red-Orange
- Yellow-Green
- Blue-Purple
Using primary, secondary, and tertiary colors correctly helps create balanced and attractive designs.
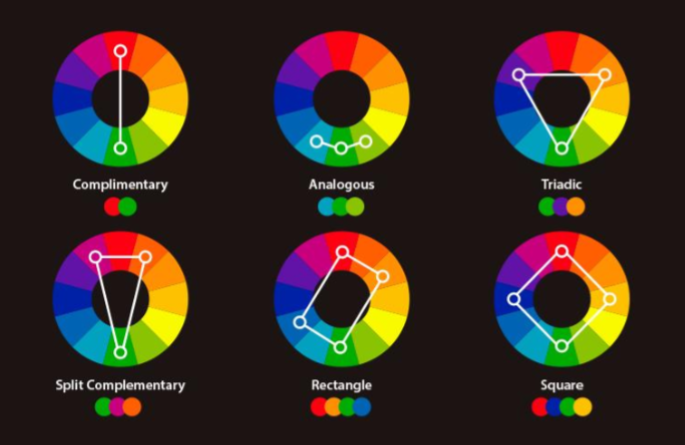
Color Harmony: Complementary, Triadic, and Analogous
Color harmony refers to combinations of colors that look pleasing together.
1. Complementary Colors
These are colors opposite each other on the color wheel.
Examples:
- Blue & Orange
- Red & Green
- Yellow & Purple
Complementary colors create high contrast and bold designs. Great for call-to-action buttons.
2. Triadic Colors
Triadic color schemes use three evenly spaced colors on the wheel.
Example:
- Red, Blue, Yellow
This combination creates vibrant and balanced designs.
3. Analogous Colors
Analogous colors sit next to each other on the color wheel.
Examples:
- Blue, Blue-Green, Green
- Red, Red-Orange, Orange
These create soft, harmonious, and natural-looking designs.
Choosing the right color harmony makes your design look professional and intentional.
Emotional Meaning of Colors
Color psychology plays a huge role in branding and marketing.
Here’s what common colors represent:
- Red – Energy, passion, urgency
- Blue – Trust, calm, professionalism
- Yellow – Happiness, optimism
- Green – Growth, health, nature
- Purple – Luxury, creativity
- Black – Power, elegance
- White – Simplicity, cleanliness
For example, luxury brands often use black and gold for a premium look. Eco-friendly brands prefer green to reflect sustainability.
Understanding emotional meaning helps designers choose colors that match the brand message.
Best Color Tools for Designers
Choosing the right colors becomes easier with professional tools.
1.
Coolors is a fast and easy color palette generator. You can lock colors and generate variations instantly.
2.
Adobe Color allows you to create palettes using color harmony rules like complementary, triadic, and analogous.
It also integrates smoothly with Adobe software like and .
These tools help you experiment and create professional color schemes quickly.
FAQ: What Are the Best Color Combinations?
There is no single “best” color combination. It depends on:
- Your target audience
- Brand personality
- Industry
- Cultural context
However, some popular combinations include:
- Blue & White (Clean and professional)
- Black & Gold (Luxury and premium)
- Purple & Yellow (Creative and bold)
- Green & Beige (Natural and organic)
The best approach is to test and refine your palette based on real design projects.
FAQ: Does Color Affect Conversions?
Yes, color significantly affects conversions.
Studies show that color can influence purchasing decisions and brand recognition. For example:
- Red creates urgency in sales banners
- Green encourages action (often used for CTA buttons)
- Blue builds trust on websites
Choosing the right call-to-action color can increase click-through rates and sales.
Conclusion: Practice Using Real Projects
Understanding color theory for designers is not just about learning rules—it’s about applying them.
Start practicing by:
- Redesigning a logo with different color harmonies
- Creating 3 social media posts using complementary colors
- Testing CTA button colors on your website
The more you experiment, the stronger your color instincts will become.
Smart color choices transform ordinary designs into powerful visual experiences.
Now it’s your turn—start creating with confidence! 🎨
Graphics Design
12 Expert Tips for Color Theory for Designers – A Beginner’s Guide to Smart Color Choices
12 Expert Tips for Color Theory for Designers – A Beginner’s Guide to Smart Color Choices
Introduction: Why Color Theory Matters in Design
Color theory for designers is one of the most powerful tools a designer has. Before you even read a word of text, color communicates mood, directs the viewer’s eye, and sets expectations. That’s exactly why understanding Color Theory for Designers – A Beginner’s Guide to Smart Color Choices is essential for anyone working in branding, web design, advertising, illustration, or UI/UX.
Color influences everything—attention, emotion, readability, and even conversion rates. When designers understand how colors relate, how they harmonize, and how they affect human psychology, their designs instantly become more polished, professional, and strategic.
Color theory for designers isn’t just artistic intuition; it’s a structured system of rules that designers rely on to make deliberate choices. Instead of guessing which colors “look good,” you’ll understand why they work. And once you master the basics, you can confidently create palettes that feel balanced, meaningful, and visually appealing.
Understanding the Color Wheel

The color theory for designers wheel is the foundation of color theory. It visually organizes colors in a circle, making it easy to understand how they relate and contrast.
Hue, Tone, Shade, and Tint
To use colors effectively, you need to understand these essential terms:
- Hue: The base color itself—red, blue, green, etc.
- Tone: Hue mixed with gray, resulting in softer, muted colors.
- Shade: Hue mixed with black, creating deeper, richer colors.
- Tint: Hue mixed with white, producing light, pastel versions.
These components help designers adjust mood and clarity. Soft tints feel gentle and friendly, whereas dark shades feel dramatic and bold.
Warm vs. Cool Colors

Warm colors—red, orange, yellow—bring energy and excitement. They draw attention quickly.
Cool colors—blue, green, purple—create calmness, trust, and relaxation.
Using warm and cool colors together can create visual balance, especially in user interfaces and branding.
Primary, Secondary, and Tertiary Colors

These groups form the backbone of the entire color wheel.
Primary Colors
- Red
- Blue
- Yellow
They cannot be created from other colors.
Secondary Colors
These are created by mixing two primary colors:
- Red + Blue = Purple
- Red + Yellow = Orange
- Blue + Yellow = Green
Tertiary Colors
Tertiary colors are formed when you mix a primary color with a secondary color. Examples include:
- Blue-green
- Yellow-orange
- Red-violet
Using These Groups in Branding
Primary color theory for designers often serve as core brand colors because they feel strong and memorable. Secondary and tertiary colors support the palette, adding dimension and flexibility for UI elements, icons, and backgrounds.
Color Harmony Fundamentals
Color harmony is about using colors in combinations that look pleasing and balanced.
Complementary Schemes
Complementary colors sit directly opposite each other on the color wheel. Examples include:
- Blue & Orange
- Red & Green
- Yellow & Purple
These pairs create high contrast, which is perfect for call-to-action buttons, posters, or impactful visual elements.
Triadic Palettes
A triadic palette forms a triangle on the color wheel—for example:
- Blue, Red, Yellow
- Purple, Orange, Green
Triadic schemes offer bold contrast while maintaining harmony.
Analogous Harmony
Analogous colors sit beside each other on the color wheel:
- Blue, Blue-Green, Green
- Red, Orange, Yellow
Analogous schemes feel calm and unified—great for backgrounds, illustrations, and user-friendly interfaces.
Psychological and Emotional Impact of Color

Color theory for designers influences human emotion across all forms of design.
Common Emotional Meanings
- Red: energy, urgency, passion
- Blue: trust, professionalism, reliability
- Yellow: optimism, creativity, cheerfulness
- Green: growth, calmness, environment
- Purple: luxury, imagination, spirituality
- Black: sophistication, strength, elegance
- White: simplicity, clarity, cleanliness
Understanding these meanings helps designers craft purposeful visual messages.
Cultural Interpretations
Color theory for designers don’t carry the same meaning in every culture.
For example:
- In the West, white symbolizes purity. In parts of Asia, it represents mourning.
- In China, red is a color of good fortune and celebration.
- In the U.S., blue often represents trust or corporate professionalism.
A designer must always consider cultural context when creating global products or branding.
Best Tools for Creating Color Palettes

Technology makes color exploration easier than ever.
Coolors
Color theory for designers is a fast, beginner-friendly palette generator. With just a click, you can lock colors, tweak brightness, and explore harmonious combinations.
Adobe Color
Adobe Color is designed for professionals. It offers:
- A digital color wheel
- Harmony suggestions
- Accessibility contrast checking
- Compatibility with Adobe Creative Cloud
This tool is perfect for branding, UI design, and large-scale visual projects.
Practical Tips for Designers to Choose Better Colors
- Start With One Base Color
Choose one color that represents the project’s mood. Build the palette around it using harmony rules.
- Consider Accessibility
Not all users see color the same way. Use contrast tools to ensure readability for people with low vision or color blindness.
- Limit Your Palette
Too many colors can overwhelm the viewer. Most branding systems use 3–5 main colors.
- Use Neutrals to Balance Your Palette
Whites, blacks, grays, and beiges provide breathing room around strong colors.
- Match Colors to Brand Personality
- Tech brands use blues for trust
- Eco brands lean toward greens
- Luxury brands prefer black, gold, or purple
FAQs
- What are the best color combinations?
Complementary and triadic combinations create the strongest visual impact, while analogous combinations create a pleasing, natural flow.
- Does color affect conversions?
Absolutely. High-contrast colors—especially for buttons—can dramatically improve user engagement and sales.
- Which tools help beginners learn Color theory for designers?
Coolors, Adobe Color, Paletton, and Canva’s palette generator are great.
- How can I pick colors for branding?
Focus on brand personality, target audience emotion, and industry standards. Start with a strong primary color.
- Are there colors designers should avoid?
Avoid extremely saturated combinations unless used sparingly for accents.
- How do I test color accessibility?
Tools like WebAIM and Adobe Color’s contrast checker help ensure your palette meets WCAG guidelines.
Conclusion: Practice Through Real-World Projects
Color theory for designers becomes easier the more you practice. Whether you redesign a homepage, create a logo, or experiment with advertisement layouts, real projects help you develop an intuitive understanding of color. The goal isn’t perfection—it’s learning to make intentional, smart choices that fit your message and audience.
The more you explore the color wheel, test harmony rules, and practice palette creation, the stronger your design skills will become.
Learn Graphic Design Online Free in 2026 – 10 Best Platforms for Beginners
Introduction: Formal Education vs Learning Online.
The design world has transformed quite drastically during the last ten years. However, at one time, to become a professional graphic designer, you needed to join a costly design school, underwent a few years of theory studies, and acquired a degree in order to get hired. But times have changed.
The year 2026 is the most convenient time to study graphic design without paying money online. And you are an amateur, who wishes to become a freelance designer, and you are a business owner, who wants to make attractive posts in social media: Thousands of free online resources are there, ready to meet you.
Online learning is convenient, cheap as well as can be learnt at any corner of the globe. You can study the principles of design at the best universities, you can get practical tutorials on design by ones working in the industry and you can create your own projects, all of it is possible on your laptop or even your phone.
In this guide, we shall discuss the 10 best sites to study graphic design online free in 2026. You will also get to know how to begin with your design career, how many years it will take to master the art, and why you do not require a degree to be a successful designer.
1. Coursera – Let’s Learn Graphic Design in Leading Universities.

Coursera is a provider that can be considered one of the most reliable and professional in the context of online learn graphic design online free. It collaborates with leading universities and institutions to provide courses in nearly all fields- graphic design one of them.
One of the most popular entries, especially in case you are a beginner, is the article Fundamentals of Graphic Design by the CalArts. The design principles that are essential like composition, typography, color theory, and image making are discussed in this course.
Why Coursera Stands Out
- Provides free (audit mode) university level education.
- Formal classes with definite objectives and tasks.
- Professional designers and professors.
- You are able to achieve certificates (paid upgrade is optional)
The Coursera is excellent when it comes to academic learners that do not want to spend money on a degree. You will also have the theoretical knowledge you need to know how design functions- a knowledge that you can apply later in programs such as photoshop or illustrator.
Recommended to: Students with a preference to structured lessons and guided learning.
Pro Tip: Take notes during video watching and train every lesson with using free design tools, such as Canva or Figma.
2. Canva Design School Free, Fun and easy to use.
Canva, in case you have ever created a poster or a social media post on the internet, you have likely heard about it. It is not a tool only, it is a learning platform!
Canva Design School provides dozens of free courses, tutorials, and video lessons to give beginners an idea of the building blocks of graphic design, branding, and visual communication.
The rules of typography and colour combinations are but the tip of the iceberg, with more complicated things such as brand storytelling, layout balance.
Why It is Ideal as a Starter.
- No subscription fee and absolutely free.
- Design tutorials with Canva step-by-step tutorials on drag and drop interface.
- Best to design logos, posters, Instagram posts, and marketing products.
- Sells mini-courses such as “Getting Started with Canva, Brand Your Business, and Create Visual Impact.
Canva is easy to learn graphic design online free and fun to use even when you are a designer who has never designed anything. You will be able to study along the way you create and it will be an informative and the practical one.
Best among: New users, social media creators and small business owners.
Hint: Therapy. Use Canva templates to redesign your favorite ads or posters. It is an excellent means of putting what you learn to practice.
3. YouTube Channels Learn from the best (GFXMentor and The Futur).

YouTube is your friend in learn graphic design online free case you are visual, and practical learners. It is entirely a free open-source and numerous professional designers provide their expertise in video instructions.
The Futur and GFXMentor are two of the most successful channels to learn graphic design in 2026 on YouTube.
GFXMentor
It is a gem to beginners and operated by a Pakistani designer Imran Ali Dina. He walks one through Adobe Photoshop and Illustrator and does it in easy-to-follow language. His tutorials address logo designing, and also, vector art and typography.
Why GFXMentor is Amazing:
- 100% free Adobe tutorials
- Explanations that are easy to understand.
- Real projects for practice
- The best one to aspiring freelancers and students.
The Futur
The Futur, which is based on the theory of design, branding, and business strategy, was founded by Chris Do. It is not only about making things look good but it is also about knowing the reason of designing.
Why The Futur is Valuable:
- Designs thinking, branding, and creative business.
- Large-scale intermediate and advanced.
- Motivating interviews with the leading creative professionals.
Best: Visual learners, freelancers and entrepreneurs.
Bonus: compile a set of design tutorials and train every day. The main ingredient of improvement is consistency.
4. Skillshare Skilled design courses- Free trial on premium courses.

One of the most famous online learn graphic design online free platforms that focus on creative professionals is Skillshare. Although it is a paid service, the platform has a 1-month free trial, which gives you the opportunity to take unlimited classes without spending a rupee.
There are thousands of graphic design courses which you can study logo design, color theory, typography, Adobe Creative Suite, and digital illustration.
The users of Skillshare also have some well known instructors such as Aaron Draplin, Jessica Hische and Daniel Walter Scott who are all renowned designers in the industry.
The Reason Why Skillshare is Worth Trying.
- Thousands of courses in art and design on the free trial.
- Get training of actual professionals and business men.
- Project-based study to assist you in developing a portfolio.
- Video lessons are short and easy to follow.
Best: Learn graphic design online free interested in premium, practical training free of charge (in the trial period).
Pro Tip: Turn on the free month, prepare your plan of studying, and take as many courses as you can finish until the trial period is over.
5. LinkedIn Learning- One-month Free.
LinkedIn Learning (previously Lynda.com) is an online business and creative platform aimed at business professionals and creative workers. It has one month free trial, whereby you are allowed to access all courses and download materials.
Here, the courses offered in learn graphic design online free are as basic as Adobe Photoshop and as such sophisticated as typography and visual communication concepts.
Key Benefits
- Educated by qualified professionals in the industry.
- Has project files, quizzes, and practice exercises.
Helps, design and soft (such as creativity and communication) skills.
- Provides completion certificates to enhance your LinkedIn profile.
LinkedIn learn graphic design online free is the best option when you want to update your skills to work in a job or work as a freelance.
Best suit: It is best suited to professionals who would like to be able to integrate design with business.
Pro Tip: The course certificates you have finished should be included in your LinkedIn profile to draw in the clients or employers.
6. Udemy- Free and Discounted Graphic Design Courses.
Another best online learn graphic design online free site which often provides free or reduced-price design courses is Udemy. Novice classes are usually available at no or low costs, such as Photoshop, Illustrator, CorelDRAW and Figma.
Learn graphic design online free in contrast to other platforms, Udemy provides a lifetime access to any course you purchase, this means that even a free course will remain in your account forever.
What Makes Udemy Great
- There are thousands of design courses of all levels.
- Discounts and free tutorials too often.
- Unlimited access to bought courses.
- Ratings and reviews to make the right choice of content.
Best: Self- learners who enjoy flexible and cheaper deals.
P.S. Try to search in Udemy filters – learn graphic design online free courses to find the hidden gems.
7. Envato Tuts+ Guides, Tutorials, and Inspiration.

Envato Tuts+ is the popular place of the creative professionals. It provides hundreds of free tutorials on such issues as logo design, typography, digital illustration, and photo editing.
You may also read articles on designs, color psychology and portfolio building- allowing you to enhance your artistic and professional abilities.
Why You’ll Love It
- In-depth instructions with step-by-step illustrations.
- Ideal in learn graphic design online free and highly skilled designers.
- Provides motivation and innovation.
- Has access to free design elements of Envato Elements.
Most appropriate: Designers that enjoy reading and experimentation.
Pro Tip: Be consistent by watching their weekly tutorials and learn something new each week.
8. Reddit Design Communities Reddit: Learn Designer Designers.
learn graphic design online free it is not always necessary to attend a course in order to learn graphic design online free. In other cases, community learning may be even more fruitful. There are a number of design communities on Reddit, such as r/graphic_design, r/design critiques, and r/ freelance where professionals interact, post their work, and share feedback.
They are also good communities to enhance your eye of design, learn the trends in the industry and connect with other creatives.
Reddit Design Learning advantages.
- Feedback in real-time of senior designers.
- Complimentary counseling and portfolio analysis.
- Industry tools and employment.
- Support and motivation of other learners.
Best: Students who develop in discussion and teamwork.
Pro Tip: You should not be afraid to ask questions and even share your work to be reviewed as this is one of the quickest methods of getting better.
9. Design Blogs – Keep Pace with the Industry News.

The underestimated method of learn graphic design online free is through blogs. They provide complimentary tutorials, motivation, and fashion updates by experts. The most effective blogs that will be useful to graphic designers in the year 2026 will be:
- Creative Bloq: Specializes in design inspiration, tools and tutorials.
- 99designs Blog: Provides an idea of branding, logo design, and freelancing advice.
Smashing Magazine covers web design, UX, and front-end development, as well as design.
- The Blog Hubby (Your Blog): Ideal to write about design tips, freelancing and creative motivation.
Why Follow Design Blogs
Learn on the basis of real cases.
- Keep up with the current design trends.
- Free tutorials and tool prescriptions.
- Good in the long term skill development.
Best: Those who are constant learn graphic design online free and wish to keep pace with the trends.
Pro Tip: Subscribe to newslets of these blogs to be updated on a weekly basis.
10. Figma Community and Learn Hub: Free to UI/UX Designers.
Figma is the best tool to master in learn graphic design online free case you are interested in digital and interface design. The Figma learn graphic design online free Hub has both beginner and advanced free tutorials, including interface layout, prototyping, and collaboration.
The Figma Community area has also been filled with free templates, wireframes, and UI kits that have been created by other designers. You may visit these as a way of understanding the construction of professional interfaces.
Why Figma is a Must-Learn Tool
- Free and Web based, no installation needed.
- UI/UX, app, and web design Perfect.
- Large community with common assets.
- On the job interactive tutorials to enjoy learning.
Best: Future UI/UX designers and freelancers.
Pro Hack: You can begin with the introductory tutorials of Figma and practice by attempting to reproduce the interface of your favorite app.
FAQ: Can I Learn Graphic Design without Degree?
Yes—absolutely! There are numerous successful designers in the world that are self-educated. One does not have to have a degree in order to demonstrate their creativity. It is really the portfolio and your practice and of course your knowledge of design principles.
You can learn graphic design online free all you need to know online, in YouTube tutorials and in the real world projects, including color harmony, communicating with clients. To become a professional designer and begin earning money on what you do is easy as long as you practice regularly.
What is the Time to Master Graphic Design?
The way you spend time will depend on your commitment.
- 1–3 months: You will be able to become a master of design basics (color, typography, layout).
- 36 months: You will learn the use of such tools as Photoshop, illustrator, or Canva.
- 6-12 months Later: You will have a good portfolio and become a freelancer or work on your own brand designs.
It is a process of learn graphic design online free and it is a process of constant improvement. The industry is constantly changing with new techniques and tools being learned by even professional people.
Conclusion: Choose One and Start Now
There’s no shortage of opportunities to learn graphic design online free in 2026. Whether you prefer structured courses like Coursera and LinkedIn learn graphic design online free or fun, visual tutorials on YouTube and Canva Design School—every platform has something valuable to offer.
The secret to success isn’t just choosing the right course—it’s taking action. Start small, stay consistent, and practice every day. Design is a skill that improves with experience, not theory alone.
So, pick one platform from this list today, set your learn graphic design online free goals, and begin your creative journey. Your dream of becoming a skilled graphic designer is just a few clicks away.
-

 Graphics Design2 years ago
7.Exploring the Importance of Color Theory Charts
-
 Graphics Design9 months ago
Top 10 Best Graphic Design Tools for Beginners in 2025 (Free & Paid)
-

 Graphics Design2 years ago
10 Stunning Gradient Design Trends You Need to Know in 2024
-
 Graphics Design8 months ago
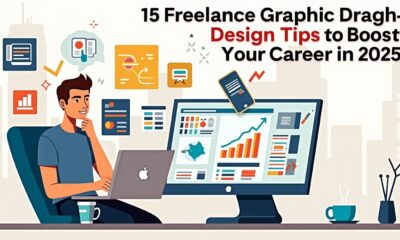
15 Freelance Graphic Design Tips to Boost Your Career in 2025
-

 Graphics Design2 years ago
29.Retro Design Is Making a Comeback in Modern Spaces
-

 Graphics Design11 months ago
Best Laptops for Graphic Designers – 2025 Buying Guide
-

 Graphics Design1 year ago
2025 Logo Design Trends: What’s In, What’s Out?
-

 Graphics Design2 years ago
15.The Importance of Effective Flyer Design in Marketing
Program iz
August 24, 2024 at 5:43 am
Program iz I very delighted to find this internet site on bing, just what I was searching for as well saved to fav
Temp Mail
August 29, 2024 at 5:37 pm
My fascination with your creations is on par with your own. The sketch you’ve presented is tasteful, and the content you’ve authored is of a high caliber. Nevertheless, you seem uneasy about the prospect of embarking on something that could be perceived as dubious. I believe you’ll be able to resolve this concern in a timely manner.
Wendell Alyea
October 26, 2024 at 6:54 am
You are a very smart person!
indicac~ao da binance
December 7, 2024 at 4:52 am
Can you be more specific about the content of your article? After reading it, I still have some doubts. Hope you can help me.
Sign Up
February 27, 2025 at 10:36 am
Your point of view caught my eye and was very interesting. Thanks. I have a question for you.