
Graphics Design
40.Mastering UX Design Creating User-Centered Experiences
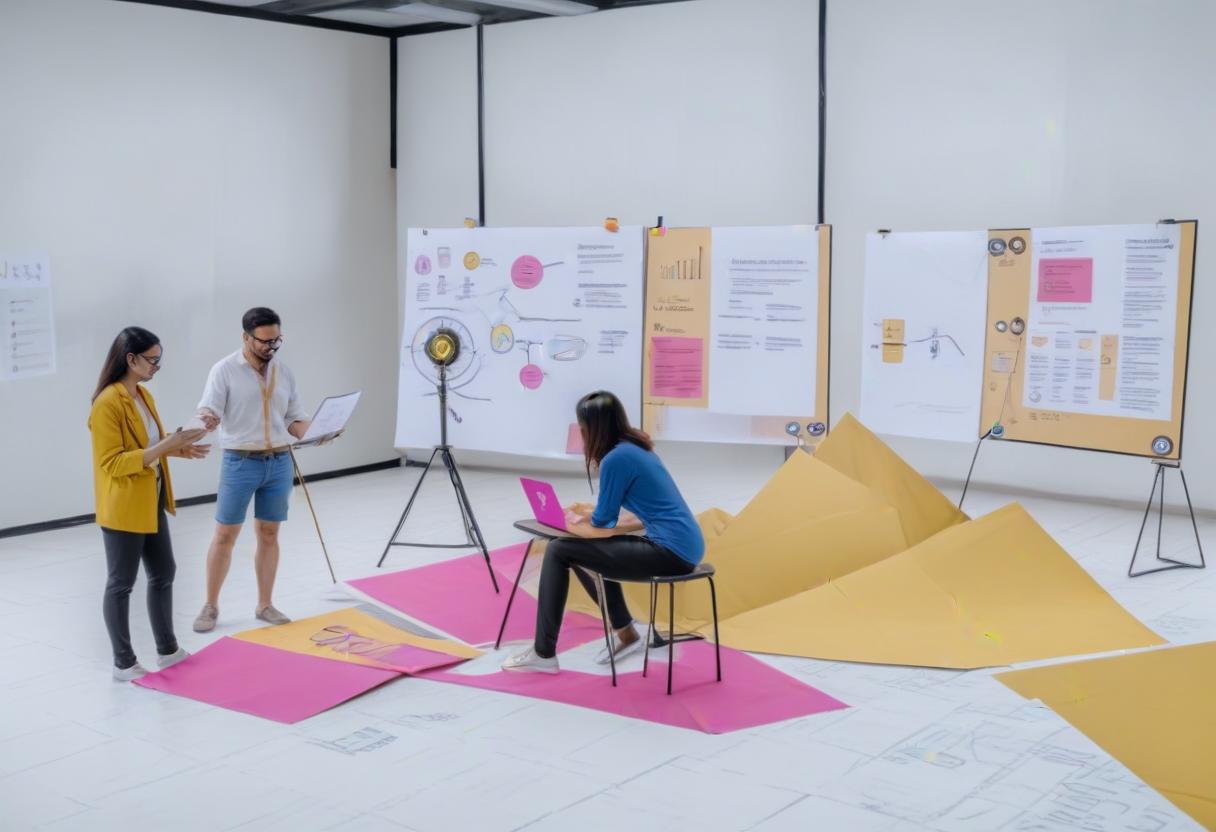
Mastering UX Design Creating User-Centered Experiences
Mastering UX design creating user-centered experiences with the growing focus on the digital space usage, user experience design has become a vital component for the development of most successful products and services. Whether it is a website, an application, or any other interface, the thing that differentiates between success and failure is the experience that a user has while engaging with it. It’s not about making designs pretty, but it’s about making products beloved and sensible by the users. In this article, I will introduce the definition of UX design and the principles that guide it, as well as the primary steps to creating effective user experiences.
What is UX Design?

Mastering UX design creating user-centered experiences is defined as the practice of working to create better experience for the user by increasing the quality of the usability, accessibility and pleasure got in the process of using the product. It is a broad area of practice that incorporates components of psychology, design, research and technology. The concept of UX design focuses on enhancing the efficiency and quality of user experience as a way of achieving the best outcomes.
Mastering UX design creating user-centered experiences the concept of user experience was first introduced by Don Norman who is a cognitive scientist and jointly heads the Nielsen Norman Group during the early 1990s. Norman explains that user experience encompasses all aspects of the end-user’s engagement with the company, its offerings and products. In a more practical sense, UX design again extends and develops on the idea of visual design and embraces the entire notion of feel.
It is also interesting to note that UX design is becoming increasingly important.

Given the presence of numerous gadgets and possibilities at the users’ fingertips, user experience may become a competitive advantage today. Good user experience contributes to higher user satisfaction level, increase engagement and finally improve the conversion rate. On the other hand, a bad design impacts the User Experience negatively and users abandon such products or services and even switch businesses.
Here are a few reasons why UX design is essential:Here are a few reasons why UX design is essential:
1. User Satisfaction: About mastering UX design creating user-centered experiences one can state that it defines a way how and what permits user to fulfill the his tasks in the best and proper way. This leads to more repeat business and that in return drives increased satisfaction.
2. Increased Engagement: The more users are satisfied with ease and well organized interfaces they are willing to continue their operating time. This can lead to longer sessions, repeated visits and therefore a better conversion rate.
3. Reduced Development Costs: Engaging mastering UX design creating user-centered experiences n at the beginnings of a product’s design process can save money in redesigning and fixing later. When problems of usability that affect a website are detected, it is easier to redesign and fix them and this is more economical.
4. Competitive Advantage: Organizations that tend to design for UX have a higher chance of being remarkable in the market. One can see, that better usability makes a product stand out from the rivals and become a product that many people will choose.
5. Improved Accessibility: For example, an important aspect of mastering UX design creating user-centered experiences , which should be taken into account is accessibility: products designed must be usable by persons with disabilities. Besides, expanding the user range contributes to increasing the company’s care for the minorities.
Modern UX design is based on certain principles which include the following:

Mastering UX design creating user-centered experiences there are a set of less obvious but nonetheles crucial guidelines that designers should follow to design the right user experience. Such guidelines are vital in the course of developing a useful product that will suit users’ needs and expectations.
1. User-Centered Design: Mastering UX design creating user-centered experiences the user is the centre of all the efforts undertaken within the framework of UX design. I can remember the mantra that every decision that is made in the design process should involve the user in the best way. This means carrying out research and understanding the users: what they want and need, what is important to them, and what challenges they face, after which creating designs that respond to such research.
2. Consistency: That is why the degree of unity in design should be perceived as an absolutely essential factor in usability. It should be clear to the users to figure out how the interface will act and what they are expected to perform. This includes the use of common visual UI assets like the color, font, icon among others as well as the interactivity UI assets like the location and affirmation of UI controls such as the buttons among others.
3. Simplicity: Firstly, an interface that is not designed too elaborately is easier to use in practice. This doesn’t mean that as many features are to be removed but it means that as many features are to be provided which are essential and can be easily accessed by the users.
4. Feedback: Mastering UX design creating user-centered experiences users also want to be informed about the company’s actions that they have taken and which they benefited. Giving the-feedback, in form of animation, sound, or message, gives the user a clue of the outcome of their actions, hence helping the user navigate through the interface.
5. Accessibility: Accessibility is another component: the idea is that the designed and developed UX should be available to all people including disabled ones. This entails aspects such as colour contrast, type size, keyboard access, and screen reader compatibility.
6. Learnability: Consumers should easily know how to operate a product without being taken through special classes. Among four components of learnability, a product design which is natural and resembles other known products, and the instructions presented in simple ways are laudable.
7. Efficiency: Mastering UX design creating user-centered experiences the presentation of a product makes it easier for the user to complete each of the tasks that formed the requirement of a product. Possible requirements which need to be improved in this aspect comprise the minimization of the required number of steps to perform a definite operation, as well as the overall cognitive load and the amount of work done.
8. Emotional Design: Another dimension that belongs to UX design is the so called emotional facet of the product. Infused with appropriate colours, typeface, and pictures, graphic work can produce emotions to complement the orchestration. One may find that one can elicit a positive emotion with a view to enhancing user satisfaction and usage.
The UX Design Process

Mastering UX design creating user-centered experiences is a cyclic process, with several steps each of which comprises several activities and tangible outcomes. While the process may vary depending on the project and the organization, it generally follows these steps:While the process may vary depending on the project and the organization, it generally follows these steps:
1. Research: The idea of designing is usually started with comprehending users, their requirements and the surroundings through which they are going to understand. This consists of user research that is undertaken by interviewing, employing questionnaires, as well as doing test for a user. The idea is what should be sought so as to guide the design of the interfaces.
2. Personas and Scenarios: From the study, designers come up with characters that are imaginary and these are used to depict various users who will come across the product. In as much as an audience does not directly use a product, scenarios are then created to explain how these personas would use the product in real life.
3. Information Architecture: Information architecture refers to the working out of the content of the product and of its various features in such a manner that the user will be able to find what he or she is looking for easily. This involves coming up with such things as sitemaps, navigation systems, as well as information architecture.
4. Wireframing and Prototyping: Mastering UX design creating user-centered experiences wireframes are low tech mockups of the product to be developed, which represent its interface. More detailed versions of the model are the prototypes that enable the users to engage and work with them. Prototypes and wireframes are similar in the sense that both of them are employed to perform the functions of implementation for the purpose of redesigning the design.
5. Interaction Design: Interaction design therefore concerns itself with how the user will use the product. This involves designing the interaction scenarios of features, designing how a user can get from one point to another and designing minuscule animation or visual cues which give the user feedback.
6. Visual Design: Mastering UX design creating user-centered experiences graphic design refers to the incorporation of the colors, type faces, pictures and several other graphical assets to the product. It is about making a neat, clean, professional, and, at the same time, creative design that will reflect the company’s idea and make the users enjoy their interaction with the site.
Following are the best practices for UX design:

Mastering UX design creating user-centered experiences should apply some principles which have been developed for the creation of multiple user-centered designs. Here are some key best practices for UX design: Here are some key best practices for UX design:
1. Start with Research: Mastering UX design creating user-centered experiences this shall require establishment of the users, their needs and the challenges that they face in the course of using the systems. Spending a time to do research on the users you are going to accommodate in your site design is extremely important.
2. Prioritize Accessibility: Designing graphic interface: Ensure that your design will meet and can easily be used by disable persons. This consist of correct color contrast, images described with text, and setting to work with keyboard rather than a mouse.
3. Focus on Simplicity: Mastering UX design creating user-centered experiences minimize on the information you wish to present to the public and make sure that the overall design is as simple as possible. Stay on the basic concepts and make them clear and simple to locate and access. The language of the programme should be simple and devoid of terms that are common in the scientific community.
4. Use Familiar Design Patterns: Mastering UX design creating user-centered experiences designers already have a set standard to follow and the users are used to it. Exploiting these familiar patterns can make your product to be easy to use and thus decreasing the time to learn how to use it.
5. Provide Feedback: Mastering UX design creating user-centered experiences it is relevant to give the user feedback when an action has been executed. These can be in form of auditory or visual signals, messages that would give the user feedback that the action is complete, or messages on what the next course of action to be taken is.
6. Test Early and Often: Usability test should be part and parcel of the design process right from the first stage through to the final stage. Try your designs with actual customers as soon as feasible and as many times as possible in order to correct flaws prior to the actual product launch.
7. Design for Flexibility: Users will use your product on different devices and that is why it is important to design for different resolutions. It is also useful to make sure the design is usable in all contexts of use or at the very least, adaptive to change.
8. Keep the User in Mind: Mastering UX design creating user-centered experiences when going through the design process of the web application, the user should remain the focus all the time. Pay much attention to their needs, preferences, and behaviors concerning all aspects of design.
9. Iterate and Improve: The refutation of the debate is simple, too important in a single statement; UX design is not ever ending. This should be done in a continuous basis from the users.
Conclusion
Mastering UX design creating user-centered experiences this is another crucial step in the development of good and viable digital products. Thus, while in the center of attention stays designers, attention also stays on users and their wants and needs so to make usage of designs easy and fun. If designers would follow the guidelines associated with UX design and keep to the rules associated with this process, it is possible to achieve a higher level of user satisfaction and engagement, and therefore business success.
The practice of mastering UX design creating user-centered experiences n is set to expand, particularly given the advancement in the technologies in the future. It is therefore imperative that the UX designers should be in possession of up-to-date information concerning the existing trends; the tools; and the methodologies of product design. Learning the best practices of UX design allows designing beautiful and appealing products, which will offer the best user experiences.
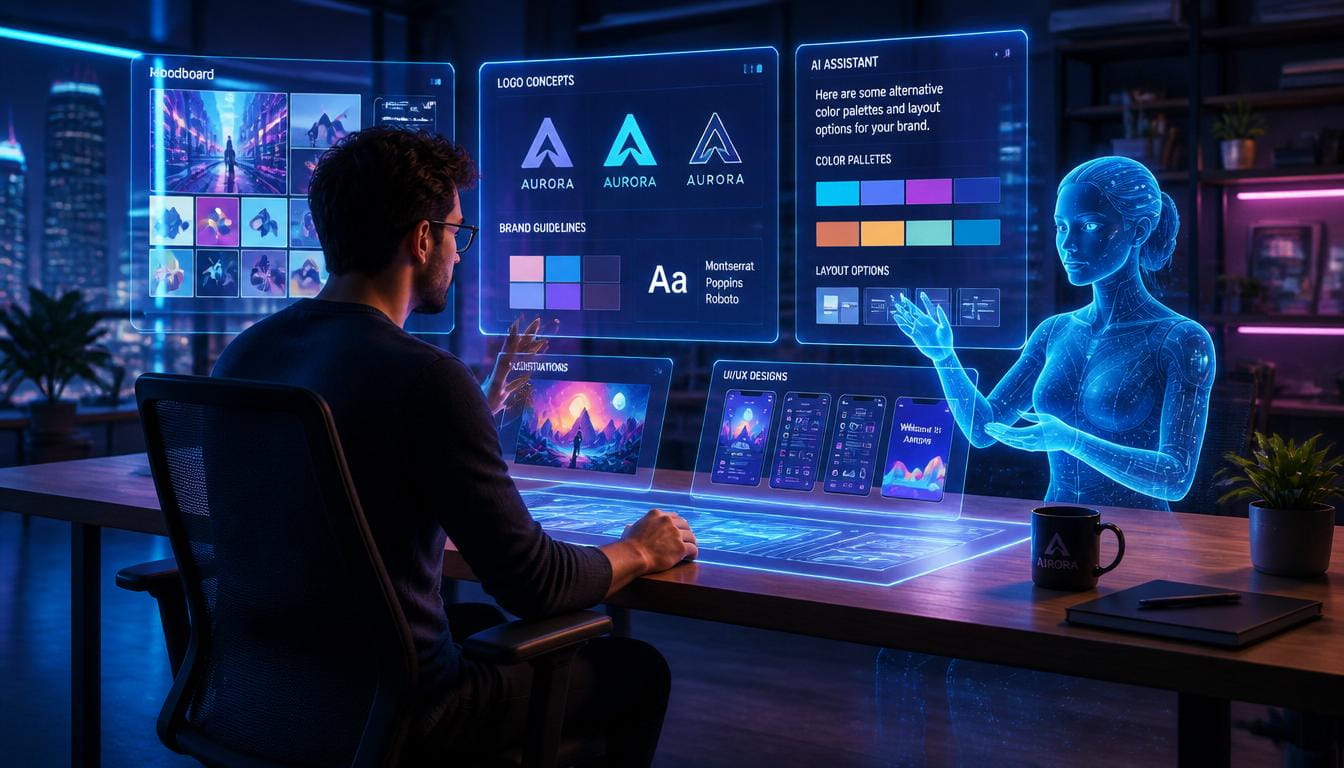
How AI Graphic Design Is Changing the Future of Creative Work
The creative industry is experiencing an unprecedented evolution. For decades, AI Graphic Design relied strictly on the mastery of complex software, years of technical training, and manual execution. However, the emergence of fundamentally disrupted this paradigm. Today, artificial intelligence is no longer just a futuristic concept or a niche tool for tech enthusiasts; it has become a core driver of modern visual culture.
From generating instantaneous concept art to automating repetitive layout tasks, AI Graphic Design is redefining how brands communicate, how agencies operate, and how creators approach their daily workflows. This shift brings both immense opportunity and profound existential questions for the creative community. Is artificial intelligence replacing the human artist, or is it liberating creators from mundane tasks to focus on pure strategy and imagination?
To understand the full scope of this transformation, we must explore how AI Graphic Design works, its tangible impacts on the creative industry, the ethical boundaries surrounding machine-generated art, and what the future holds for human designers navigating this brave new digital landscape.
The Genesis and Evolution of AI Graphic Design

To appreciate where we are today, we must look at how quickly AI Graphic Design transformed from rudimentary pixel generation to sophisticated, photorealistic composition. Early iterations of machine-learning art were largely abstract, often producing distorted imagery that required massive compute power for minimal aesthetic output.
However, the introduction of Generative Adversarial Networks (GANs) and later, advanced diffusion models, completely changed the trajectory of AI Graphic Design. These systems were trained on massive datasets of images, art history, typography, and layout principles. By learning the mathematical relationships between words and visual elements, tools utilizing AI Graphic Design technology unlocked the ability to translate simple text prompts into complex visual assets within seconds.
Today, AI Graphic Design encompasses much more than just text-to-image generation. It integrates deeply into the workflows of UI/UX layout creation, automated vector scaling, intelligent color palette generation, and content-aware photo manipulation. What began as a novel tech experiment has matured into an industrial-grade creative engine that influences everything from digital billboards to mobile app interfaces.
How AI Graphic Design Works Behind the Scenes

At its core, AI Graphic Design relies on deep learning algorithms that analyze and synthesize patterns. Unlike a human designer who draws inspiration from personal experiences, museums, or mood boards, an AI Graphic Design system draws inspiration from billions of data points.
When a user types a prompt into an AI Graphic Design platform, the software doesn’t simply copy and paste existing images from the internet. Instead, it references its neural network to understand what concepts like “minimalist,” “cyberpunk,” or “art deco” actually mean in terms of geometry, contrast, and color theory. The AI Graphic Design engine then generates an entirely new image from scratch, refining random noise into a coherent structural composition that aligns with the user’s intent.
Furthermore, predictive AI Graphic Design tools can analyze user behavior on websites to automatically adjust layout elements, button placements, and visual hierarchies in real-time. This branch of AI Graphic Design blends data science with aesthetic intuition, allowing for hyper-personalized visual experiences that adapt to the viewer’s preferences instantly.
Empowering Creators: The Core Benefits of AI Graphic Design

The rapid adoption of Graphic Design across creative agencies and freelance ecosystems is driven by several distinct advantages. Rather than hindering the creative process, these systems act as massive force multipliers for those who learn to master them.
1. Unprecedented Speed and Efficiency
The most obvious benefit of AI Graphic Design is the elimination of time-consuming, repetitive tasks. In traditional workflows, resizing assets for twenty different social media formats, removing backgrounds from product photos, or color-correcting a massive catalog could take days. With Graphic Design automation, these tasks are completed in milliseconds, allowing design teams to fulfill demanding production schedules without burning out.
2. Democratization of Visual Expression
Historically, bringing a complex visual concept to life required technical proficiency in vector drawing, spatial composition, and rendering software. Graphic Design lowers the barrier to entry, enabling entrepreneurs, writers, and small business owners to articulate their visions visually without needing an enterprise-level budget. This democratization ensures that great ideas aren’t bottlenecked by a lack of technical drafting skills.
3. Hyper-Personalization at Scale
Modern marketing demands tailored content for highly specific audience segments. Graphic Design enables dynamic content creation, where a single master concept can be spun into thousands of localized, culturally relevant variations automatically. Through AI Graphic Design, brands can test variations of imagery, typography, and layouts simultaneously to see what resonates best with different demographic subsets.
4. Overcoming the “Blank Canvas” Syndrome
Every creator dreads the stagnation that comes with staring at a blank screen. AI Graphic Design serves as an exceptional brainstorming companion. By generating dozens of variations based on a vague conceptual phrase, Graphic Design gives professionals an immediate foundation to critique, alter, and build upon, drastically shortening the ideation phase of a project.
Redefining the Role of the Human Designer
A common narrative surrounding AI Graphic Design is the fear of total automation leading to widespread displacement of human workers. While it is true that entry-level production roles are shifting, the demand for human ingenuity has never been higher. The role of the designer is evolving from a technical executor to a creative director.
Traditional Workflow: Ideation ➔ Manual Drafting ➔ Iterative Execution ➔ Final Asset
AI-Augmented Workflow: Ideation ➔ AI Prompting & Curation ➔ Human Refinement ➔ Final Asset
In an era where anyone can generate a pretty picture using AI Graphic Design, the value of a design no longer lies solely in its execution. Instead, value is found in the strategy, emotional resonance, brand consistency, and cultural context behind the visual. A human professional understands why a certain color palette connects with an audience on a psychological level, whereas an AI Graphic Design algorithm only knows that those colors statistically complement each other.
Therefore, the most successful creatives of tomorrow will not be those who fight against AI Graphic Design, but those who integrate it into their toolkits. By leveraging AI Graphic Design to handle production mechanics, human designers free up cognitive bandwidth to focus on brand storytelling, user psychology, and high-level creative direction.
Major Pillars of AI Graphic Design Technology

To truly understand how deeply Graphic Design has integrated into the creative pipeline, we must examine the specific modalities where it operates. It is not a monolithic technology, but rather a collection of specialized applications.
Generative Layout and UI/UX

Designing web interfaces and mobile applications requires strict adherence to usability guidelines, grid systems, and responsiveness. Modern AI Graphic Design tools can take a text-based wireframe description and instantly output fully coded, responsive user interfaces. These AI Graphic Design frameworks automatically calculate ideal padding, typography scales, and contrast ratios to ensure accessibility compliance right out of the box.
Automated Typography and Branding
Choosing the right typeface is critical to a brand’s voice. Specialized AI Graphic Design systems analyze a company’s mission statement, target industry, and emotional tone to recommend or generate entirely unique typefaces. Additionally, AI Graphic Design engines can instantly generate cohesive brand style guides, mapping out brand hierarchies, logo placements, and iconography sets based on minimal baseline inputs.
Vector Asset Generation
For a long time, generating clean, scalable vector graphics was a major hurdle for artificial intelligence, as neural networks naturally excel at pixel-based raster imagery. However, recent breakthroughs in AI Graphic Design allow for the direct generation of mathematical vector paths. This means AI Graphic Design can now produce logos, icons, and scalable illustrations that can be infinitely resized without losing quality, matching the exact technical requirements of professional print and digital media.
AI Graphic Design in Branding, Marketing, and Advertising
The corporate world has embraced AI Graphic Design with open arms, primarily because it directly addresses the modern demand for infinite content streams. Marketing campaigns that previously required months of coordination can now pivot in real-time based on live data feeds, thanks to agile AI Graphic Design workflows.
Consider a global retail brand launching a seasonal campaign. By using AI Graphic Design, their marketing team can automatically generate localized visual assets tailored to the weather patterns, regional subcultures, and trending aesthetics of hundreds of cities simultaneously. The core brand guidelines remain locked in place by the AI Graphic Design framework, ensuring absolute brand consistency while maximizing local relevance.
Furthermore, A/B testing has reached hyper-sophistication. Instead of testing two human-designed banners, conversion rate optimization specialists can use AI Graphic Design to generate and deploy hundreds of micro-variations of a single landing page layout, analyzing micro-interactions to permanently optimize the visual real estate for higher engagement.
The Ethical Challenges of AI Graphic Design
No discussion about Graphic Design is complete without addressing the immense ethical, legal, and social hurdles that accompany its rapid rise. Because these systems learn by synthesizing vast repositories of human-created data, they exist in a legally complex grey area.
Copyright Infringement and Data Provenance
Many AI Graphic Design models were trained on publicly available internet data without the explicit consent, compensation, or attribution of the original creators. This has led to intense pushback from the global art community. When an AI Graphic Design tool produces an image “in the style of” a living freelance illustrator, it directly competes with that artist using their own intellectual property against them.
Intellectual Property Ownership of AI Output
Another unresolved legal question is who actually owns the copyright of an image generated by AI Graphic Design. Is it the software developer who built the algorithm? Is it the user who typed the prompt? Or is the output completely uncopyrightable and part of the public domain? Courts worldwide are currently grappling with these questions, making businesses cautious about using unverified AI Graphic Design assets for proprietary commercial purposes.
Deepfakes, Misinformation, and Visual Manipulation
The sheer realism achievable by modern AI Graphic Design tools presents significant societal risks. The ease with which bad actors can synthesize hyper-realistic deceptive imagery, forged historical documents, or non-consensual altered photos means that public trust in visual media is deteriorating. As AI Graphic Design becomes more powerful, the industry must develop robust watermarking standards and cryptographic provenance protocols to verify authentic human media from synthetic creations.
Best Practices for Integrating AI Graphic Design into Professional Workflows
For agencies and independent creators looking to adopt AI Graphic Design without compromising their creative integrity or legal standing, a balanced framework is necessary.
- Use AI for Ideation, Not Final Output: Treat AI Graphic Design as an ultra-fast mood board creator. Use it to explore conceptual directions, color schemes, and compositions, but execute the final client-facing deliverables manually or through verified, legally clean toolsets.
- Opt for Ethical AI Models: Prioritize AI Graphic Design tools that are trained exclusively on licensed stock libraries or public domain data where creators have been fairly compensated or given opt-out mechanisms.
- Focus on Custom Refinement: Never present a raw, unedited piece of Graphic Design output as a finished product. Inject human craft, custom typography, vector refinement, and conceptual polish to elevate the asset into something distinctly unique.
- Maintain Transparency with Clients: Clearly outline in your creative contracts how and when Graphic Design tools are utilized in your production pipeline. Transparency builds long-term professional trust.
The Future of Creative Work in an AI-Driven World
As we look toward the horizon, the trajectory of Graphic Design points toward complete, multi-modal integration. We are moving away from isolated tools where a user inputs text to get a single image, and toward holistic, real-time creative operating systems.
In the near future, an architect or interior designer might use Graphic Design to mock up a spatial environment, which instantly generates the branding assets, the wayfinding signage, the web interface, and the promotional video campaign all in one unified, interconnected workflow. The barriers between different creative disciplines—such as graphic design, 3D modeling, filmmaking, and copy editing—will continue to blur.
Ultimately, AI Graphic Design will not kill human creativity; it will amplify it. By taking over the heavy lifting of manual execution, it challenges humanity to dream bigger, think more critically, and push the boundaries of what visual storytelling can achieve. The future of creative work belongs not to the machine alone, nor to the traditionalist who rejects progress, but to the hybrid creator who masterfully guides technology with human empathy, intent, and soul.
Frequently Asked Questions About AI Graphic Design
What is AI Graphic Design exactly?
AI Graphic Design refers to the application of artificial intelligence, machine learning algorithms, and deep neural networks to assist, automate, or completely generate visual assets, layouts, typography choices, and overall creative design compositions.
Will AI Graphic Design completely replace human graphic designers?
No, it will not replace human designers entirely, but it is radically changing their job descriptions. While basic production roles are shifting to automation, high-level strategy, human empathy, emotional branding, and conceptual thinking still require a human touch that cannot replicate.
Can I legally copyright imagery generated by AI Graphic Design?
Legal frameworks vary by country, but in many major jurisdictions, purely machine-generated outputs cannot be copyrighted because they lack human authorship. However, if a designer significantly alters, edits, or integrates the output into a larger, complex human-created piece, that final composite may be eligible for copyright protection.
Which are the most popular AI Graphic Design tools available today?
Prominent platforms include Midjourney and Stable Diffusion for concept generation; Adobe Firefly, which is built directly into Photoshop and Illustrator with an emphasis on commercial safety; and platforms like Canva and Figma, which utilize integrated features to automate layouts, copywriting variations, and photo editing.
How can traditional graphic designers start learning AI Graphic Design?
The best way to start is by experimenting with prompting techniques in generative tools, exploring the integrated AI features within standard industry software like Adobe Creative Cloud, and studying how to use automated layout assistants to speed up daily workflows. Embracing these systems early builds a massive competitive advantage.
7 Modern UI Design Trends 2026 That Make Websites Look Premium
Introduction
The digital world is evolving faster than ever, and businesses are constantly searching for ways to make their websites look more luxurious, interactive, and trustworthy. In 2026, user expectations are no longer limited to fast-loading websites and responsive layouts. Users now expect immersive experiences, clean aesthetics, intuitive navigation, and emotionally engaging interfaces. That is exactly why Modern UI Design Trends 2026 are becoming one of the most important topics for designers, developers, startups, agencies, and brands.
Modern websites are no longer simple information pages. They are digital experiences that communicate a brand’s identity, quality, and professionalism within seconds. If a website looks outdated, visitors instantly lose trust. However, when a website follows the latest Modern UI Design Trends 2026, it immediately feels premium, modern, and credible.
The newest UI trends focus heavily on user psychology, smooth interactions, minimal layouts, AI-powered personalization, immersive animations, accessibility, and futuristic visual aesthetics. These trends are not only about making websites beautiful. They also improve engagement, conversion rates, retention, and overall user experience.
Many global companies are already redesigning their platforms according to Modern UI Design Trends 2026 because premium interfaces help brands stand out in a competitive market. Whether you run a blog, SaaS platform, eCommerce store, portfolio website, agency site, or startup landing page, implementing these UI trends can dramatically improve your website performance and visual appeal.
In this detailed guide, you will discover the top 7 Modern UI Design Trends 2026 that are dominating the web design industry. Each trend is explained in detail with benefits, practical applications, and ideas you can implement immediately.
-
Glassmorphism 2.0 Interfaces

One of the biggest Modern UI Design Trends 2026 is the evolution of Glassmorphism. While glass-style interfaces started gaining popularity a few years ago, 2026 introduces a more refined and premium version known as Glassmorphism 2.0.
This trend focuses on frosted-glass effects, blurred backgrounds, layered transparency, smooth shadows, and soft gradients. Websites using this design style instantly feel futuristic and luxurious. Instead of flat design elements, interfaces now create depth and realism.
Premium SaaS websites, fintech dashboards, crypto platforms, and AI startup websites are heavily using this trend because it creates a sophisticated visual identity. Modern Glassmorphism combines transparency with subtle animations and dynamic lighting effects to produce highly engaging interfaces.
The reason this trend dominates Modern UI Design Trends 2026 is because users are now attracted to immersive digital environments. Frosted glass cards floating over colorful backgrounds create a premium user experience that feels interactive and modern.
Another reason Glassmorphism continues growing is its compatibility with dark mode interfaces. The blurred transparent layers look extremely elegant on dark backgrounds, which further enhances the premium feel of websites.
Designers implementing this trend should focus on:
- Soft background blur
- Layered depth
- Minimal text
- Rounded corners
- Smooth hover animations
- Subtle gradients
- Soft shadow systems
When used correctly, Glassmorphism makes websites feel expensive, modern, and highly interactive.
-
AI-Powered Personalized Modern UI Design Trends 2026 UI

Artificial intelligence is completely transforming web experiences, making AI-powered interfaces one of the leading Modern UI Design Trends 2026.
Modern websites now adapt dynamically based on user behavior, preferences, location, browsing history, and interaction patterns. Instead of showing the same layout to every visitor, AI-driven interfaces personalize content and design elements automatically.
For example:
- eCommerce websites recommend products intelligently
- SaaS dashboards customize layouts
- Streaming platforms personalize recommendations
- Blogs adapt content categories
- Landing pages optimize CTAs dynamically
The integration of AI into UI design creates a highly personalized and premium browsing experience. Visitors feel understood, which increases trust and engagement.
In Modern UI Design Trends 2026, personalization is becoming essential because users expect experiences tailored specifically for them. Generic websites are slowly becoming outdated.
AI-powered interfaces also improve:
- User retention
- Conversion rates
- Session duration
- Customer satisfaction
- Navigation efficiency
The visual side of AI interfaces also matters. Many modern websites now use intelligent micro-interactions, predictive search systems, chatbot integrations, adaptive color themes, and real-time UI adjustments.
This trend is especially powerful for businesses wanting to create premium user journeys and modern digital ecosystems.
-
Dark Mode With Neon Accents

Dark mode continues dominating Modern UI Design Trends 2026, but now designers are combining it with vibrant neon accents and futuristic color palettes.
This trend creates a premium cyber-futuristic appearance that feels modern, immersive, and visually powerful. Instead of plain dark backgrounds, websites now use:
- Neon gradients
- Glowing buttons
- Electric blue accents
- Purple highlights
- Animated lighting effects
- Futuristic typography
The combination of dark interfaces and vibrant accents creates high visual contrast, improving readability and user engagement.
Dark mode websites are also easier on the eyes, especially during nighttime browsing. That is why users increasingly prefer dark-themed interfaces.
One reason this trend dominates Modern UI Design Trends 2026 is because it aligns perfectly with modern technology brands, AI startups, gaming websites, fintech platforms, and creative portfolios.
Designers are now experimenting with:
- Animated neon borders
- Glow effects
- Futuristic icons
- Dynamic gradients
- Interactive lighting systems
This visual style instantly makes websites look advanced and premium.
To implement this trend successfully:
- Use dark gray instead of pure black
- Limit neon colors to key highlights
- Keep typography clean
- Avoid excessive glow effects
- Focus on readability
When balanced correctly, dark mode with neon accents creates stunning digital experiences.
-
3D Interactive Elements

Among all Modern UI Design Trends 2026, interactive 3D elements are becoming one of the most attention-grabbing innovations.
Modern websites are no longer static. Designers now use 3D graphics, interactive models, immersive product showcases, floating objects, and motion-based interactions to create engaging user experiences.
Thanks to improved browser technology and faster devices, websites can now handle advanced 3D visuals without sacrificing performance.
This trend is highly popular in:
- Product landing pages
- Fashion websites
- Luxury brands
- Technology startups
- Gaming websites
- Portfolio websites
Interactive 3D elements create a sense of realism and immersion. Users spend more time exploring websites that feel dynamic and interactive.
Many brands now use:
- Mouse-reactive animations
- Floating 3D cards
- Interactive product viewers
- Scroll-triggered 3D scenes
- Immersive storytelling sections
The reason this trend stands out in Modern UI Design Trends 2026 is because it transforms websites into digital experiences instead of simple pages.
However, designers must optimize carefully because excessive 3D effects can slow down websites. Performance optimization remains critical.
The best approach is using lightweight 3D interactions selectively to enhance storytelling and user engagement.
-
Minimalism With Bold Typography

Minimalism remains one of the strongest foundations of Modern UI Design Trends 2026, but the new version focuses heavily on bold typography and expressive layouts.
Instead of overcrowded interfaces, modern websites are now using:
- Large headlines
- Clean white space
- Minimal color palettes
- Editorial-style layouts
- Oversized typography
- High readability
This trend creates a premium and sophisticated look while improving user focus and content hierarchy.
Users today prefer simple interfaces that communicate messages quickly. Overcomplicated layouts often reduce engagement and increase bounce rates.
Modern minimalist design helps brands appear:
- Professional
- Elegant
- Luxurious
- Trustworthy
- Modern
Typography now plays a central role in branding and storytelling. Large text sections combined with clean layouts create strong visual impact.
In Modern UI Design Trends 2026, designers are increasingly using typography as a design element itself instead of simply displaying text.
This trend works exceptionally well for:
- Agency websites
- Luxury brands
- Fashion websites
- Architecture firms
- Creative portfolios
- Startup landing pages
To achieve the premium minimalist look:
- Use strong typography hierarchy
- Add sufficient white space
- Limit unnecessary elements
- Focus on clean navigation
- Use modern fonts
Minimalism with bold typography creates timeless website aesthetics that feel modern and elegant.
-
Scroll-Based Storytelling

Scroll-based storytelling is redefining user engagement and has become one of the fastest-growing Modern UI Design Trends 2026.
Instead of static page sections, websites now reveal content dynamically as users scroll. This creates an immersive storytelling experience similar to cinematic presentations.
Modern scroll interactions include:
- Parallax effects
- Animated transitions
- Text reveals
- Sticky sections
- Motion graphics
- Scroll-triggered animations
- Interactive scenes
This design trend keeps users engaged because each scroll movement reveals new visual experiences.
Many premium brands now use scroll storytelling to:
- Present products
- Explain services
- Showcase portfolios
- Highlight company journeys
- Improve engagement
The reason this trend dominates Modern UI Design Trends 2026 is because users now expect interactive experiences rather than static browsing.
When executed correctly, scroll storytelling can dramatically improve:
- Time on site
- User engagement
- Brand perception
- Emotional connection
- Conversion rates
However, designers should avoid overusing animations because excessive motion can harm usability and accessibility.
The key is balancing storytelling with performance optimization and intuitive navigation.
-
Micro-Interactions and Motion UI

Micro-interactions are small animations and responses triggered by user actions. In Modern UI Design Trends 2026, they are becoming essential for creating premium digital experiences.
These interactions may seem small, but they significantly improve user engagement and usability.
Examples include:
- Hover animations
- Button feedback
- Smooth transitions
- Loading animations
- Animated icons
- Swipe effects
- Interactive cursors
Motion UI adds personality and responsiveness to websites. It helps users understand actions, navigation flow, and interface behavior more intuitively.
Premium websites now use subtle animations to create smoother experiences that feel polished and professional.
The reason this trend is central to Modern UI Design Trends 2026 is because users now expect interfaces to feel alive and interactive.
Modern motion systems focus on:
- Smooth easing
- Natural transitions
- Responsive feedback
- Fluid navigation
- Elegant animations
Good micro-interactions improve:
- User satisfaction
- Navigation clarity
- Engagement
- Conversion rates
- Brand identity
However, animations should always support usability rather than distract users.
Subtle and purposeful motion design creates a highly premium feel without overwhelming the interface.
Why Modern UI Design Matters in 2026
The importance of Modern UI Design Trends 2026 goes far beyond aesthetics. A premium interface directly impacts:
- User trust
- SEO performance
- Website engagement
- Conversion optimization
- Brand identity
- Bounce rate reduction
Search engines increasingly prioritize user experience signals. Websites with modern interfaces, fast interactions, responsive layouts, and engaging designs tend to perform better in search rankings.
Premium UI design also helps businesses establish authority and professionalism in competitive industries.
Brands that ignore Modern UI Design Trends 2026 risk appearing outdated and losing customers to competitors with better digital experiences.
Best Practices for Implementing Modern UI Design Trends 2026
To successfully implement Modern UI Design Trends 2026, focus on the following:
Prioritize User Experience
Visual design should always support usability.
Optimize Performance
Heavy animations and large graphics should be optimized carefully.
Maintain Accessibility
Ensure your design works for all users.
Use Consistent Branding
Keep colors, typography, and design elements consistent.
Focus on Mobile Responsiveness
Mobile-first design remains essential.
Avoid Overdesign
Too many effects can hurt usability.
Conclusion
The future of web design is immersive, intelligent, interactive, and visually sophisticated. The top Modern UI Design Trends 2026 are transforming ordinary websites into premium digital experiences that engage users and build stronger brands.
From Glassmorphism 2.0 and AI-powered personalization to dark mode neon aesthetics, 3D interactions, minimalist typography, scroll storytelling, and micro-interactions, these trends are defining the next generation of web design.
Businesses, designers, and developers who adopt Modern UI Design Trends 2026 early will gain a significant competitive advantage in branding, engagement, and user experience.
If you want your website to look premium, modern, and future-ready, now is the perfect time to start implementing these UI trends.
FAQs
What are Modern UI Design Trends 2026?
Modern UI Design Trends 2026 refer to the latest user interface styles, technologies, and visual experiences shaping modern websites and applications in 2026.
Why are Modern UI Design Trends 2026 important?
They improve user experience, engagement, conversion rates, and brand perception while making websites look more premium and modern.
Which industries benefit most from Modern UI Design Trends 2026?
Industries such as SaaS, eCommerce, fintech, AI startups, gaming, fashion, and creative agencies benefit greatly from modern UI trends.
Is dark mode still popular in 2026?
Yes, dark mode combined with neon accents remains one of the most powerful Modern UI Design Trends 2026.
How does AI impact Modern UI Design Trends 2026?
AI helps personalize interfaces, improve recommendations, automate layouts, and create smarter user experiences.
Are 3D website elements good for SEO?
3D elements can improve engagement, but they must be optimized carefully to avoid slowing down website performance.
What is the biggest Modern UI Design Trend 2026?
AI-powered personalization and immersive interactive experiences are among the biggest trends dominating web design in 2026.
Can small businesses implement Modern UI Design Trends 2026?
Yes, even small businesses can apply modern UI principles like minimalism, dark mode, typography improvements, and micro-interactions to create premium websites.
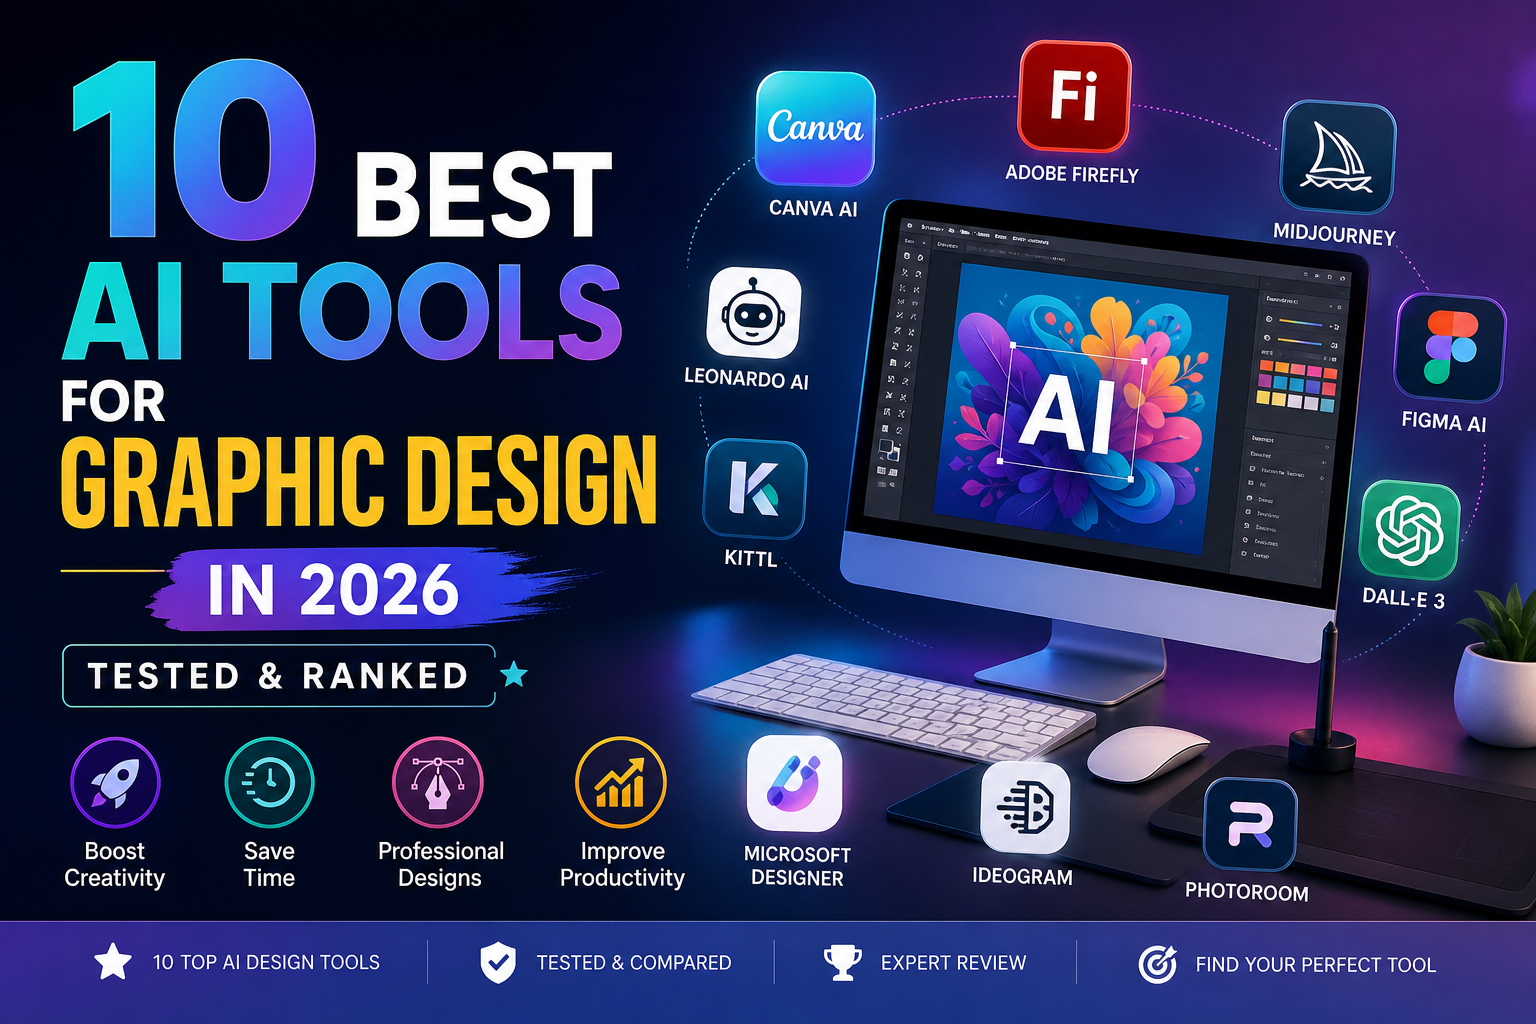
10 Best AI Tools for Graphic Design in 2026 (Tested & Ranked)
Artificial Intelligence has completely transformed the design industry. In 2026, graphic designers are no longer spending hours manually creating visuals — instead, they are leveraging powerful AI tools to automate workflows, generate ideas, and produce high-quality designs in minutes. The rise of AI-powered design platforms has made it easier for beginners, freelancers, and professionals alike to create stunning visuals without extensive technical skills.
In this comprehensive guide, we will explore the 10 Best AI Tools for Graphic Design in 2026. These tools are tested, ranked, and analyzed based on performance, features, ease of use, pricing, and real-world usability. Whether you are a beginner or an expert designer, this article will help you choose the best tool for your workflow.
Why 10 Best AI Tools for Graphic Design Are Essential for Designers in 2026
The demand for faster content creation has pushed designers toward AI-powered solutions. Today, AI tools can generate images, create layouts, remove backgrounds, and even design entire branding kits automatically.
According to recent industry insights, AI tools significantly reduce repetitive tasks such as resizing, editing, and generating design variations, allowing designers to focus more on creativity and strategy. (ToolChase)
This is why the 10 Best AI Tools for Graphic Design are becoming essential for anyone working in digital design, marketing, or content creation.
1. Canva AI (Magic Studio) — Best All-in-One Tool
Canva AI remains one of the 10 Best AI Tools for Graphic Design because of its simplicity and powerful features. It is perfect for beginners and professionals who want quick results.
Canva’s Magic Studio allows users to generate designs from text prompts, remove backgrounds, and even animate graphics instantly. With millions of templates and assets, it’s ideal for social media graphics, presentations, and branding. (tasarim.ai)
Key Features:
- Magic Design (AI-generated layouts)
- Text-to-image generator
- Background remover
- Drag-and-drop editor
Best For: Beginners and marketers
2. Adobe Firefly — Best for Professionals
Adobe Firefly is one of the most powerful tools in the 10 Best AI Tools for Graphic Design list, especially for professionals already using Adobe Creative Cloud.
It integrates seamlessly with Photoshop and Illustrator, offering generative fill, text-to-image, and advanced editing features. It is also trained on licensed data, making it safer for commercial use. (BuildPilot)
Key Features:
- Generative fill
- Style transfer
- Commercial-safe outputs
- Deep Adobe integration
Best For: Professional designers
3. Midjourney — Best for Creative Concepts
Midjourney is widely considered one of the 10 Best AI Tools for Graphic Design for generating high-quality artistic visuals.
Designers use it for mood boards, concept art, and creative exploration. Its ability to produce visually stunning images makes it a favorite among artists. (AI Tools Capital)
Key Features:
- High-quality image generation
- Style consistency
- Artistic rendering
Best For: Concept designers
4. Figma AI — Best for UI/UX Designers
Figma AI is a must-have in the 10 Best AI Tools for Graphic Design list for UI/UX professionals.
It helps designers generate layouts, automate design systems, and collaborate in real-time. It also integrates with plugins for enhanced productivity. (ToolChase)
Key Features:
- AI layout generation
- Real-time collaboration
- Design automation
Best For: UI/UX design
5. DALL·E 3 — Best for Beginners
DALL·E 3 is one of the easiest tools in the 10 Best AI Tools for Graphic Design category.
It allows users to generate images using simple text prompts, making it perfect for beginners who want quick results without technical knowledge. (AI Profit Labs)
Key Features:
- Text-to-image generation
- Easy prompt-based editing
- High-quality outputs
Best For: Beginners
6. Leonardo AI — Best Budget Option
Leonardo AI is among the 10 Best AI Tools for Graphic Design for those looking for affordability and flexibility.
It offers a free plan with daily credits and supports multiple design styles, including gaming assets and illustrations. (designshifu.com)
Key Features:
- Free plan available
- Multiple art styles
- Fast rendering
Best For: Budget users
7. Microsoft Designer — Best Free Tool
Microsoft Designer is a strong competitor in the 10 Best AI Tools for Graphic Design category, offering free AI-powered design features.
It allows users to create social media graphics, presentations, and marketing materials quickly using AI suggestions. (tasarim.ai)
Key Features:
- Free AI design tools
- Quick templates
- Easy interface
Best For: Free users
8. Kittl — Best for Typography Design
Kittl is one of the 10 Best AI Tools for Graphic Design known for its typography and logo design capabilities.
It provides advanced text editing tools and AI-powered design suggestions for branding projects.
Key Features:
- Typography tools
- Logo creation
- Vector editing
Best For: Branding designers
9. Ideogram — Best for Text-Based Designs
Ideogram stands out in the 10 Best AI Tools for Graphic Design for its ability to generate images with accurate text.
This makes it ideal for posters, ads, and social media content.
Key Features:
- Accurate text rendering
- AI-generated posters
- Creative layouts
Best For: Text-heavy designs
10. PhotoRoom — Best for Product Design
PhotoRoom completes the 10 Best AI Tools for Graphic Design list with its powerful product image editing features.
It is widely used for eCommerce and marketing visuals.
Key Features:
- Background removal
- Product mockups
- Batch editing
Best For: eCommerce
Comparison Table: 10 Best AI Tools for Graphic Design
| Tool | Best For | Pricing | Skill Level |
|---|---|---|---|
| Canva AI | All-in-one | Freemium | Beginner |
| Adobe Firefly | Professionals | Paid | Advanced |
| Midjourney | Concept art | Paid | Intermediate |
| Figma AI | UI/UX | Freemium | Advanced |
| DALL·E 3 | Beginners | Freemium | Beginner |
| Leonardo AI | Budget | Freemium | Intermediate |
| Microsoft Designer | Free tools | Free | Beginner |
| Kittl | Typography | Paid | Intermediate |
| Ideogram | Text design | Freemium | Intermediate |
| PhotoRoom | Product design | Freemium | Beginner |
How to Choose the Right AI Tool
When selecting from the 10 Best AI Tools for Graphic Design, consider these factors:
- Purpose: Social media, branding, UI/UX, or product design
- Skill level: Beginner vs professional
- Budget: Free vs paid tools
- Features: Automation, templates, integrations
Future of AI in Graphic Design
The future of design is heavily influenced by AI. Tools are becoming smarter, faster, and more intuitive. New advancements are focusing on automation, collaboration, and real-time editing.
However, AI is not replacing designers — it is enhancing their capabilities and allowing them to work more efficiently. (ToolChase)
Final Verdict
The 10 Best AI Tools for Graphic Design in 2026 offer something for everyone — from beginners to professionals. Tools like Canva AI and Adobe Firefly dominate the market, while Midjourney and Leonardo AI provide creative flexibility.
If you are just starting, go with Canva or DALL·E 3.
If you are a professional, Adobe Firefly and Figma AI are your best options.
Conclusion
The rise of AI has made graphic design more accessible than ever before. By using the 10 Best AI Tools for Graphic Design, you can create high-quality visuals, save time, and boost productivity.
Whether you are a freelancer, business owner, or content creator, these tools will help you stay ahead in 2026 and beyond.
-

 Graphics Design2 years ago
7.Exploring the Importance of Color Theory Charts
-

 Graphics Design12 months ago
Top 10 Best Graphic Design Tools for Beginners in 2025 (Free & Paid)
-

 Graphics Design2 years ago
10 Stunning Gradient Design Trends You Need to Know in 2024
-

 Graphics Design11 months ago
15 Freelance Graphic Design Tips to Boost Your Career in 2025
-

 Graphics Design2 years ago
29.Retro Design Is Making a Comeback in Modern Spaces
-

 Graphics Design1 year ago
Best Laptops for Graphic Designers – 2025 Buying Guide
-

 Graphics Design1 year ago
2025 Logo Design Trends: What’s In, What’s Out?
-

 Graphics Design2 years ago
15.The Importance of Effective Flyer Design in Marketing
Ny weekly
August 23, 2024 at 2:09 pm
Ny weekly This was beautiful Admin. Thank you for your reflections.
dodb buzz
October 15, 2024 at 8:09 am
dodb buzz You’re so awesome! I don’t believe I have read a single thing like that before. So great to find someone with some original thoughts on this topic. Really.. thank you for starting this up. This website is something that is needed on the internet, someone with a little originality!