
Graphics Design
Illustrator Pen Tool Guide: How to Master It Step by Step (2026)

Illustrator Pen Tool Guide: How to Master It Step by Step (2026)
If you have ever tried to draw a smooth curve in Adobe Illustrator and ended up with a wobbly mess, you are not alone. The Pen Tool is the most powerful tool in the program, and it is also the one that frustrates beginners the most.
This Illustrator Pen Tool Guide will change that. You will learn every part of the tool in plain language, from your first click to advanced path editing.
By the end, you will be able to draw logos, icons, and illustrations with clean, professional vector paths. No guesswork, no shortcuts that fall apart later. That is the promise of this Illustrator Pen Tool Guide.
Whether you are a student, a freelance designer, or a business owner creating your own branding, this Illustrator Pen Tool Guide gives you a repeatable system. Follow it in order, practice each step, and the tool will start to feel natural. The Illustrator Pen Tool Guide is built for exactly that.
What Is the Pen Tool in Illustrator?

The Pen Tool is a drawing tool that creates vector paths. A path is a line or shape built from mathematical points rather than pixels.
Because paths are mathematical, they scale to any size without losing quality. This is why the Illustrator Pen Tool Guide matters for professional work. A logo drawn with the Pen Tool looks equally sharp on a business card and on a billboard.
You can find the tool in the toolbar on the left side of the screen. Its keyboard shortcut is the letter P.
Every Illustrator Pen Tool Guide starts with this basic idea. You place points, and Illustrator connects them with lines or curves. Your job is to control where the points go and how the curves bend.
The Pen Tool works in two modes. You can click to make sharp corners, or click and drag to make smooth curves. Mastering the difference between those two actions is the heart of this entire tutorial.
Why Mastering the Pen Tool Matters
Many Illustrator tools are quick and easy, such as the Rectangle Tool or the Ellipse Tool. So why spend time learning something harder?
The answer is control. Control is the main reward of the Illustrator Pen Tool Guide. The Pen Tool lets you draw any shape you can imagine, not just the ones Illustrator provides.
Here is what you gain when you learn it properly:
- Custom logo design. Unique marks need custom shapes, and custom shapes need the Pen Tool.
- Clean tracing. You can trace sketches, photos, and hand-drawn artwork with precision.
- Fewer anchor points. Skilled users draw smoother shapes with fewer points, which means lighter files and easier edits.
- Professional results. Clients and employers can instantly tell the difference between careful path work and auto-generated shapes.
Treat the Illustrator Pen Tool Guide as an investment. The hours you spend now will save you far more time on every future project.
Setting Up Your Workspace

Before you draw anything, a few small settings will make learning much easier.
Create a Practice Document
Go to File > New and choose a standard size such as A4 or 1920 x 1080 pixels. Pick RGB for screen work or CMYK for print work.
Set Fill and Stroke Correctly
When learning, turn the fill off and use a visible stroke. A black stroke with no fill lets you see every segment clearly.
Select the Pen Tool, then set the fill to none and the stroke to black. Set the stroke weight to 2 pt for easy viewing.
Turn On Smart Guides
Press Ctrl + U on Windows or Cmd + U on Mac. Smart Guides show you helpful hints such as “anchor” and “path” when your cursor lands on the right spot.
Show the Grid
Press Ctrl + ‘ on Windows or Cmd + ‘ on Mac to display the grid. A grid helps you place points evenly while you practice. A tidy setup makes the Illustrator Pen Tool Guide easier.
Open the Properties Panel
Choose Window > Properties. This panel shows the options you need most, and it saves you from hunting through menus.
With these settings in place, the rest of this Illustrator Pen Tool Guide will be much easier to follow.
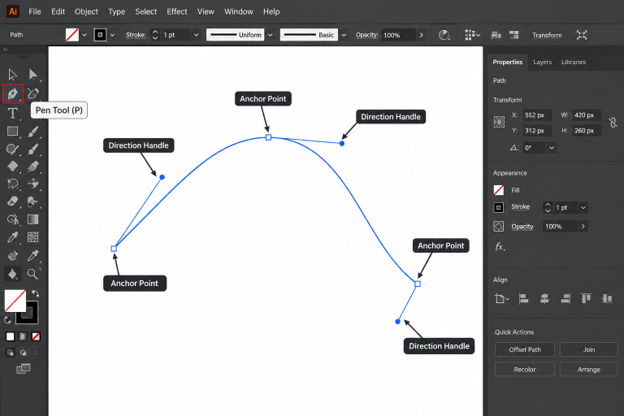
Anchor Points, Segments, and Handles Explained
Before you click anything, you need to understand the three building blocks of every path.
Image suggestion: an annotated diagram labeling an anchor point, a segment, and two direction handles.
Anchor Points
An anchor point is a small square that marks a position on the path. Think of it as a pin holding the line in place. Keep this image in mind through the rest of the Illustrator Pen Tool Guide.
There are two main types. A corner point creates a sharp angle. A smooth point creates a flowing curve.
Segments
A segment is the line between two anchor points. It can be straight or curved depending on the points at each end. Segments are central to the Illustrator Pen Tool Guide.
Direction Handles
Direction handles are the thin lines with round dots that appear when you drag. They control how a curve leaves and enters an anchor point.
The length of a handle controls how wide the curve is. The angle of a handle controls the direction of the curve. Handles are the most important concept in the Illustrator Pen Tool Guide.
Understanding these three parts is the foundation of this Illustrator Pen Tool Guide. Almost every mistake beginners make comes from not understanding what the handles are doing.
How to Draw Straight Lines
Straight lines are the easiest place to start. They teach you how clicks create points before you add the complexity of curves.
Step 1: Select the Pen Tool
Press P or click the Pen Tool in the toolbar. Step one of the Illustrator Pen Tool Guide is always selecting the right tool.
Step 2: Click to Place the First Point
Click once on the artboard. You will see a small anchor point appear. Every Illustrator Pen Tool Guide exercise begins with this single click.
Step 3: Click to Place the Second Point
Move your cursor and click again. Illustrator draws a straight segment between the two points. This simple action is the base of any Illustrator Pen Tool Guide.
Step 4: Hold Shift for Perfect Angles
Hold Shift while you click, and the line snaps to 45-degree angles. This is perfect for drawing exact horizontal, vertical, and diagonal lines.
Step 5: End the Path
To finish an open path, press Enter or click on the Pen Tool in the toolbar again. You can also hold Ctrl or Cmd and click on an empty area.
Practice drawing a zigzag, a star, and a simple house shape. Straight-line work builds the muscle memory you need for the next section of this Illustrator Pen Tool Guide.
How to Draw Curves

Curves are where most people get stuck. The secret is simple: click and drag instead of just clicking. This one idea unlocks the whole Illustrator Pen Tool Guide.
Step 1: Click and Drag the First Point
Click on the artboard to place the starting point, but do not release the mouse. Drag in the direction you want the curve to go, then release.
You will see two handles appear. They point in opposite directions from the anchor.
Step 2: Click and Drag the Second Point
Move your cursor to where the curve should end. Click and drag again, this time pulling in the direction the path should continue.
A smooth curve will appear between the two points.
Step 3: Adjust While You Draw
If the curve looks wrong, press Ctrl + Z or Cmd + Z and try again. Do not be afraid to redo it many times. Redoing is a normal part of any Illustrator Pen Tool Guide.
The Golden Rule of Curves
Place your anchor points at the extremes of the curve. These are the highest, lowest, leftmost, and rightmost points.
Use as few points as possible. Fewer points is the golden thread of the Illustrator Pen Tool Guide. A simple circle needs only four anchor points. Beginners often use ten or more, which makes the shape bumpy.
Handle Length Matters
Short handles create tight curves. Long handles create wide, gentle curves. Handle control is a signature skill from the Illustrator Pen Tool Guide. A good rule is to drag about one-third of the distance to the next anchor point.
This one habit improves almost every Illustrator Pen Tool Guide exercise. When your curves look lumpy, the handles are usually too long, too short, or pointing the wrong way.
Combining Corner and Curve Points
Real shapes use both sharp corners and smooth curves. A heart, a leaf, and a speech bubble all need both.
Going from a Curve to a Corner
After drawing a curve, you need to remove the outgoing handle before placing a sharp corner. Hold Alt on Windows or Option on Mac and click directly on the last anchor point.
This collapses the handle on one side. Your next segment will now start fresh instead of continuing the curve.
Going from a Corner to a Curve
This is simpler. Place a corner point with a normal click, then click and drag at the next point to start a curve. Mixing both is the real test of the Illustrator Pen Tool Guide.
Practice Shape: The Leaf
Draw a leaf with two curved sides that meet at sharp tips. Start at the bottom tip, curve up the left side, make a corner at the top, then curve down the right side and close the path.
This is one of the best exercises in the entire Illustrator Pen Tool Guide because it forces you to switch between point types.
Practice Shape: The Heart
A heart has two curved lobes, one sharp point at the bottom, and a dip at the top. Use four anchor points and adjust the handles until the shape feels balanced.
Do not worry if your first attempts look rough. Everyone’s early hearts are lopsided. Keep going with the Illustrator Pen Tool Guide and they will improve.
Closing Paths and Working with Open Paths

A path can be open or closed. An open path has two loose ends, like a line. A closed path forms a complete loop, like a circle.
How to Close a Path
Move your cursor over the first anchor point. A small circle appears next to the Pen icon. Click once, and the path closes.
Only closed paths can hold a fill color evenly. If your shape will not fill properly, check whether the path is really closed.
How to Continue an Open Path
Select the Pen Tool and hover over the end point of an open path. Click on it, and you can keep drawing from that point. This trick is a handy part of the Illustrator Pen Tool Guide.
How to Join Two Open Paths
Select both end points with the Direct Selection Tool, then press Ctrl + J on Windows or Cmd + J on Mac. Illustrator joins them into one path. Joining paths is a useful skill in any Illustrator Pen Tool Guide.
Understanding open and closed paths is a core lesson in this Illustrator Pen Tool Guide, because logos, icons, and lettering all depend on them.
Editing Paths After You Draw Them

Nobody draws a perfect path on the first try. Professional designers draw quickly and then refine. Editing is just as important as drawing in any Illustrator Pen Tool Guide.
The Direct Selection Tool
Press A to switch to the Direct Selection Tool. Click an anchor point to select it, then drag it to a new spot. Click and drag a handle to reshape the curve.
The Add Anchor Point Tool
Press + to add a point on a segment. Use it when a curve needs more control. Add points only where needed, because extra points create lumpy results.
The Delete Anchor Point Tool
Press – to remove a point. Illustrator will adjust the curve to flow smoothly through the remaining points. This is the best fix for overly complicated paths.
The Anchor Point Tool
Press Shift + C to switch to the Anchor Point Tool. Click a smooth point to turn it into a corner. Click and drag on a corner point to turn it into a smooth point.
This tool also lets you move one handle without moving the other, which is vital for shapes that have a curve on one side and a flat edge on the other.
Simplify a Messy Path
Choose Object > Path > Simplify. Illustrator reduces the number of anchor points while keeping the overall shape. Use the slider carefully so you do not lose important detail. Simplify is a favorite of those who master the Illustrator Pen Tool Guide.
A cleaner path is easier to edit, easier to animate, and easier to hand off to other designers. This is why every serious Illustrator Pen Tool Guide teaches editing along with drawing.
Essential Pen Tool Shortcuts

Shortcuts turn a slow workflow into a fast one. Learn these and you will work twice as quickly. Speed is a big benefit of the Illustrator Pen Tool Guide.
| Action | Windows | Mac |
| Pen Tool | P | P |
| Direct Selection Tool | A | A |
| Selection Tool | V | V |
| Anchor Point Tool | Shift + C | Shift + C |
| Add Anchor Point | + | + |
| Delete Anchor Point | – | – |
| Constrain to 45 degrees | Shift | Shift |
| Remove one handle | Alt + click | Option + click |
| Temporarily use Direct Selection | Ctrl | Cmd |
| Join paths | Ctrl + J | Cmd + J |
| Undo | Ctrl + Z | Cmd + Z |
You do not need to memorize everything today. Start with P, A, Shift, and Alt or Option, then add the rest over time. This is the fastest way to apply the Illustrator Pen Tool Guide.
Keep this table nearby while you work through the Illustrator Pen Tool Guide, and shortcuts will soon become second nature.
Pen Tool vs Curvature Tool
Illustrator also includes the Curvature Tool, shortcut Shift + `. Many beginners wonder whether it can replace the Pen Tool.
How the Curvature Tool Works
You click to place points, and Illustrator automatically creates smooth curves between them. There are no handles to manage. To make a corner, you double-click a point.
When to Use the Curvature Tool
It is excellent for quick, organic shapes and for beginners who feel overwhelmed by handles. It is a friendly way to build confidence.
When to Use the Pen Tool
The Pen Tool gives you far more control. For logos, technical illustrations, and precise tracing, it is the industry standard.
Which Should You Learn First?
Learn the Pen Tool. Once you understand it, the Curvature Tool becomes easy. The reverse is not true. Remember this advice from the Illustrator Pen Tool Guide.
That is why this Illustrator Pen Tool Guide focuses on the Pen Tool, while treating the Curvature Tool as a helpful bonus.
Tracing Images with the Pen Tool

Tracing is the best way to practice, and it is also a real professional skill. Every Illustrator Pen Tool Guide should include it. Designers trace sketches, photos, and old logos every day.
Step 1: Place Your Image
Choose File > Place and select your reference image. Resize it so it fills most of the artboard.
Step 2: Dim and Lock the Layer
Open the Layers panel and double-click the image layer. Set the opacity to about 40 percent, then click the lock icon. This stops you from moving the image by accident.
Step 3: Create a New Layer
Add a new layer above the image. Draw all your paths on this layer so your work stays organized.
Step 4: Trace the Main Shapes First
Start with large, simple shapes. Place anchor points at the extremes of each curve, as you learned earlier.
Step 5: Add Detail Last
After the main shapes are done, add smaller details such as eyes, highlights, and textures. Patience is the secret of the Illustrator Pen Tool Guide.
Step 6: Choose Colors
Once the outlines are clean, remove the strokes and apply fill colors. Use the Swatches panel to keep your palette consistent.
Tracing may feel slow at first. Within a few projects, you will notice that your speed and accuracy improve dramatically, which is the whole point of this Illustrator Pen Tool Guide.
Common Mistakes and How to Fix Them

Every learner makes the same handful of mistakes. Knowing them in advance saves a lot of frustration. Consider this list the practical heart of the Illustrator Pen Tool Guide.
Mistake 1: Using Too Many Anchor Points
Beginners add points everywhere. The result is a bumpy, hard-to-edit path. The Illustrator Pen Tool Guide solves this problem with a simple rule.
Fix: Use fewer points and place them at curve extremes. Delete extras with the Delete Anchor Point Tool.
Mistake 2: Handles That Are Too Long
Long handles create wide, floppy curves that overshoot the shape.
Fix: Shorten the handles to about one-third of the distance between points.
Mistake 3: Forgetting to Remove a Handle
You draw a curve, then click for a corner, and the next segment curves unexpectedly.
Fix: Hold Alt or Option and click the last anchor point to remove the outgoing handle before you continue.
Mistake 4: Not Closing the Path
The shape will not fill, or the stroke looks broken at the start point.
Fix: Hover over the first point until the small circle appears, then click.
Mistake 5: Working Without Zooming In
Tiny placement errors become obvious later. Zoom in with Ctrl and + or Cmd and + for detailed sections.
Mistake 6: Giving Up Too Early
The Pen Tool feels awkward for almost everyone at first. Progress comes from steady practice, not talent.
Fixing these six problems will improve your results more than any other change you make while following this Illustrator Pen Tool Guide.
Practice Exercises

Reading is not enough. You must practice with your own hands. The Illustrator Pen Tool Guide works best when you practice each step. Here is a simple plan you can follow. It fits the Illustrator Pen Tool Guide perfectly.
Week 1: Straight Lines and Corners
Draw a zigzag, a star, a triangle, and a house. Use Shift to keep angles exact.
Week 2: Basic Curves
Draw a wave, a circle with four points, an S-curve, and a spiral. Focus on handle length.
Week 3: Mixed Shapes
Draw a leaf, a heart, a cloud, and a teardrop. Practice switching between corner and curve points.
Week 4: Real Projects
Trace a simple logo, a hand-drawn sketch, and an icon. Compare your results with the original and fix any lumpy sections.
Spend 20 to 30 minutes a day. Short, regular practice beats one long weekend session every time. That is the best advice any Illustrator Pen Tool Guide can give. This schedule turns the Illustrator Pen Tool Guide into a real skill rather than just something you read.
Pro Tips for 2026

Once the basics feel comfortable, these tips will help you work like a professional. Treat them as the advanced chapter of the Illustrator Pen Tool Guide.
- Use the Contextual Taskbar. Recent versions of Illustrator show helpful options right next to your selection, saving you trips to the menus.
- Draw with a tablet. A pen tablet makes drawing curves feel more natural, though a mouse works fine.
- Name your layers. Clear names such as “outline” and “details” make complex files easy to manage.
- Use Outline Mode. Press Ctrl + Y or Cmd + Y to see only the paths. This reveals extra points and messy joins.
- Use Pathfinder wisely. Combine simple shapes with Pathfinder, and use the Pen Tool only for the custom parts.
- Save often. Illustrator files can grow large, so save frequently and keep backups.
- Study great work. Look at logos and illustrations by professionals and ask yourself where they placed their points.
Always check the latest Illustrator release notes, because Adobe regularly adds features that can speed up path work. Staying current is a quiet advantage that strengthens any Illustrator Pen Tool Guide.
Troubleshooting Pen Tool Problems
Sometimes the tool does not behave the way you expect. Here are the most common issues and quick solutions. Think of it as the support desk of the Illustrator Pen Tool Guide.
The Pen Tool Draws a Fill Instead of a Line
Your fill is turned on. Set the fill to none and the stroke to a visible color before drawing.
I Cannot See My Path
The stroke may be white or set to none. Select the path and change the stroke color.
Clicking Adds Points to the Wrong Path
If an existing path is selected, the Pen Tool may continue it. Deselect everything with Ctrl + Shift + A or Cmd + Shift + A before starting a new shape.
My Curves Look Jagged
Zoom in and check for too many points or mismatched handles. Use Simplify or delete extra anchors.
The Cursor Does Not Look Like a Pen
Caps Lock can change the cursor to a crosshair. Turn it off and the normal Pen icon returns.
Keep this list handy while you work through the Illustrator Pen Tool Guide, because these small issues cause most of the confusion new users face.
Using the Pen Tool for Logo Design

Logo design is where the Pen Tool earns its reputation. A logo must look perfect at every size, and only clean vector paths can do that.
This part of the Illustrator Pen Tool Guide shows a simple workflow you can reuse for any brand project.
Start with a Sketch
Draw rough ideas on paper first. Scan or photograph your best sketch and place it in Illustrator on a locked layer.
Build Shapes from Simple Parts
Look at the sketch and break it into basic forms such as circles, lines, and curves. Draw each form with as few points as possible.
Keep Curves Consistent
Good logos have a consistent feel. If one curve is tight and another is wide, the mark looks uneven. Compare handle lengths across the whole design.
Check the Design in Outline Mode
Press Ctrl + Y or Cmd + Y to see the raw paths. Look for stray points, overlapping segments, and tiny gaps.
Test at Small and Large Sizes
Zoom out to see how the logo looks at the size of a favicon. Then scale it up to check the details. Clean paths will hold up in both cases.
Save Multiple Versions
Export your logo as SVG, PNG, and PDF. SVG keeps the vector quality, which is the main benefit of everything you learn in this Illustrator Pen Tool Guide.
Many clients ask for a logo that works on websites, packaging, and signs. The Pen Tool makes that possible with a single file.
Quick Recap of the Whole Process

Here is a short summary you can save for later. It condenses the entire Illustrator Pen Tool Guide into a simple checklist.
- Set the fill to none and the stroke to a visible color.
- Press P to select the Pen Tool.
- Click to place corner points and hold Shift for exact angles.
- Click and drag to create smooth curve points.
- Place anchor points at the extremes of each curve.
- Keep handles about one-third the distance to the next point.
- Hold Alt or Option to remove a handle before a corner.
- Close the path by clicking the first anchor point.
- Refine with the Direct Selection and Anchor Point tools.
- Delete extra points and check your work in Outline Mode.
If you remember only these ten steps, you already understand the core of the Illustrator Pen Tool Guide.
Why This Method Works
Many tutorials throw dozens of tips at you at once. That approach feels productive, but it rarely sticks.
This Illustrator Pen Tool Guide works because it follows a clear order. You learn the parts, then the clicks, then the curves, then the editing, and finally the real projects.
Each step builds on the one before it. That is how the Illustrator Pen Tool Guide keeps you moving forward. When something goes wrong, you can look back and find exactly which step needs more practice.
The method also keeps your files clean. Fewer points, consistent handles, and organized layers mean you spend less time fixing and more time creating.
Designers who follow a structured Illustrator Pen Tool Guide tend to improve faster than those who learn by random experimentation. Structure removes the guesswork and keeps your motivation high.
Who Should Use This Guide
This tutorial is useful for several kinds of learners.
- Complete beginners who have never opened Illustrator.
- Graphic design students who need a reliable reference for assignments.
- Freelancers who want to offer logo and icon design services.
- Small business owners who want to create their own branding.
- Photoshop users who are moving into vector work.
No matter your background, the Illustrator Pen Tool Guide is designed to meet you at your level and carry you to confident, professional path work.
Frequently Asked Questions (FAQs)
What is the Pen Tool in Illustrator used for?
The Pen Tool is used to draw precise vector paths, including straight lines, curves, and complex custom shapes. Designers use it for logos, icons, illustrations, and tracing.
Is the Pen Tool hard to learn?
It feels difficult at first because of the handles. With a clear method and about a month of regular practice, most people become comfortable. A good Illustrator Pen Tool Guide makes the process much smoother.
What is the shortcut for the Pen Tool in Illustrator?
Press P to select the Pen Tool. Press Shift + C for the Anchor Point Tool and A for the Direct Selection Tool. These shortcuts appear throughout the Illustrator Pen Tool Guide.
How do I make a curve with the Pen Tool?
Click and drag instead of clicking once. The drag creates handles that control the curve. Place points at the extremes of each curve and keep handles about one-third of the distance to the next point.
How do I remove a handle while drawing?
Hold Alt on Windows or Option on Mac and click directly on the last anchor point. This removes the outgoing handle so you can draw a sharp corner next.
What is the difference between the Pen Tool and the Curvature Tool?
The Curvature Tool creates smooth curves automatically with no visible handles. The Pen Tool offers full manual control. Most professionals prefer the Pen Tool for precision work.
How many anchor points should a path have?
As few as possible. Fewer points create smoother curves and cleaner files. A circle needs only four points. This rule is the backbone of the Illustrator Pen Tool Guide.
Can I use the Pen Tool for logo design?
Yes. Most professional logos include custom paths drawn with the Pen Tool. Following a structured Illustrator Pen Tool Guide helps you build logos that look sharp at every size.
How long does it take to master the Pen Tool?
Most learners feel confident in two to four weeks of daily practice. True mastery comes with real projects over several months. The Illustrator Pen Tool Guide gives you a clear path to follow.
Is the Pen Tool the same in Photoshop?
The tools work in a very similar way, so skills transfer easily. Learning the Illustrator Pen Tool Guide helps with Photoshop too. Illustrator creates vector paths, while Photoshop uses them mainly for shapes and selections.
Conclusion
The Pen Tool rewards patience. Nothing in the Illustrator Pen Tool Guide is out of reach. Once the idea of anchor points, segments, and handles clicks into place, you will draw with confidence and speed.
Start with straight lines, move on to curves, and then combine both. Edit your paths carefully, use shortcuts, and practice a little every day.
Return to this Illustrator Pen Tool Guide whenever you feel stuck, and use the practice plan to keep improving. Every professional designer began with the same wobbly curves you are drawing today. Trust the Illustrator Pen Tool Guide and keep practicing.
Open Illustrator, press P, and draw your first shape right now. Your next logo, icon, or illustration is only a few clicks away. Bookmark this Illustrator Pen Tool Guide and share it with anyone who is learning vector design.

10 Proven Strategies to Find Clients for Your Freelance Design Business
Why Most Designers Struggle to Find Clients
Every freelance designer hits the same wall sooner or later. Your portfolio looks sharp and your skills are solid, yet your inbox stays quiet. Learning how to find clients is the part nobody teaches in design school.
The good news is that finding work is a skill, not luck. Designers who book projects consistently follow repeatable systems. They show up where buyers look, explain their value clearly, and follow up without being pushy.
Inconsistent income is the main reason many freelancers quit. One month you juggle five projects. The next month you refresh your email every ten minutes. A reliable method to find clients smooths out that rollercoaster and gives you the confidence to set fair prices.
In this guide, you will learn 10 proven strategies to find clients for your freelance design business. Each one comes with practical steps you can start this week, even if you have no audience yet.
You will also get a bonus section with a weekly routine that keeps your pipeline full, plus answers to the questions designers ask most.
Before we start, remember one rule: clients buy outcomes, not pixels. A logo, website, or social media kit only matters when it solves a business problem. Keep that mindset as you apply every strategy below.
1. Build a Portfolio Website That Helps You Find Clients

Your portfolio is your hardest-working salesperson. It works while you sleep, and it is usually the first thing a buyer checks before replying to you.
Many designers upload a gallery of pretty images and stop there. Buyers need more. They want to know the problem, your process, and the result.
Turn each project into a mini case study with this simple structure:
- The client and their challenge
- Your approach and key design decisions
- The final deliverables
- The measurable result, such as more sign-ups or higher sales
Choose quality over quantity. Six strong case studies beat twenty average ones. Show the type of work you want more of, because clients hire based on what they see.
A portfolio is the foundation of every method to find clients. Without it, outreach, ads, and referrals all lead to a dead end.
Add a clear call to action on every page. A button that says “Book a free discovery call” removes friction. Place testimonials right next to it for social proof.
Speed and mobile design matter too. If your site loads slowly, visitors leave. Compress your images and keep the navigation simple.
Finally, optimize your site for search. Use descriptive page titles such as “Brand Identity Designer for Startups.” Over time, organic traffic helps you find clients without chasing them.
Think of your portfolio as a filter. It helps ideal buyers discover you, and it helps you find clients who match your style and budget.
2. Choose a Niche So It Is Easier to Find Clients

Generalists compete on price. Specialists compete on expertise. When you say “I design everything for everyone,” buyers struggle to see why you are the right choice.
A niche does not trap you. It simply gives your marketing a clear target. Instead of “graphic designer,” try “brand designer for wellness startups” or “packaging designer for craft food brands.”
A focused message makes it far easier to find clients because the right people instantly recognize themselves in your words.
Use these questions to choose your niche:
- Which past projects did you enjoy most?
- Which industries do you already understand?
- Which markets have healthy budgets?
- Which problems can you solve again and again?
Test your niche for 60 days. Update your portfolio, bio, and outreach messages around it. If enquiries improve, keep going. If not, adjust.
Specialization also lets you charge more. Buyers pay premium rates for experts who understand their audience and their language.
Remember, a niche is a direction, not a prison. Many designers expand into nearby industries after winning a few anchor projects. Once you have proof in one market, you can find clients in neighboring ones with much less effort.
Write one sentence and use it everywhere: “I help [type of business] achieve [result] through [type of design].”
Clear positioning is one of the fastest ways to find clients online, because search engines and social platforms reward consistent topics.
3. Use LinkedIn to Find Clients Who Already Hire Designers

LinkedIn is where founders, marketing managers, and business owners spend their working hours. Unlike entertainment platforms, people here are already in a buying mindset.
Start by polishing your profile:
- Write a headline that states who you help and how
- Use a banner that shows your best work
- Write an About section focused on client results
- Pin case studies in the Featured section
Next, post consistently. Share finished projects, before-and-after comparisons, short design tips, and lessons from client work. Aim for two or three posts per week.
Engage before you pitch. Comment thoughtfully on posts from your target prospects. This puts your name in front of them without a single sales message.
When you send a connection request, keep it short and human. Mention something specific, such as a recent launch or a post you enjoyed.
Use search filters to build a prospect list. Filter by job title, industry, and company size, then save the search so new profiles appear automatically.
This approach works because it builds trust before the sales conversation. It is one of the most reliable ways to find clients in B2B markets.
Set a weekly goal: ten new connections, five comments, and two posts. In a few months, you may find clients reaching out to you instead.
4. Send Personalized Cold Emails to Find Clients Directly

Cold email has a bad reputation because of spam. Done properly, it is the opposite: research-based, short, and genuinely helpful.
Follow this simple process:
- Build a list of 20 businesses whose visuals could be better
- Find the right contact, usually a founder or marketing lead
- Spend five minutes noting one specific improvement
- Write a short email that leads with that observation
- Follow up politely if you hear nothing
A strong cold email has five parts: a clear subject line, a personal observation, a one-sentence offer, a small proof point, and a low-pressure question.
Here is a sample you can adapt:
Subject: Quick idea for your packaging
Hi Sara, I noticed your new tea range has a lovely story, but the labels do not show it yet. I recently redesigned labels for a similar brand and helped them increase repeat orders. Would you like a short mood board with two ideas, no strings attached?
Keep emails under 120 words. Avoid heavy attachments and share a link to a relevant case study instead.
Send two or three follow-ups, spaced three to five days apart. Many replies arrive after the second message.
Expect low reply rates at first. A reply rate of five to ten percent is normal. Send 20 emails each week and you will soon have steady conversations. Persistence is what helps you find clients through email.
Always respect local privacy and anti-spam rules, and include a simple way to opt out.
Cold email also costs almost nothing. That makes it one of the cheapest ways to find clients when your budget is small.
5. Join Freelance Marketplaces to Find Clients Faster

Platforms such as Upwork, Fiverr, and 99designs bring buyers to you. Demand already exists, so you do not need to build an audience first.
The trade-offs are real. Competition is heavy and fees reduce your earnings. That is why marketplaces work best as a launchpad rather than a final destination.
Think of them as a shortcut to your first reviews. They help you find clients quickly when you are new, and they give you proof that you deliver.
Use these tips to stand out:
- Choose a specific profile title, such as “Logo and Brand Identity Designer”
- Show your best three samples first
- Write every proposal for the specific job, never a copy-paste template
- Mention the client’s goal in your first sentence
- Start with smaller projects to earn early reviews
Avoid racing to the bottom on price. Compete on clarity, speed of response, and relevant experience instead.
Once you have several five-star reviews, raise your rates gradually. Buyers on these platforms often pay more for proven results.
Use marketplace income to fund your other marketing channels. Over time, you will need the platform less. Diversification is key when you want to find clients reliably.
Always read each platform’s rules before moving a conversation off-site.
6. Showcase Your Work on Social Media to Find Clients Passively

Social media lets potential buyers see your style again and again. By the time they need a designer, your name is already familiar.
Pick two platforms and do them well. Instagram, Behance, Dribbble, and Pinterest suit visual work. LinkedIn and X suit business conversations.
Show your process, not just the final result. Time-lapses, sketches, and before-and-after slides tell a story that static images cannot.
Present your work in real-world mockups. A logo on a storefront, a menu, or a mobile app helps a buyer picture it in their own business.
Write story-driven captions with three parts: the problem, your approach, and the result. This turns a pretty picture into a mini sales pitch.
Use relevant hashtags and keywords in your profile and captions so the right people can discover you. Add a link in your bio that goes straight to your portfolio or booking page.
Social media works best as a trust builder. People see your style repeatedly, then remember you when a need arises. That makes it a powerful, low-pressure way to find clients.
Reply to comments and direct messages quickly. A fast, friendly answer often decides who gets the job.
Track which posts bring enquiries, then double down on what works to find clients consistently.
7. Network Online and Offline to Find Clients Through Relationships

Many of the best projects come from conversations, not advertisements. People hire those they know, like, and trust.
Offline, look for local business events, coworking spaces, chambers of commerce, and industry expos. Online, join Facebook groups, Slack communities, Discord servers, and niche forums where your ideal buyers gather.
Here is a tip most designers miss: go where your clients are, not where designers are. A wedding photographer meets competitors at a design meetup but meets buyers at a bridal expo.
Give before you ask. Answer questions, share useful resources, and offer quick feedback. People remember generous members and recommend them later.
Prepare a 20-second introduction that explains who you help and what result you create. Keep it simple and free of jargon.
Follow up within 24 hours of meeting someone. A short message that mentions your conversation keeps the connection warm.
Networking compounds over time. One chat may not lead to a project, but it might lead to an introduction that does.
Set a modest goal: attend one event each month and stay active in two online communities. This habit helps you find clients you would never reach through ads.
8. Turn Happy Customers Into a Referral Engine to Find Clients

Referrals are the warmest leads you will ever receive. The buyer already trusts the person who recommended you, so the sales conversation is short.
They are also the easiest way to find clients who already trust you before the first message.
Ask at the right moment. The best time is right after you deliver final files and the client expresses delight.
Make it easy for them. Send a short message they can forward, such as: “If you know anyone who needs branding help, I would love an introduction.”
Consider a small thank-you for referrals, such as a discount on their next project or a handwritten note.
Collect testimonials as well. Ask two simple questions: what problem did you have, and what changed after we worked together? Publish the answers on your website and social profiles.
Stay in touch after delivery. Send a friendly check-in after three to six months, share a helpful tip, or congratulate them on a milestone.
A simple follow-up system helps you find clients repeatedly from the same circle of people.
Finally, remember that repeat clients cost nothing to acquire. Before spending time on new leads, review your past client list and see who might need an update.
9. Use Content Marketing and SEO to Find Clients on Autopilot

Blog posts, case studies, and guides answer the questions your buyers ask before they hire. A single helpful article can bring enquiries for years.
Content is the long game. Unlike outreach, it keeps working after you hit publish. It helps you find clients while you focus on delivery.
Start with real buyer questions. Think about pricing, timelines, process, and common mistakes. If prospects ask it on calls, they are probably searching for it online.
Good content formats for designers include:
- Detailed case studies with results
- Pricing and process guides
- Checklists, such as a startup branding checklist
- Comparison posts, such as “logo vs full brand identity”
- Short videos that explain design decisions
Use the words your buyers search for. A phrase like “packaging designer for food brands” belongs in your title, headings, and first paragraph.
Repurpose everything. One blog post can become a LinkedIn post, an Instagram carousel, and a section of your email newsletter.
Build an email list as well. Offer a free template or checklist in exchange for an email address. Subscribers already like your work, so they convert at a higher rate than cold visitors.
Be patient. SEO often takes three to six months to show results, but consistency pays off. Over a year, content can find clients more effectively than many paid ads.
Publish twice a month and track your traffic and enquiries. This steady habit is one of the smartest long-term ways to find clients.
10. Partner With Agencies, Developers, and Marketers to Find Clients

Other professionals serve the same customers you want, but they do not offer design. Web developers, copywriters, SEO consultants, photographers, printers, and small agencies all fit this group.
This creates a natural win-win. You send them work, and they send work back to you.
Agencies often need extra hands during busy periods. Many also hire white-label designers who work behind the scenes. Reach out with a short note, a link to your portfolio, and your rate sheet.
Follow these steps to build partnerships:
- List ten professionals whose clients may need design
- Message each one with a specific collaboration idea
- Offer to work together on a small first project
- Agree on a simple referral arrangement
Reliability is your greatest asset here. Agencies remember the designer who never misses a deadline and keep sending work to them.
Strong partnerships are one of the most underrated ways to find clients, because each partner brings their own network.
Even two or three good partners can fill your calendar. They help you find clients without you spending a cent on advertising.
Put expectations in writing. Cover pricing, commissions, file ownership, and who communicates with the end client. Clear terms prevent awkward conflicts later.
Treat partnerships as long-term relationships. Over time, a small network of trusted partners becomes a dependable engine to find clients month after month.
Bonus: A Weekly Routine to Find Clients Consistently

Knowing ten strategies is not the same as using them. The designers who succeed turn tactics into a routine.
Here is a simple weekly plan you can follow even with a busy schedule. Treat it like a client meeting that you never cancel.
- Monday: Send five personalized cold emails
- Tuesday: Post on LinkedIn and comment on ten prospect posts
- Wednesday: Write or repurpose one piece of content
- Thursday: Network, join a community discussion, and follow up with warm leads
- Friday: Update your tracker and review the week
That adds up to about five to eight hours per week. It is small enough to sustain and large enough to produce real results.
Track your pipeline in a simple spreadsheet. Record the lead, source, date, status, and next action. Tracking shows which channels truly find clients for you and which ones waste your time.
Apply the 80/20 rule after 90 days. Look at where your best projects came from, then invest more in the top two channels.
Set monthly targets, such as 20 outreach messages, three discovery calls, and one new project. Numbers keep you honest. Once you know your conversion rate, you can predict how many messages you need to find clients and hit your income goal.
Do not wait until you are free to prospect. The best time to market yourself is when you are busy. Otherwise, you will fall into the feast-and-famine cycle.
A routine also changes the question “how do I find clients?” into a simple checklist that you complete each week.
Review your results monthly. Ask what worked, what to stop, and what to test next. Small tweaks compound, and within a quarter this routine will help you find clients more predictably than random bursts of effort.
5 Common Mistakes That Make It Harder to Find Clients

Even talented designers sabotage their own results. Avoid these five mistakes, and you will find clients faster with far less stress.
- Waiting for work to arrive. Great work does not sell itself. You have to decide to find clients on purpose and show up every week.
- Sending generic messages. Copy-paste pitches get deleted. A single personal sentence shows effort and earns attention.
- Undercharging. Very low prices attract demanding buyers and leave you too tired to market yourself. Fair pricing signals confidence and quality.
- Skipping follow-ups. Most deals are won after the second to fifth contact. A polite reminder is not annoying; it is helpful.
- Hiding your process. Buyers feel safer when they know what happens next. Explain your steps, timeline, and deliverables upfront.
Fixing even one of these can transform how you find clients and how much you earn from each project.
Conclusion: Start Small and Stay Consistent to Find Clients
You now have ten proven strategies, a weekly routine, and a list of mistakes to avoid. The next step is action.
You do not need to use every method at once. Pick two or three that suit your personality and your niche, and commit to them for 90 days.
The designers who find clients consistently are not always the most talented. They are the ones who show up, follow up, and keep improving.
Start today. Update your portfolio headline, send five personalized emails, and post one case study. Momentum builds quickly once you begin.
Every successful freelancer once had zero clients. Persistence and a clear system are what help you find clients, build trust, and grow a business you enjoy.
Choose one strategy right now and take the first step.
Frequently Asked Questions About How to Find Clients
What is the fastest way to find clients as a freelance designer?
The fastest way is direct outreach combined with a strong portfolio. Send personalized emails and LinkedIn messages to businesses that need your skills. Marketplaces can also help you find clients quickly while you build reviews.
How long does it take to find clients when you are just starting out?
Most beginners land their first project within two to eight weeks if they reach out consistently. Building momentum to find clients regularly usually takes three to six months.
Where can I find clients for free?
You can find clients for free using LinkedIn, social media, online communities, local networking, and referrals. These options cost time rather than money, and they work best when combined.
Do I need a website to find clients?
A website is not mandatory on day one, but it makes you look professional and gives buyers a place to see your work. Even a simple one-page portfolio can help you find clients while you grow.
How do I find clients with no experience or a small portfolio?
To find clients with no experience, create two or three concept projects, offer a discounted first project in exchange for a testimonial, and collect early reviews on marketplaces. Many buyers care more about clarity and reliability than a long client list.
Is cold emailing a good way to find clients?
Yes, when it is personalized and respectful. Short messages focused on the recipient’s problem get far better replies than generic templates. It remains one of the most cost-effective ways to find clients.
How many hours a week should I spend trying to find clients?
Aim for at least five to eight hours per week, even when you are busy with active projects. Consistent effort prevents the feast-and-famine cycle, and tracking results shows which channels help you find clients best.
How do I keep clients coming back so I do not have to find clients from scratch every month?
Deliver on time, communicate clearly, ask for feedback, and check in every few months. Repeat business means you spend less time trying to find clients and more time designing.
Should I use social media or marketplaces to find clients?
Use both if you can. Social media builds trust over time, while marketplaces bring immediate demand. Start with the channel that matches your niche, then expand to find clients through a second channel.
Pricing Guide: 9 Smart Ways to Set the Right Price for Your Graphic Design Services
Introduction: Why Every Designer Needs a Pricing Guide
Setting a price is one of the hardest parts of running a design business. This Pricing Guide will help you charge with confidence.
Many designers simply guess. They check what others charge, pick a number, and hope clients say yes.
That approach is stressful. It often leads to underpaid projects, late nights, and burnout.
A smart pricing guide takes the guesswork out of the process. It connects your price to your skills, your time, and the value you deliver.
In this Pricing Guide, you will learn nine practical methods for pricing logos, branding, social media graphics, packaging, and web assets.
You will also find a brand-new section on retainer pricing, plus a detailed FAQ at the end.
Whether you are a beginner or a seasoned freelancer, this Pricing Guide gives you a clear path to fair and profitable rates.
Bookmark this Pricing Guide and return to it whenever you quote a new project.

Why Pricing Matters More Than You Think
Your price does more than pay the bills. It sends a message about quality.
A very low price can make clients doubt your skills. A fair, confident price builds trust before the project even begins.
Pricing also shapes the type of clients you attract. Bargain hunters negotiate every detail. Serious businesses respect clear, professional rates.
Good pricing protects your time, too. When rates are too low, you need more clients to earn the same income. That leaves less room for quality work and creative growth.
Think of this Pricing Guide as a business tool, not just a list of numbers. Each method helps you make a decision you can explain and defend.
A reliable pricing guide also keeps emotion out of your numbers. You stop pricing from fear and start pricing from facts.
When you can explain your price, clients stop arguing about it.
Here is what a solid pricing strategy gives you:
- Steady income you can plan around
- Clients who value your work
- Less stress during negotiations
- Room to grow your studio or freelance business
Before you apply any method, gather three facts: your monthly living and business costs, the hours you can realistically work, and the income you want to earn.
These three numbers are the foundation of every smart price.
Method 1: Calculate Your Hourly Rate the Smart Way
The hourly rate is the simplest starting point in any Pricing Guide.
Start with your yearly income goal. Add your business expenses, such as software, equipment, internet, and taxes.
Next, estimate your billable hours. Most designers cannot bill 40 hours a week. Meetings, emails, and admin work take time. A realistic number is 20 to 25 billable hours.
Here is a simple formula:
Hourly rate = (Income goal + yearly expenses) ÷ billable hours per year
For example, if you need $40,000 in income and $8,000 in expenses, you need $48,000 a year. With 1,000 billable hours, your rate is $48 per hour.
That number is your minimum, not your final price. This Pricing Guide formula keeps you from working at a loss.
Hourly pricing works well for small edits, consultations, and projects with unclear scope. It is less ideal for creative work, because clients may count every minute.
Fast designers also get punished by hourly billing. The better you become, the less you earn.
That is why a modern pricing guide often uses the hourly rate as a calculator, not as the number clients see.
Use it behind the scenes to check that every project price covers your time.
Pricing Guide Tip: Track your time on every project for one month. Real data shows you which services pay well and which ones drain your hours.

Method 2: Use Flat-Rate Project Pricing
Flat-rate pricing means one fixed price for a defined project. Clients love it because they know the total cost upfront.
Designers love it because they are rewarded for efficiency.
To set a flat rate, estimate the hours you need and multiply by your hourly rate. Then add a buffer of 15 to 25 percent for revisions and surprises.
For example, a logo package might take 12 hours. At $48 per hour, that is $576. With a 20 percent buffer, your flat price is about $690.
This Pricing Guide recommends listing exactly what is included. Mention the number of concepts, revision rounds, and final file formats.
A clear scope protects you from scope creep. Without it, “one small change” can turn into ten.
Common flat-rate packages include:
- Logo design
- Business card design
- Social media template sets
- Brochure and flyer design
- Packaging labels
If a client wants extra work, quote it as an add-on. Keep the process simple and written.
Flat-rate pricing is the most popular method in any freelance pricing guide because it is easy to understand and easy to sell.
Write each flat-rate package into your own Pricing Guide so that quotes take minutes instead of hours.
Pricing Guide Tip: Always state the price validity, such as “valid for 14 days.” It encourages faster decisions.

Method 3: Try Value-Based Pricing
Value-based pricing focuses on the result you create, not the hours you spend.
Ask a simple question: how much is this design worth to the client’s business?
A logo for a local bakery has one value. A logo for a funded tech startup has another. The skills may be similar, but the business impact is very different.
To use this method, ask discovery questions:
- What problem will this design solve?
- Who is the target audience?
- How will the design help the company earn more?
- What is the budget range for this project?
Your Pricing Guide should include a short discovery questionnaire for this reason.
If a packaging design could help a brand sell thousands of units, a higher price is fair.
Value-based pricing needs confidence. You must explain how your work supports the client’s goals.
Many experts call this the most profitable chapter of any pricing guide. It rewards strategy, not speed.
It works best for branding projects, website graphics, and campaigns tied to sales.
Be careful with very small clients. They may not have the budget for value-based rates. Even then, your Pricing Guide can offer a lighter version of the service with a clear scope.
Pricing Guide Tip: Share one short case study showing how your design improved a client’s results. Proof makes higher prices easier to accept.

Method 4: Offer Tiered Packages (Good, Better, Best)
Tiered pricing gives clients choices. Instead of one price, you present three.
A common structure looks like this:
- Basic: One logo concept, two revisions, standard file formats
- Standard: Three concepts, three revisions, color and black-and-white versions, social media sizes
- Premium: Full brand identity with logo, color palette, typography, and a short style guide
Most clients choose the middle option. This is called the middle-choice effect, and it works in your favor.
Tiered packages also reduce negotiation. Clients focus on which package fits instead of asking for a discount.
When building tiers, make sure each step offers clear extra value. The gap should feel fair, not forced.
Every Pricing Guide worth reading suggests naming your tiers in a client-friendly way. “Starter,” “Growth,” and “Complete” sound better than “Package 1, 2, and 3.”
Add a short description of who each package is best for.
A tiered Pricing Guide also makes upselling natural. A client who starts with Basic may upgrade once they see what Premium includes.
Place your tiers at the center of your Pricing Guide page, with the recommended option highlighted.
A clean layout builds trust and speeds up decisions.
Pricing Guide Tip: Make the middle tier your most profitable one. That is the package most clients will choose.

Method 5: Research Your Market and Competitors
Your prices should not copy competitors, but they should respect the market.
Market research is the first step of any Pricing Guide that actually works. Spend an hour studying designers in your niche.
Look at freelance platforms, agency websites, and portfolio sites.
Note three things: the services they offer, the experience level they show, and the price ranges they publish.
Then place yourself honestly. A beginner with a small portfolio can price below a veteran, but not at the bottom of the market.
Also consider your location and client base. Rates differ across countries and industries. A designer serving international clients can often charge more than one serving a small local market.
A good pricing guide builds a range, not a single number. Your skills, speed, and results decide where you land inside that range.
Use this Pricing Guide as a checklist when you compare competitors:
- Do they charge per project or per hour?
- What is included in each package?
- How do they present their value?
- What do clients say in reviews?
Avoid racing to the bottom. If you are the cheapest, you attract the clients who value your work least.
Instead, find a gap. Maybe competitors ignore fast delivery, brand guidelines, or industry specialization. Fill that gap and charge for it.
Pricing Guide Tip: Save screenshots of competitor packages each quarter. You will quickly see how the market is moving.

Method 6: Price According to Your Experience and Skill Level
Your experience should shape your rates. A new designer and an expert should not charge the same.
Here is a simple way to think about it:
- Beginner (0–1 year): Build a portfolio and charge modest rates
- Intermediate (2–4 years): Raise prices as results and testimonials grow
- Advanced (5+ years): Charge premium rates for strategy and consistency
Skills matter as much as years. Mastering Adobe Illustrator, Photoshop, typography, and brand strategy increases your value.
Specialization raises prices even more. A designer who focuses on restaurant branding can charge more than a general designer.
Revisit your rates every six months. If you have more experience, better testimonials, and a full schedule, it is time to raise prices.
A strong pricing guide treats your rates as a living number. Grow your skills, and your prices should grow with them.
Update your personal Pricing Guide every six months so it always reflects your current level.
Each time you add a skill, such as motion graphics or packaging design, update the Pricing Guide you share with clients.
Do not apologize when you raise prices. Announce the change politely, give existing clients notice, and move forward.
Pricing Guide Tip: Keep a “wins” folder with testimonials, results, and awards. Use it to justify every price increase.

Method 7: Charge for Usage Rights and Licensing
Many designers forget that a design keeps its value after delivery. This is where a Pricing Guide can raise your income without raising your workload.
Usage rights decide how, where, and for how long a client can use your work.
A logo used on a local shop sign has a small reach. The same logo used in national advertising has a much larger one.
Larger reach means higher value, and higher value deserves a higher price.
Your licensing options might look like this:
- Personal use: The client can use the design for non-commercial purposes
- Standard commercial use: The client can use the design in their own business materials
- Extended use: Wider reach, such as large campaigns, merchandise, or paid advertising
- Exclusive buyout: The client owns all rights and you cannot reuse the work
A complete Pricing Guide lists each level with a clear price or percentage increase.
For example, extended use might add 25 percent to the base fee. An exclusive buyout might add 50 percent or more.
State the rights in your contract. Include the duration, the regions, and the media where the design can appear.
This simple step avoids confusion later.
The rule in any practical pricing guide is simple: the more people see the work, the more the work should cost.
Pricing Guide Tip: Never hand over source files for free. Charge a separate fee for editable files such as AI, PSD, or Figma documents.

Method 8: Add Rush Fees and Paid Extras
Not every project arrives on a comfortable schedule. Some clients need work tomorrow.
Rush work forces you to reorganize your calendar, delay other projects, and sometimes work late. That effort deserves extra pay.
A good Pricing Guide includes a rush fee, usually 25 to 50 percent above the normal price.
Set clear rules for what counts as rush work. For example, any project due in under five working days.
Extras are another source of income. Many clients ask for additional items after the main project starts.
Common paid extras include:
- Extra revision rounds
- Additional logo concepts
- Social media banner sets
- Stationery and business card layouts
- Brand style guides
- Mockups and presentation files
List these in your Pricing Guide with a fixed price for each one.
When a client asks for something outside the scope, you can answer calmly: “Great idea. Here is the add-on price.”
That response sounds professional and leaves no room for awkward arguments.
Whenever a deadline is shorter than normal, point to the rush section of your Pricing Guide and quote the fee upfront.
Never offer rush delivery for free. It teaches clients that your schedule has no value.
Pricing Guide Tip: Offer a small discount for flexible deadlines. Clients who can wait two extra weeks save money, and you gain scheduling freedom.

Method 9: Present Your Price with Confidence
Even the best Pricing Guide can fail if you present your price poorly.
Confidence matters. If you sound unsure, clients will push back.
Follow this simple approach when sending a quote:
- Restate the client’s goal in one sentence
- Explain what you will deliver
- Share the price clearly
- Mention the timeline
- Invite questions
Lead with value before you mention cost. When clients see the result first, the price feels smaller.
Send quotes as a clean PDF or a simple web page. Messy quotes create doubt.
Your Pricing Guide should also include short answers to common objections, such as “Your price is higher than others” or “Can you do it for less?”
When a client asks for a discount, adjust the scope instead of the price. Remove one deliverable or reduce the number of concepts.
That keeps your hourly value safe and still gives the client a choice.
If a client still refuses, thank them politely and move on. The wrong client is not worth a lower rate.
A written pricing guide gives you calm, ready-made answers when negotiations get tense.
Pricing Guide Tip: Practice saying your prices out loud. Saying them without hesitation builds the confidence clients can feel.

New Section: Retainer Pricing for Long-Term Clients
Retainers turn one-time clients into steady monthly income. This new part of the Pricing Guide shows you how to set them up.
A retainer is a fixed monthly fee for a defined amount of work. Many businesses need design every month for social media, ads, newsletters, and updates.
For you, a retainer means predictable income. For the client, it means priority access and a consistent brand look.
Here is how to price one:
- Estimate the hours the client needs each month
- Multiply the hours by your hourly rate
- Apply a small discount, such as 10 percent, for the commitment
For example, 15 hours at $48 equals $720. With a 10 percent discount, the retainer is $648 per month.
Every retainer-ready Pricing Guide should define three things:
- Scope: What is included each month, such as 10 social posts and 2 banners
- Response time: How fast you reply and deliver
- Rollover rules: What happens to unused hours
Set a minimum commitment of three months. This protects your schedule and gives the client time to see results.
Review each retainer every quarter. If the workload grows, adjust the price.
A retainer-friendly pricing guide also helps you avoid feast-and-famine income. You can plan your month with real numbers.
Many designers add a short retainer page to their Pricing Guide with three simple plans:
- Light: 5 hours per month
- Growth: 10 hours per month
- Studio: 20 hours per month
Offer retainers to clients who already trust you. A happy one-time client is your best candidate.
Put the terms in writing, including payment dates, cancellation notice, and the rate for extra hours.
This section of your Pricing Guide may soon become the most reliable part of your income.
Use this retainer chapter of the Pricing Guide as a bridge from project work to a stable design business.

Common Pricing Mistakes to Avoid
Even with a strong Pricing Guide, designers fall into a few common traps.
Watch out for these mistakes:
- Copying competitor prices without checking your costs
- Forgetting to include revision limits
- Working without a deposit
- Offering discounts too quickly
- Ignoring taxes, software costs, and unpaid admin time
- Never raising rates for loyal clients
Take deposits seriously. A 30 to 50 percent upfront payment protects you from non-paying clients and shows that both sides are committed.
Also watch your free work. Unpaid test designs and endless “quick favors” quietly destroy your profit.
Avoid these mistakes, and your Pricing Guide will work harder for you.
Fix them early. A pricing guide only works when you follow it, even on difficult days.

Final Thoughts: Put Your Pricing Guide Into Action
Pricing is a skill, and like every skill, it improves with practice.
This Pricing Guide gave you nine smart methods: hourly rates, flat fees, value-based pricing, tiered packages, market research, experience-based rates, usage rights, rush fees, and confident presentation. You also learned how to build retainers.
You do not need to use every method at once. Choose two or three that fit your business and test them.
Revisit your Pricing Guide every quarter. Update it as your skills, clients, and costs change.
A confident pricing guide builds a confident designer. And a confident designer earns more, stresses less, and attracts better clients.
Take your calculator, open a blank page, and start drafting your Pricing Guide today.
Your talent deserves a fair price. Now you have the tools to ask for it.
Frequently Asked Questions (FAQs)
What is a pricing guide for graphic designers?
It is a document that explains your services, rates, packages, and project rules. It helps clients understand your costs and helps you quote faster.
How do I start building my own Pricing Guide?
Begin with your income goal and business costs. Calculate your hourly rate, then turn it into flat-rate packages for your most common services.
Add rules for revisions, deposits, and deadlines so every quote follows the same structure.
How much should a beginner charge for logo design?
Rates vary by country, niche, and client type. Beginners often start with modest packages while they build a portfolio.
Your Pricing Guide should start with a rate that covers your time and costs, then rise as your portfolio and testimonials grow.
Is hourly or flat-rate pricing better?
Both work. Hourly pricing suits projects with unclear scope. Flat rates suit defined projects such as logos and business cards.
Most designers use flat rates in the final Pricing Guide they share with clients and keep hourly numbers for internal planning.
How often should I update my pricing guide?
Review your rates every six months. Raise them when your skills, results, or demand increase.
Give existing clients at least 30 days of notice before a new rate begins.
Should I publish prices on my website?
Yes, it can help. A public pricing guide filters out clients with very small budgets, saves you from repeating the same answers, and builds trust.
If you prefer flexibility, show “starting at” prices for each package.
How do I respond when a client says my price is too high?
Stay calm and ask what budget they have in mind. Then offer a smaller scope instead of a lower rate.
Point to the value of your work and the details in your Pricing Guide. Do not cut your price without cutting deliverables.
What should a pricing guide include?
Include your services, prices, what each package contains, revision limits, timelines, payment terms, rush fees, usage rights, and add-on prices.
A short note about your process also helps clients feel confident.
Does a pricing guide page attract more clients?
Yes. Clear prices help serious clients take action faster and reduce unnecessary back-and-forth emails.
It also shows professionalism, which improves trust before the first conversation.
Do I need a different Pricing Guide for each service?
Not necessarily. One document can cover all your services if each section is clear and easy to scan.
If your services are very different, such as branding and web graphics, you can create separate sections with their own packages and rules.

Graphic Design Portfolio: The Secret to Presenting Creative Work with Confidence
Every designer reaches the same moment. A client asks, “Can I see your work?” Your heart skips a beat. You know you are talented, but can you prove it in a way that feels clear, professional, and persuasive?
That is exactly where a graphic design portfolio comes in. It is not just a folder of pretty files. It is your voice, your proof, and your handshake, all in one place.
A strong graphic design portfolio does something remarkable. It answers questions before anyone asks them. It shows how you think, how you solve problems, and how you turn vague ideas into visuals that people remember.
Think about the last time you were impressed by someone’s creative work. Chances are, it was not only the visuals. It was the clarity, the story, and the sense that they knew exactly what they were doing. You can create that same impression.
The good news is that confidence is a skill you can build. When your graphic design portfolio is organized, honest, and well presented, you stop dreading the moment someone asks to see it. You start looking forward to it.
In this guide, you will learn how to plan, build, present, and promote your creative work. We will cover what to include, how to tell project stories, which platforms to use, and the mistakes that quietly cost designers opportunities. By the end, you will have a clear roadmap for creating a graphic design portfolio that works as hard as you do.
Let’s begin.
What Is a Graphic Design Portfolio and Why Does It Matter?
A graphic design portfolio is a curated collection of your best creative projects. It shows your skills, style, and experience through real examples instead of empty claims.
Think of it as visual evidence. Anyone can write “creative problem solver” on a résumé. Only your work can prove it.
Hiring managers and clients often spend less than a minute on their first look. In that short window, your graphic design portfolio must communicate who you are and what you offer.
This is why it matters so much:
- It builds trust before the first conversation even happens
- It helps you stand out in a crowded creative market
- It attracts the kind of projects you actually want to do
- It supports higher rates because quality is easy to see
- It gives you confidence because everything is ready to share
For beginners, a portfolio can make up for a lack of job experience. For seasoned designers, it keeps their story current and relevant.
It also works while you sleep. A well-built online portfolio can be discovered, shared, and reviewed by people in any time zone, long after you have closed your laptop.
Most importantly, it gives you control. Instead of letting others guess what you can do, you decide exactly how your work is seen.

Types of Graphic Design Portfolio You Can Create
Not every portfolio looks the same. The right format depends on your goals, your specialty, and your audience.
Online portfolio. An online graphic design portfolio is the most popular option today. It is easy to share, simple to update, and accessible from any device. Most recruiters now expect to receive a link rather than a file.
Print portfolio. A physical book or folder still makes a powerful impression in face-to-face meetings. It is especially useful for packaging, editorial, and print-focused designers who want clients to feel paper, texture, and finish.
PDF portfolio. A PDF is perfect for job applications and email pitches. It is lightweight, controlled, and looks the same on every screen. Keep the file size low so it opens quickly on any connection.
Hybrid approach. Many working designers keep a hybrid graphic design portfolio. A full website acts as the main home, a short PDF is tailored for specific pitches, and a print version is ready for in-person meetings.
Start with one format and do it well. You can always expand later as your career grows and your needs change.

Define Your Goals and Audience Before You Start
Before you open any design software, ask one simple question: who is this for?
A graphic design portfolio built for startups looks very different from one aimed at advertising agencies. Startups often want brand identity and flexible systems. Agencies may care more about campaigns and bold concepts.
Write a one-sentence goal. For example: “My graphic design portfolio should help me land packaging projects with food brands.” That single sentence guides every decision that follows.
Next, picture your ideal viewer. Are they a creative director with five minutes, a small business owner who is not familiar with design terms, or a recruiter scanning dozens of links? Their needs shape how much detail you share and how you explain it.
Keep your graphic design portfolio focused. A tight message is far more memorable than a scattered one. If you want to be known for logo design, let logos lead.
Clear direction also makes your graphic design portfolio feel intentional. Viewers can sense when a collection has a purpose. It signals professionalism before they read a single word.
If you are unsure about your direction, look at the projects you enjoyed most. Energy shows in the finished work, and clients can feel it.

How to Choose the Best Projects for Your Graphic Design Portfolio
The projects you choose define the impression you leave. Every piece in your graphic design portfolio must earn its place.
Use these questions as a filter:
- Does this project show a skill I want to be hired for?
- Is the final result genuinely strong?
- Can I explain the thinking behind it?
- Does it fit the audience I defined earlier?
A great graphic design portfolio shows range within a clear signature. You might include a logo system, a poster series, a social media campaign, and a piece of packaging. Together they prove you can adapt without losing your voice.
Pick work that solved real problems. A beautiful poster is good. A poster that tripled event attendance is better. Whenever possible, connect visuals to outcomes.
Be ruthless about removing weak pieces. If you would feel nervous discussing a project in an interview, take it out. One average project can lower the perceived quality of the nine strong ones around it.
Finally, show your best work first and last. People remember openings and endings. Place your strongest projects there and let the middle support them.

Quality Over Quantity: How Many Projects Should You Include?
More is not better. Reviewers rarely scroll through endless work, and attention fades quickly.
Most experienced reviewers prefer a graphic design portfolio with eight to twelve strong projects. That is enough to show depth and variety without overwhelming anyone.
If you specialize, you can go smaller. Six excellent branding projects are more convincing than twenty mixed ones. If you are a generalist, aim for a balanced spread across your main services.
A helpful trick is to imagine the viewer has only 90 seconds. Which projects would you want them to see? Those are your headliners. Everything else is optional.
Remember that a graphic design portfolio is only as strong as its weakest piece. Quality control is not about being harsh on yourself. It is about respecting your viewer’s time and your own talent.
You can still keep extra work available. Offer a “more projects” page or say “additional samples available on request.” This lets you stay concise while showing there is more behind the curtain.

Turn Projects Into Stories With Case Studies
Images alone rarely tell the whole story. Clients want to know how you think, and that is where case studies shine.
Case studies are the heart of a modern graphic design portfolio. They transform a pretty result into proof of your process and your value.
A Simple Case Study Structure
You do not need a long essay. Keep it short and scannable with these parts:
- The challenge: What problem did the client or brief present?
- The approach: What research, sketches, and decisions shaped the work?
- The solution: What did you create, and why does it work?
- The result: What changed because of your design?
Include process visuals such as early sketches, moodboards, and alternate concepts. They show that great work does not appear by accident.
A graphic design portfolio with honest case studies builds trust quickly. Do not hide mistakes or pivots. Explaining how you adjusted after feedback shows maturity, which clients value as much as talent.
Use plain language. Avoid jargon that a non-designer would not understand. If a small business owner can follow your story, you have communicated well.
Adding stories to your graphic design portfolio also makes you easier to remember. People forget thumbnails, but they remember a good tale about a tricky problem solved with clever design.
Keep each case study to a few short sections. Pair every paragraph with an image so the page feels balanced and easy to skim.

Design Your Portfolio Like a Client Project
Your portfolio is a design project, and viewers will judge it as one. Treat it with the same care you give to paying clients.
Your graphic design portfolio is itself proof of your taste, so keep the layout clean and confident. Use a consistent grid, generous white space, and a limited color palette. Let your projects be the stars.
Choose one or two typefaces and stay loyal to them. Readable type, comfortable line spacing, and clear hierarchy do more for professionalism than any fancy effect.
Present each project with high-quality mockups. A logo on a flat white background is fine, but showing it on packaging, signage, or a website brings it to life and helps viewers imagine it in the real world.
Navigation should be effortless. Visitors should reach any project in two clicks or fewer. Place your name, specialty, and contact details where they are impossible to miss.
Branding yourself matters too. A simple personal logo, color system, and consistent tone of voice make a clean graphic design portfolio feel like a complete brand. That consistency makes you look reliable before you say a word.
Finally, test everything on mobile. Many viewers will open your link on a phone. If images are tiny or text is hard to read, they may leave before seeing your best work.

Where to Host Your Graphic Design Portfolio: Best Platforms
Your graphic design portfolio needs a stable, professional home. The platform you choose affects how people find your work and how they experience it.
- Behance: Great for exposure. Creative professionals and recruiters browse it daily, and projects are easy to present in a long-scroll format.
- Adobe Portfolio: Included with many Creative Cloud plans, it offers clean templates and a quick setup if you already use Adobe tools.
- Dribbble: Ideal for visual snapshots, UI work, and building a following among fellow designers.
- Personal website: A personal website gives you full control over your graphic design portfolio, from layout to domain name.
- Website builders: Tools such as Squarespace, Wix, and Webflow let you create a polished site without writing code.
Pair a social platform with your own site. Social platforms bring discovery, while your own site brings credibility and control. Link them together so viewers can move easily between the two.
Whichever option you choose, make sure your graphic design portfolio is easy to share with one short, memorable link. Use your real name in the address whenever you can, because it helps people remember you and find you again.

Build Confidence in Presenting Your Creative Work
Confidence rarely comes from talent alone. It comes from preparation, repetition, and knowing your material inside out.
Almost every creative person battles self-doubt. You compare your work to others, notice flaws no one else sees, and wonder whether you are good enough. This is normal, and it does not mean you are not ready.
A well-organized graphic design portfolio is the best cure for self-doubt. When your strongest work is arranged clearly, you can see your progress and your skills in one place.
Try these confidence builders:
- Review your graphic design portfolio like a stranger would, and note what stands out first
- Ask two or three trusted peers for honest feedback
- Write a short statement about the purpose of each project
- Collect client testimonials and keep them visible
- Compare your current work with last year’s and celebrate the growth
Practice talking about your work out loud. Explain each project in thirty seconds, then in two minutes. The more you rehearse, the more natural your words become.
Remember that confidence grows through action. Each time you share your graphic design portfolio, the next time gets easier.

How to Present Your Graphic Design Portfolio in Interviews and Client Meetings
Presenting is a skill of its own. A beautiful body of work can still fall flat if it is explained without clarity or energy.
When you present your graphic design portfolio, lead with your strongest and most relevant project. First impressions set the tone for everything that follows.
Follow a simple flow:
- Introduce yourself in two or three sentences.
- Choose two or three projects that match the role or client.
- Walk through the challenge, your process, and the result.
- Invite questions and listen carefully.
Rehearse a ten-minute walkthrough of your graphic design portfolio until it feels conversational rather than memorized. Aim to sound like a person sharing a story, not a robot reciting a script.
Tailor your selection to the audience. If you are meeting a fashion brand, open with your most stylish work. If you are meeting a software company, lead with interface or digital projects.
Prepare for the practical side too. Bring an offline copy in case the internet fails, test your screen-sharing setup, and keep your files organized so you never hunt for a project mid-meeting.
If someone criticizes a project, stay curious. Ask what they would change and why. A calm, well-paced presentation of your graphic design portfolio shows that you can take feedback gracefully, which is a major strength in any creative team.
End with a clear next step. Thank them for their time, mention what you would love to work on, and make your contact details easy to find.

Graphic Design Portfolio SEO: How to Get Found on Google
If your graphic design portfolio lives on a website, search engines can send you clients while you are busy designing. A few smart habits make your pages easier to find.
Start with clear page titles. Instead of “Home,” use something descriptive such as “Brand Identity Designer for Small Businesses.” Search engines and humans both understand it instantly.
Write descriptive alt text for every image in your graphic design portfolio. It helps visually impaired visitors, and it gives search engines context about your visuals.
Here are more practical tips:
- Compress images so pages load quickly
- Use readable headings and short paragraphs
- Mention your services and location naturally in your text
- Make sure your site works smoothly on mobile
- Add a blog or case study pages that answer common client questions
- Link your pages together so visitors can explore easily
Backlinks matter too. When respected websites, design communities, or clients link to your work, search engines see your site as more trustworthy. Share your projects on social platforms and ask satisfied clients to mention you.
A fast, well-structured graphic design portfolio is more likely to keep visitors engaged, and engaged visitors are more likely to become clients.

Common Graphic Design Portfolio Mistakes to Avoid
Most portfolio problems are easy to fix once you know where to look. Here are the mistakes that quietly cost designers opportunities.
- Showing too much work. Endless scrolling hides your best pieces.
- Providing no context. Viewers need to know your role, the goal, and the result.
- Using low-quality images. Blurry or poorly cropped visuals make strong design look weak.
- Keeping outdated projects. Old work from years ago can misrepresent your current level.
- Ignoring mobile users. A layout that breaks on a phone loses many visitors.
- Hiding contact details. If people cannot reach you in seconds, they will move on.
- Having typos. Small errors weaken trust, especially for a designer.
- Copying trends blindly. Your own point of view is your biggest advantage.
Even a beautiful graphic design portfolio can lose opportunities when links are broken, pages load slowly, or the message is unclear. Always test every link and button before sharing.
Another common mistake is presenting only final images. Without process, viewers cannot tell how much of the thinking was yours.
Fixing these issues will instantly make your graphic design portfolio feel more polished and professional. Small improvements often create the biggest results.

How to Keep Your Graphic Design Portfolio Fresh and Growing
A portfolio is never truly finished. Your skills evolve, and your work should show that evolution.
Treat your graphic design portfolio as a living document. Set a reminder to review it every three to six months. Add new projects, replace weaker ones, and refresh your introduction.
Use a simple routine:
- Add one standout project after each major job
- Remove anything that no longer reflects your level
- Update your bio, services, and contact details
- Collect testimonials as soon as a project ends
- Track results such as sales growth, engagement, or positive feedback
Personal projects are a great way to experiment. Try a new style, tool, or industry and share what you learned. These pieces show curiosity, which clients love.
Every completed project is a chance to improve your graphic design portfolio. Ask yourself what you learned, what you would do differently, and what the project says about your direction.
Finally, stay inspired. Follow other designers, visit exhibitions, and study great case studies. Fresh ideas keep your own work moving forward.

No Client Work Yet? Build a Graphic Design Portfolio From Scratch
Every designer starts somewhere. If you have no clients yet, you can still create impressive work.
Beginners can build a strong graphic design portfolio with self-initiated projects. Treat each one like a real brief, with a goal, an audience, and a finished result.
Here are practical ideas to get started:
- Redesign an existing brand. Choose a local business and improve its identity or packaging.
- Create a fictional brand. Build a name, logo, color palette, and mockups from nothing.
- Join design challenges. Daily and monthly prompts help you build habits and variety.
- Volunteer for a cause. Nonprofits and community groups often need posters, flyers, and social graphics.
- Design for friends and family. Event invitations and small business materials are real experience.
Explain your thinking for every project. Beginners often impress reviewers more with clear reasoning than with perfect polish.
A thoughtful beginner graphic design portfolio can easily beat a messy one filled with random client work. Focus, clarity, and honesty always win.
Be transparent about self-initiated work. Label it as a personal or concept project, and let your skills speak for themselves.

Graphic Design Portfolio Checklist Before You Publish
Run through this quick checklist before you share your graphic design portfolio with the world.
- My goal and audience are clear
- I have eight to twelve strong projects
- Each project explains the challenge, process, and result
- Images are high quality and consistently sized
- My layout is clean and easy to navigate
- My bio, services, and contact details are visible
- Every link works on desktop and mobile
- The pages load quickly
- Someone I trust has proofread everything
If you can tick every box, your graphic design portfolio is ready. If not, fix one item at a time. Progress beats perfection.
Final Thoughts: Present Your Work With Confidence
A graphic design portfolio is more than a collection of files. It is the story of your growth, your thinking, and your creative voice.
Confidence does not appear overnight, but it does appear with preparation. Choose your best projects, explain your process, design a clean presentation, and practice talking about your work.
Start small. Even a simple graphic design portfolio with five great projects can open doors, because quality and clarity matter more than size.
Keep refining your graphic design portfolio as you learn and grow. Every update moves you closer to the clients and roles you want.
Your talent deserves to be seen. Build your graphic design portfolio today, share it proudly, and let your work introduce you with confidence.
FAQs About Building a Graphic Design Portfolio
What should a graphic design portfolio include?
Include eight to twelve of your best projects, a short bio, a list of services, and clear contact details. Add case studies with the challenge, process, and results. Testimonials and a downloadable résumé are helpful extras.
How many projects should I add to my graphic design portfolio?
Most designers do best with eight to twelve strong projects. Specialists can show fewer, as long as every piece is excellent and relevant to the work they want.
Which platform is best for hosting a portfolio?
A personal website gives you the most control, while Behance, Adobe Portfolio, and Dribbble help you get discovered. Many designers use a personal site as their main home and link it to a social platform.
How often should I update my portfolio?
Review it every three to six months. Add new work, remove outdated projects, and refresh your bio and contact details so everything stays current.
Can beginners create a portfolio without client work?
Yes. Use redesigns, fictional brands, design challenges, and volunteer projects. Explain your process clearly so viewers can see how you think.
Do I need a website for my graphic design portfolio?
A website is not required, but it is strongly recommended. It looks professional, gives you control over presentation, and can help clients find you through search engines. A PDF or a Behance profile can work well when you are just starting out.
What makes a graphic design portfolio stand out?
Strong projects, clear storytelling, a clean layout, and a consistent personal brand make a portfolio memorable. Showing real results and your creative process makes it even more convincing.
-

 Graphics Design3 years ago
7.Exploring the Importance of Color Theory Charts
-

 Graphics Design1 year ago
Top 10 Best Graphic Design Tools for Beginners in 2025 (Free & Paid)
-

 Graphics Design2 years ago
10 Stunning Gradient Design Trends You Need to Know in 2024
-

 Graphics Design1 year ago
15 Freelance Graphic Design Tips to Boost Your Career in 2025
-

 Graphics Design2 years ago
29.Retro Design Is Making a Comeback in Modern Spaces
-

 Graphics Design2 years ago
Best Laptops for Graphic Designers – 2025 Buying Guide
-

 Graphics Design2 years ago
2025 Logo Design Trends: What’s In, What’s Out?
-

 Graphics Design3 years ago
15.The Importance of Effective Flyer Design in Marketing