
Graphics Design
10 Stunning Gradient Design Trends You Need to Know in 2024


10 Stunning Gradient Design Trends You Need to Know in 2024
As we stand on the brink of 2024, gradient designs are all the rave in the creative space and breathe life, color depth and contemporary into websites, branding and more. complicated gradients, which several years ago could impress only with conformity to the maximum bid, are the most promising direction to for all designers today, who want to innovate and create something interesting. If you are a designer or an owner of a business, or simply interested in design, these categories will give you an idea of what is new and developing in the field.
In this article, we’ll take a closer look at 10 **most important gradient design trends** that you should expect in 2024 with examples of their application and ideas about how they change the design industry.
Outline of the Article:
- Introduction
- 1. Retro Gradients
- 2. Neon Glow Gradients
- 3. Monochromatic Gradients
- 4. Pastel Gradients
- 5. Nature-Inspired Gradients
- 6. Duotone Gradients
- 7. 3D Gradients
- 8. Metallic Gradients
- 9. Transparent Gradients
- 10. Gradient Meshes
- Gradients today Modern Design
- Gradients in Design: Best Tips
- Conclusion
- FAQs
Introduction
Transitions have been a cornerstone of gradient design trends for a long time and being able to smoothly transition from one color hue to another to making designs come to life. As technology advances, and preferences change, the use of two material types is pioneering the look in 2024. As observed in web design and product packaging or digital marketing, the following 10 gradient design trends should help inspire the next big project.
1. Retro Gradients

Gradient design trends the talk of the town ‘ nostalgia ‘ has called it’s shots on contemporary gradient design trends and brands and the retro gradients are back in business with full flavor in 2024. Intense colors associated with the pop-culture of the 80s and 90s are now features of designers’ works. Imagine an alternative world of neon pinks, electric blues and strong oranges combined in spectacular ways. These gradients are not just simply about the awesome colors, but are also about the mood of those decades, bringing an antique but fresh feeling to your designs.
Retro gradient design trends are used most often in the branding process and digital arts as they add dynamic energy to the artwork. Applying retro gradients in the creations aimed at youth or focused on a specific narrowly interested circle, it will be possible to succeed.
2. Neon Glow Gradients

Other gradient design trends that light up like neon are also something to look forward to in 2024. These gradients combine and explode a number of colors such as fluorescent green, purple and pink. Smart gradients with the neon glow are perfect for nightlife, entertainments and fashion-related niches that require statement and futuristic vibes.
It is just adding these gradient design trends to branding or your digital interfaces can make them look sleek and modern, making your design stand out among the rest. Just then ensure that the colors are not very intense such that they overload your audience with color.
3. Monochromatic Gradients
Monochromatic gradient design trends, as the name suggests, is about the use of different instalments of the same color to ensure effects of continuity. This approach is quite elegant and simple, which will make it perfect for use in minimalistic design. It may sound a bit mundane but monochromatic gradients offer a certain degree of depth to the designs you make without necessarily straining the receiver’s eye.
In web and app design monochromatic gradients are widely used for backgrounds, buttons and any sort of navigation. They also play a part in making the site’s appearance more professional and cleanup, all the while still being engaging to the user.
4. Pastel Gradients
Gradient design trends views and opinions Pastel gradation is characterized by subtle changes in soft pastel colors that do not shock the eye. These gradients are particularly suitable in the wellness, style of life and beauty industries where comfort is of paramount importance. Try imagine weak shades of lavender that gradually turn into pastel blue or pale pink that gently transition into delicate cream color.
However, pastel gradient design trends are not only beautiful but also very suitable for a variety of design uses, as has been previously demonstrated. It makes them feel warm and comfortable and, therefore, if you want to get your audience in a good mood, these kinds of images will do just fine.
5. Nature-Inspired Gradients

Having witnessed a steady adoption of sustainable and environmentally friendly approaches to life, natural gradients are making a comeback. These gradients are based on natural color and they utilize earthy colours like forest green, sky blue and sunset orange.
The gradient design trends which are depicted using the logo of the natural world are ideal for the brands that have values attached to mother nature or those brands which would like to give their customers a feeling of calmness and serenity. These gradients are also part of biophilic design, which uses nature as a big part of the built environment to bring well-being.
6. Duotone Gradients
Duotone gradient design trends are made by using two different shades of color and the impression usually can be really strong. It is suitable when brands have to leave a strong image of themselves that would be easily memorable. It is also popularly integrated in the digital designs, advertisements, promotions, and any social media posts due to its ability to have an impact and flexibility in the redesign of the design.
For Instance, a duotone gradient shall combine an indigo hue with a lime green hue to come up with a modern look. This trend also seems perfect for typographic treatments, where text on top of duotone backgrounds, as you may imagine, only gets even more striking.
7. 3D Gradients

Currently, the application of 3D gradient design trends is on the rise as designers seek to create an illusion of depth when designing their images. It is possible to make a design look more realistic, allowing designers to enhance lighter and shadow items, as well as texture items and 3D shapes and objects, by applying gradients to them.
This trend is very pertinent to the field of UI/UX design since 3D gradients could make the users have a lot of fun. Wherever it pop up as a floating button or an animated object, 3D gradients make it look authentic and dynamic to look at.
8. Metallic Gradients
Every now and then, metallic gradient design trends are associated with luxury and sophistication. Coming up with hybrids of golds, silvers, bronzes and coppers festivals the designers with rich and chic appearance that portrays luxury. These gradients are ideal to be applied to premium brands and businesses that would like to make their brand(images) look more elegant.
Erect metallic gradients in your packaging, logos and websites that will be related to luxury goods. They also shine and create the illusion of sophistication that is immediately obvious but requires little effort to embody making it ideal for any design since it will make the design look more expensive and appealing.
9. Transparent Gradients
As simple as the gradients are, they are perfect for the addition of depth without necessarily being too distracting. Hence, if incorporation of transparency was made, designers can infuse colors at different levels producing complex kind of impression. This trend is especially used often in website layout designs, where you can use the smooth gradient to create background, overlay and the hover effects.
By combining different levels of color transparency you’ll achieve a highly appealing color hierarchy which along with minimalist progressing will illuminate important sections.
10. Gradient Meshes

They are a technique feature a little more complex than standard pixel blending, and is commonly referred to as gradient meshes. While the linear or radial gradients are a form of approach allowing designers to create smooth transition between two colors at certain point of an object or background, gradient meshes propel designers to creating complex gradients between multiple colors at different points. This technique is prevalent in vector graphic design since the operation involves precision and the smooth workflow.
Gradient design trends meshes are subsequently tender and primarily used in illustrations and digital art where shading, which is realistic, and blending of colors, which may be fancy or complex, are paramount. They let one achieve highly personalized layouts that appear to serve specific needs of a given project or process.
Gradients today Modern Design
Gradient design trends can add an exciting and sophisticated look to any design which put them in a rather strong position in a designer’s portfolio. They can give extra dimensions, target attention and produce a more stimulating point of view. In general, gradients are now widely used for something that has gained importance with the appearance of digital interfaces: the need to make flat designs monumental. This makes them adaptable in almost any field ranging from the new technological venture to refined brands of production.
Gradients in Design: Best Tips
However, gradients are definitely useful, although their application should be used correctly. Here are a few tips:
- **Balance**: Avoid the problem of the gradients overwhelming other design elements.
- **Context**: We must remember the target audience and the field of the project while selecting colors.
- **Consistency**: Be consistent in your choice of colors to ensure that you do not end up with contrasting visuals on your design that may not blend well.
- **Accessibility**: Make sure that every gradient is responsive and can be read by different people on various devices.
Conclusion
Gradient design trends as we anticipate the year 2024 remains dynamic thereby enhancing the creativity by tendering unending options. These are the trends that are already shaping the future of the visual design, from the old school with retro themes and neon flashes to such outstanding pieces like glowing nature and three-dimensional simulations. From web design to branding projects or illustration, these gradient trends will see you through to the next level and onwards.
FAQs
- Even though identifying this feel is not straightforward, the next questions pops up: what is the key to choosing the right gradient?
Connect with the core focus of the video plus the emotions desired from the audience to be effective. When implemented they should complement your design.
and can correspond to the registration of the brand image in consumers’ perceptions.
- In other words, are gradients appropriate for any kind of design work?
Yes indeed, gradients are very flexible and can be used anywhere from website UI to product labeling. Yet, the application of all of them should be adjusted according to the particular project requirements.
- What can I do to make my gradient design look good on devices?
Consistency of gradients must be checked across the screens and different resolutions – this must be achieved by using responsive design techniques and testing gradients on the interval of that.
- I am trying to design an interface and the problem that I faced is that bright gradients may overload users.
Balance is key. Applying gradients in bright tones is better when applied minimally or accentually with background with less distracting neutral colors.
- As much as I appreciate gradients, I have no idea of the kind of tools I can use to make mine look excellent.
Some of the most well-known tools include Adobe Illustrator, Figma, Sketch, and simple web-based tools to get gradient ideas and to make gradients, Gradient Hunt and Coolors.
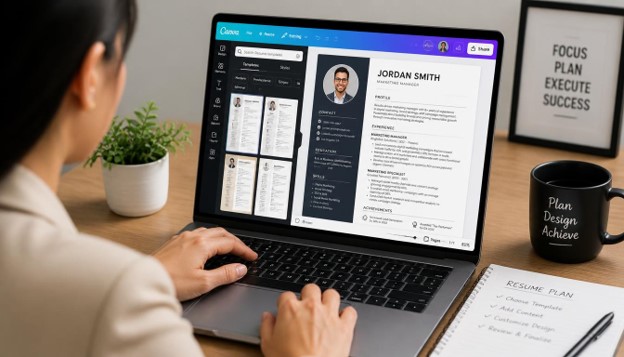
Canva Resume: How to Create a Professional Resume in 2026
Finding a job in 2026 is a different experience than it was even a few years ago. Recruiters skim applications in seconds, applicant tracking systems filter out resumes before a human ever sees them, and the first impression you make often comes down to a single page of formatted text. This is exactly why so many job seekers have turned to a Canva Resume as their go-to solution for building an application that actually gets noticed. This kind of document combines the visual polish of a graphic design tool with the structure recruiters expect, giving ordinary job seekers access to layouts that used to require a professional designer. Whether you are a fresh graduate applying for your first role, a mid-career professional switching industries, or an executive updating your credentials, building a Canva Resume can save you hours of formatting frustration while producing a document that looks like it was made by an expert.
In this guide, we will walk through everything you need to know about creating a Canva Resume in 2026, from choosing the right template to optimizing your document for applicant tracking systems, exporting it correctly, and avoiding the common mistakes that quietly hurt your chances. By the end, you will have a clear, repeatable process for building a resume that reflects your experience, your personality, and your professionalism, all without needing any design background.
What Is a Canva Resume?
A Canva Resume is simply a resume created using Canva, the popular online design platform that offers drag-and-drop tools, thousands of pre-built templates, and an enormous library of fonts, icons, and graphics. Unlike traditional word processors that force you to manually align text boxes and guess at spacing, Canva gives you a visual canvas where every element snaps into place. This makes the format especially appealing to people who want a document that stands out visually without spending days learning design software like Adobe InDesign or Photoshop.
What sets a Canva Resume apart from a resume built in Microsoft Word or Google Docs is the level of creative control paired with simplicity. You can choose from resume templates designed by professional graphic designers, swap fonts and colors in a few clicks, add subtle design accents like sidebars or icons, and preview exactly how the final document will look before you download it. For creative fields such as marketing, design, media, and communications, a well-designed layout can genuinely help you stand out. For more traditional industries like finance, law, or engineering, Canva also offers clean, minimalist templates that maintain a professional tone while still benefiting from Canva’s superior formatting consistency.
Why So Many Job Seekers Are Choosing Canva Resume in 2026
The rise of remote work, increased competition for open roles, and the growing sophistication of applicant tracking systems have all changed what employers expect from a resume. A Canva Resume addresses several of these shifts at once. First, it solves the formatting problem. Anyone who has tried to adjust margins or bullet spacing in a Word document knows how frustrating small formatting glitches can be, especially when they shift unexpectedly after editing. Canva’s grid-based design system prevents this kind of misalignment, so your finished document looks exactly the same no matter how many times you edit it.
Second, a Canva Resume gives job seekers access to professional design language that was previously reserved for people who could either design themselves or pay someone else to do it. Templates are built with proper visual hierarchy, appropriate white space, and complementary color palettes, meaning your resume automatically looks more polished than a plain black-and-white document. Third, Canva makes it incredibly easy to customize a resume for different job applications. You can duplicate the file, tweak the content for a specific job posting, and export a new version in minutes, which is critical in 2026 when tailoring your resume to each application meaningfully improves your response rate.
Finally, Canva’s cloud-based nature means your Canva Resume is accessible from any device. You can start editing on a laptop, review it on a tablet, and make final tweaks from your phone before hitting submit on a job application. This flexibility matters more than ever now that job searching often happens in stolen moments between other responsibilities.
Getting Started: Setting Up Your Canva Account for Resume Building
Before you can build your resume, you need a Canva account, which is free to create using an email address, Google account, or Facebook login. Once you are logged in, the Canva homepage presents a search bar where you can simply type “resume” to browse the platform’s full library of resume templates. Canva offers both a free tier and a paid Canva Pro subscription. The free version includes a substantial number of resume templates and design elements, which is more than enough for most job seekers to build an excellent finished product. Canva Pro unlocks premium templates, additional fonts, a background remover tool, and the ability to resize your design instantly, but it is not required to produce a high-quality, professional document.
When you search for resume templates, Canva organizes results by style, industry, and color scheme, which makes it easy to filter down to templates that match your personality and the tone of the industry you’re applying to. Take your time browsing at this stage. The template you choose becomes the visual foundation of your entire Canva Resume, so it’s worth spending a few extra minutes comparing several options before committing to one.
Step-by-Step: How to Create a Canva Resume in 2026
Step 1: Choose a Template That Matches Your Industry
The first and most important decision you’ll make when building your resume is selecting the right template. Creative industries such as design, advertising, and media generally reward bold layouts, unique typography, and color accents, while corporate industries such as finance, consulting, and law tend to favor cleaner, more conservative designs. Browsing Canva’s resume category, you’ll notice templates labeled by style, such as “minimalist,” “modern,” “creative,” or “professional.” Choosing a template that aligns with your target industry ensures the finished document communicates the right tone before a recruiter even reads a single word.
Step 2: Customize the Layout to Fit Your Experience
Once you’ve selected a base template, the next step is adjusting the layout to fit the amount of experience you have. Someone early in their career might need to shrink the work experience section and expand the education or skills section, while a seasoned professional might need the opposite. Canva makes this easy because every text box, section, and element on the template can be resized, moved, or deleted. Don’t be afraid to combine elements from different templates or restructure a layout entirely; the goal is a Canva Resume that fits your actual career story rather than forcing your story into someone else’s template.
Step 3: Add Your Personal and Contact Information
At the top of your Canva Resume, include your full name, a professional email address, your phone number, your city and state (a full street address is unnecessary and outdated), and links to relevant professional profiles such as LinkedIn or a portfolio website. Keep this section clean and easy to scan, since recruiters need to be able to contact you within seconds of glancing at your document.
Step 4: Write a Strong Professional Summary
Most modern resume templates on the platform include a short summary section near the top of the page. This two-to-three sentence introduction should highlight your years of experience, your core skill set, and what kind of value you bring to an employer. Avoid generic statements like “hardworking team player” and instead focus on specific, measurable strengths that are relevant to the role you’re applying for. A strong summary at the top of your Canva Resume gives recruiters a reason to keep reading.
Step 5: Detail Your Work Experience With Impact
The work experience section is the heart of any resume, and this one is no exception. List your positions in reverse chronological order, including your job title, company name, location, and dates of employment. Under each role, use concise bullet points that emphasize accomplishments rather than routine duties. Whenever possible, quantify your achievements with numbers, percentages, or dollar amounts, since specific metrics make your Canva Resume far more persuasive to both human readers and automated screening systems.
Step 6: Highlight Your Skills Strategically
Most resume templates on the platform include a dedicated skills section, often displayed as a simple list, a set of tags, or even a visual skill bar. While the visual skill bars can look appealing, be cautious about using graphical ratings for your abilities, since applicant tracking systems cannot read graphics and some hiring managers find subjective skill ratings unconvincing. A safer approach is to list clear, relevant skills as plain text within your Canva Resume, prioritizing the specific tools, technologies, and soft skills mentioned in the job description you’re applying to.
Step 7: Add Education, Certifications, and Extras
Below your experience and skills, include your educational background, any relevant certifications, and optional extras such as volunteer work, languages, or professional affiliations. These sections don’t need to be lengthy, but they round out your Canva Resume and can be the tiebreaker between two similarly qualified candidates.
Step 8: Choose Fonts and Colors Thoughtfully
One of the biggest advantages of building your resume this way is the ability to control typography and color with precision. Stick to no more than two font families throughout your document, one for headings and one for body text, to maintain a clean and consistent look. For color, a single accent color used sparingly, such as in section headers or icons, tends to look far more professional than multiple bright colors competing for attention. Remember that your Canva Resume may eventually be printed in black and white by a hiring manager, so make sure your text remains legible even without color.
Step 9: Proofread and Review the Full Document
Before exporting, step back and review the entire document as a whole. Check for consistent spacing, aligned text boxes, and matching formatting between sections. Read every line of text out loud to catch typos or awkward phrasing that your eyes might otherwise skip over. It’s also worth asking a friend, mentor, or colleague to review your Canva Resume with fresh eyes, since a second opinion often catches errors you’ve become blind to after hours of editing.
Step 10: Export and Save Your Canva Resume Correctly
When your document is finished, use Canva’s download feature to export it, choosing PDF as your file format unless a job application specifically requests something else. Selecting “PDF Standard” keeps your file size reasonable while preserving your exact formatting across any device that opens it. Name your file clearly, such as “FirstName-LastName-Resume.pdf,” so hiring managers can immediately identify whose Canva Resume they’re viewing among dozens of other applications.

Best Canva Resume Templates to Use in 2026
Canva’s template library is constantly refreshed, but certain styles consistently perform well across industries. Minimalist templates featuring a simple sidebar for contact information and skills, paired with a clean main column for experience, work well across nearly every field because they balance visual interest with readability. Modern two-column templates with subtle color blocking are popular among marketing, design, and tech candidates who want their Canva Resume to feel current without being flashy. For more conservative industries, single-column templates with classic serif fonts and minimal color present a polished, traditional look that still benefits from Canva’s superior spacing and alignment compared to a plain Word document.
When browsing templates, pay attention to how much of the page is dedicated to decorative elements versus actual content. A Canva Resume template that devotes too much space to graphics, photos, or empty white space can leave you without enough room to properly describe your experience. The best templates strike a balance, using design to enhance readability rather than distract from your qualifications.
Design Principles That Actually Matter
Good design isn’t about adding as many decorative elements as possible to your Canva Resume; it’s about guiding the reader’s eye toward the information that matters most. When working inside the editor, keep visual hierarchy at the front of your mind. Your name and job title should be the largest and boldest text on the page, followed by section headings, then body text. This hierarchy tells a recruiter’s eyes exactly where to look first, second, and third, which matters enormously when the average hiring manager spends only a handful of seconds scanning a new application.
White space is another principle that’s easy to underestimate. A page packed edge to edge with text feels overwhelming and signals poor editing judgment, while generous margins and breathing room between sections make even a dense career history feel approachable. Alignment matters just as much: every text block, icon, and divider line should line up consistently along an invisible grid. Canva’s snap-to-grid functionality makes this far easier than manually eyeballing alignment in a word processor, but it still requires attention, especially after you’ve moved elements around or deleted a section.
Contrast is the final principle worth understanding. Your accent color should stand apart clearly from your background and body text, but not so aggressively that it becomes distracting. A soft navy, deep green, or muted burgundy against a white or off-white background tends to read as confident and professional, while neon colors or low-contrast pastel-on-pastel combinations can strain the eye and undermine an otherwise strong layout. When in doubt, look at how the original template designer used color and try to preserve that same balance even as you swap in your own accent shade.
Industry-Specific Examples: Tailoring the Document for Different Career Paths
Not every career path calls for the same visual approach, and understanding how to adjust your template for different fields will meaningfully improve your results.
Tech and Engineering: Candidates in software development, data science, and engineering generally benefit from a clean, single or two-column layout that leaves plenty of room for a detailed skills section listing programming languages, frameworks, and tools. Avoid overly artistic templates in this field; hiring managers in technical roles tend to value clarity and information density over visual flair.
Creative and Design Roles: Marketing, graphic design, and media professionals have more freedom to experiment with bold typography, color blocking, and even a small portfolio thumbnail section. This is where a well-designed template genuinely doubles as a portfolio piece, demonstrating your design sensibility before an employer even opens your full portfolio link.
Corporate and Finance: For law, finance, consulting, and other traditional corporate paths, restraint is the name of the game. A single accent color, a classic serif or clean sans-serif font, and a straightforward single-column layout communicate seriousness and attention to detail, both qualities highly valued in these industries.
Students and Recent Graduates: Early-career candidates often have limited work history, so choosing a layout that emphasizes education, coursework, internships, and extracurricular leadership can help fill the page meaningfully without appearing padded. A slightly more visual template can also help a thin work history feel more substantial and intentional.
How to Add Icons, Photos, and Visual Elements the Right Way
Small visual touches like icons next to contact details or section headings can add polish without overwhelming the page, but they should always be used with restraint. Stick to a single icon style throughout the document, such as all outline icons or all filled icons, rather than mixing styles, which can make the layout feel disjointed. When it comes to photos, only include a professional headshot if it’s customary in your country or industry, and always use a high-resolution, well-lit image with a neutral or softly blurred background.
Avoid decorative stock photography, illustrations of unrelated scenes, or elaborate background patterns behind text, since these elements rarely add value and can sometimes make text harder to read or interfere with automated parsing systems. If you want to include a subtle visual accent, a thin colored sidebar, a simple divider line, or a small geometric shape in your accent color usually achieves a polished look without adding unnecessary clutter.
Sharing and Submitting Your Document Online
Once your design is finalized, you’ll likely need to share it in more than one format. Beyond the standard PDF download used for most job applications, Canva also allows you to generate a shareable web link, which can be useful for including in an email signature or a personal website where you want a recruiter to view your qualifications without downloading a file. Keep in mind that some employers explicitly request a specific file type, so always double-check the job posting’s instructions before submitting.
If you’re uploading the file directly to a company’s applicant portal, test the upload first to confirm the formatting holds up after processing, since some portals convert PDFs into plain text for internal storage. It’s also smart to keep a version history; if you tailor the content for multiple job applications, save each variation with a clear file name so you always know which version was sent to which employer. This small organizational habit prevents the common mishap of accidentally sending an outdated or mismatched file during a fast-moving job search.
Building a Matching Cover Letter and Portfolio
A polished resume rarely works in isolation. Most applications benefit from a cover letter that echoes the same visual identity as your main document, using the same fonts, accent color, and header style so the two pieces feel like part of a single, cohesive application package. Canva offers matching cover letter templates for many of its resume designs, which makes this consistency easy to achieve without starting from scratch. Simply search for the same template family within the cover letter category, or duplicate your resume’s header design and adapt it into a one-page letter format.
If you work in a creative field, consider building a simple one-page portfolio summary using the same design language, then linking to it from your contact section. This creates a unified impression across every touchpoint a hiring manager encounters, from the initial application to any follow-up materials you send during the interview process. Consistency across these documents signals attention to detail, a quality that employers consistently rank among the most desirable traits in a candidate, regardless of industry.
It’s worth noting that a cover letter should never simply restate what’s already on your one-page application. Instead, use the extra space to tell a short story: why you’re interested in this particular company, how a specific past achievement connects to what the role requires, and what you hope to contribute in the first six months. Recruiters read hundreds of cover letters that repeat the same information already visible in the attached document, so anything that adds new context and personality will naturally stand out.
Reviewing Real-World Feedback Before You Apply
Before sending out any job application, it pays to get outside feedback on your finished layout, not just a spellcheck. Career centers at universities, professional mentors, and even online communities dedicated to job searching can offer perspective on whether your formatting choices, content balance, and overall presentation land the way you intend. What looks perfectly balanced to you after hours of editing might read as cluttered or sparse to someone seeing it for the first time.
A useful exercise is the five-second test: show your finished document to someone unfamiliar with your background and give them five seconds to look at it before taking it away. Then ask what they remember. If they can recall your name, your target role, and one or two standout qualifications, your layout is doing its job. If they struggle to recall anything specific, it’s often a sign that the visual hierarchy needs more work, whether that means enlarging your name, simplifying a cluttered skills section, or removing a decorative element that’s pulling attention away from the content that actually matters to a hiring decision.
Making Your Canva Resume ATS-Friendly
One of the most important considerations for any Canva Resume in 2026 is compatibility with applicant tracking systems, the software many companies use to automatically filter resumes before a human recruiter ever sees them. Because these systems scan text rather than interpret complex visual layouts, certain design choices that look great to the human eye can actually cause problems during automated screening.
To keep your Canva Resume ATS-friendly, avoid placing critical information inside text boxes that overlap images or graphics, since some parsing software struggles to extract text from layered elements. Steer clear of templates that rely heavily on tables for the main content, as tables can sometimes scramble the reading order when converted to plain text. Stick to standard section headings like “Experience,” “Education,” and “Skills” rather than creative alternatives, since ATS software is often trained to recognize conventional labels. It’s also wise to avoid placing your contact information inside a graphic element like an icon-heavy sidebar without also including it as selectable text elsewhere in the document.
Many job seekers choose to keep a simpler, single-column version of their Canva Resume specifically for online applications that route through an ATS, while reserving a more visually elaborate version for networking, portfolio sites, or situations where a human will view the document directly. This dual approach lets you enjoy the design benefits of Canva while still maximizing your chances of passing automated screening.

Canva Resume vs Traditional Resume Builders
Compared to building a resume in Microsoft Word, this approach offers significantly more design flexibility without the formatting headaches that come from manually adjusting tables and text boxes. Word documents are notorious for shifting formatting when opened on different devices or software versions, while this kind of document exported as a PDF maintains pixel-perfect consistency everywhere it’s viewed. Compared to dedicated resume-builder websites that generate resumes from form fields, Canva offers far more creative control, allowing you to move beyond generic templates that thousands of other applicants might also be using.
That said, dedicated ATS-optimization tools sometimes offer built-in scoring systems that tell you exactly how well your resume will parse through specific applicant tracking software, a feature Canva does not natively provide. For most job seekers, though, the combination of visual polish, ease of use, and free access makes a Canva Resume the more practical choice, especially when paired with the ATS-friendly best practices outlined above.
Common Mistakes to Avoid When Building a Canva Resume
Even with Canva’s intuitive design tools, it’s easy to make mistakes that undercut an otherwise strong layout. One of the most frequent errors is choosing an overly decorative template that prioritizes style over substance, leaving too little room for actual content or making the document harder to scan quickly. Another common mistake is inconsistent formatting, such as mixing font sizes or bullet styles between sections after copying and pasting text from an old resume. Overcrowding the page with too much information is another pitfall; a Canva Resume should generally stay to one page for early or mid-career professionals, and rarely more than two pages even for senior candidates.
Using a low-quality or overly casual profile photo is another mistake worth avoiding, particularly in regions or industries where photos on resumes are uncommon or even discouraged due to bias concerns; always research norms in your target country and industry before including a photo. Finally, many job seekers forget to update the generic placeholder text embedded in Canva’s templates, accidentally leaving behind leftover phrases from the original design. Always review your finished Canva Resume line by line before exporting to make sure every piece of placeholder content has been replaced with your own information.
Tips to Make Your Canva Resume Stand Out
To get the most out of your finished document, tailor the content for every application rather than sending an identical document to every employer. Reading the job posting carefully and mirroring some of its specific language within your skills and experience sections can meaningfully improve how well your Canva Resume performs, both with human readers and automated systems. Keep your design choices consistent with your personal brand across other materials, such as your LinkedIn profile or portfolio website, so a hiring manager who looks you up online sees a cohesive professional image.
Consider creating two or three versions of your resume tailored to different types of roles you’re pursuing, especially if you’re applying across slightly different job functions or industries. Pay close attention to white space; a Canva Resume with generous margins and breathing room between sections generally reads as more confident and polished than a cramped document trying to fit too much onto the page. Finally, always export a fresh PDF after making edits and open the file yourself to double check that nothing shifted unexpectedly, since even small technical glitches can occasionally occur during export.

Final Thoughts on Building Your Canva Resume in 2026
Building a Canva Resume in 2026 gives job seekers a genuine competitive advantage: professional-grade design without the cost or complexity of hiring a designer, combined with the flexibility to tailor your document for every application. By choosing the right template, writing clear and results-focused content, keeping your formatting ATS-friendly, and avoiding the common mistakes outlined above, you can create a document that not only looks impressive but actually helps you land interviews. Take the time to get every section right, review your document carefully, and don’t be afraid to create multiple versions as you apply to different types of roles. With the right approach, your Canva Resume can become one of the most valuable tools in your entire job search.
Free Plan or Pro Plan: Which One Do You Actually Need?
A question many job seekers ask is whether it’s worth upgrading to a paid subscription before building their application. In most cases, the free plan is genuinely sufficient for building a complete Canva Resume. It includes a wide selection of templates, standard fonts, basic icons, and unlimited PDF exports, which covers everything the average job seeker needs to produce a polished, one-page document. The paid tier mainly adds value for people who apply to jobs frequently over an extended period, want access to premium template collections, or need advanced tools like the background remover for cleaning up a headshot.
If you’re only building one or two versions of your application for a short-term job search, there’s little reason to pay for the upgrade. On the other hand, if you’re a freelancer, recruiter, or career coach who regularly helps other people with their applications, the expanded template library and brand kit features can save meaningful time over the course of dozens of projects. Either way, start with the free tier first, build out a complete draft, and only consider upgrading if you find yourself specifically wanting a locked template or feature that the free version doesn’t unlock.
Frequently Asked Questions About Canva Resume
Is Canva Resume free to use? Yes, Canva offers a substantial selection of free resume templates that anyone can use to build a Canva Resume without paying anything. A paid Canva Pro subscription unlocks additional premium templates and design tools, but it is not required to create a polished, professional document.
Can a Canva Resume pass applicant tracking systems? A Canva Resume can pass most applicant tracking systems as long as you follow ATS-friendly best practices, such as avoiding heavy graphics over text, using standard section headings, and choosing a simpler single-column layout when applying through online job portals.
What file format should I use when exporting my Canva Resume? Exporting your Canva Resume as a PDF is generally the safest choice, since it preserves your exact formatting across devices and is the format most commonly accepted by employers and job application systems.
How long should a Canva Resume be? Most professionals should keep their Canva Resume to a single page, especially early or mid-career candidates. Senior professionals with extensive experience can extend to two pages, but should still aim to be as concise as possible.
Should I include a photo on my Canva Resume? Whether to include a photo on your Canva Resume depends on the norms of your country and industry. In the United States and several other countries, photos are typically discouraged due to potential bias concerns, while they are more common in parts of Europe and Asia.
Can I edit my Canva Resume after downloading it? Yes, because Canva saves your project in the cloud, you can return to your account at any time to edit your Canva Resume and export an updated version whenever needed.
Is a Canva Resume suitable for corporate and conservative industries? Absolutely. Canva offers clean, minimalist templates specifically designed for traditional industries like finance, law, and consulting, allowing you to build a professional Canva Resume that still benefits from consistent formatting and thoughtful design.

Best Free Canva Templates for Social Media, Business & Marketing
If you have ever tried to create a professional-looking graphic without any design background, you already know how frustrating it can be. Staring at a blank canvas, trying to line up text, pick matching colors, and choose the right fonts can eat up an entire afternoon, and the result still might not look the way you imagined. This is exactly why millions of people around the world now rely on Canva Templates to build stunning visuals in minutes instead of hours. Whether you are a small business owner, a social media manager, a student, or a full-time marketer, these ready-made layouts make it possible to produce polished, on-brand designs without ever opening complicated software like Photoshop or Illustrator. In this guide, we will walk through the best free Canva Templates available today for social media, business, and marketing, and explain exactly how to use them to grow your brand and save time.
Design used to be something only trained professionals could do well, but that has changed dramatically over the past decade. Free online tools have democratized visual creation, and Canva has positioned itself as the leader of this shift by combining an intuitive drag-and-drop editor with a massive, searchable library of layouts for nearly every purpose imaginable. From a quick Instagram graphic to a full multi-page business proposal, there is almost always a starting point already built for you, which means you spend your time on your message and your brand instead of wrestling with alignment guides and font pairings.
Canva has grown into one of the most popular design platforms in the world, and a huge part of that popularity comes from its massive library of ready-made layouts. Instead of starting from a blank canvas, you can simply search, pick a design, and customize it in a few clicks. That is the entire promise behind Canva Templates: professional results without professional design skills. In the sections below, we will break down everything from social media graphics to business documents and marketing materials, so you can find exactly what fits your needs.
What Are Canva Templates?
Canva Templates are pre-designed layouts created by professional designers and made available inside the Canva platform for anyone to use and customize. Each template already has a balanced structure, matching colors, readable fonts, and properly sized elements, so all you need to do is swap in your own text, photos, and logo. Because Canva offers templates for almost every possible use case, from Instagram posts to resumes to restaurant menus, users rarely need to design anything completely from scratch.
The biggest advantage of Canva Templates is that they remove the guesswork from design. A beginner does not need to understand color theory, spacing, or typography rules, because the template has already been built around solid design principles. You simply drag, drop, and edit. Many of these ready-made layouts are also fully responsive to different formats, meaning you can resize a design for Instagram, Facebook, or Pinterest without losing quality. This flexibility is one of the main reasons Canva Templates have become the go-to solution for individuals and businesses that need fast, reliable, and attractive visuals.
Another underrated benefit is how these designs teach good habits over time. When you repeatedly work inside a well-structured layout, you naturally start noticing patterns, such as how much white space professional designs use, how headlines are sized relative to body text, and how a limited color palette usually looks cleaner than a busy one. Even if you never take a formal design course, spending time customizing a wide variety of these layouts can quietly improve your overall visual instincts, which carries over into everything else you create, from presentations to your personal website.
Why Use Free Canva Templates?
There are countless reasons why free Canva Templates have become so widely used, but the most obvious one is cost. Hiring a graphic designer for every single post, flyer, or business document can be expensive, especially for small businesses, freelancers, or students working with a limited budget. These free, ready-to-edit designs eliminate that cost entirely while still delivering a professional, polished appearance that looks like it was made by an experienced designer.
Accessibility is another reason for their popularity. Everything runs in a web browser, so there is no need to download heavy software, buy an expensive license, or own a powerful computer. Anyone with an internet connection can open the editor, browse the library, and start creating within seconds, which is a major reason why students, hobbyists, nonprofit organizations, and small businesses with tight budgets have all adopted this workflow so quickly. This kind of accessibility has effectively leveled the playing field between large companies with dedicated design teams and solo entrepreneurs working out of a spare bedroom.
Another major reason people choose Canva Templates is the incredible time savings. Designing something from scratch, even with design experience, can take hours. With a template, that same process takes minutes because the heavy lifting of layout, spacing, and visual hierarchy has already been done for you. This is especially valuable for businesses that need to post content consistently across multiple platforms every single day.
Consistency is another huge benefit. When you use a set of matching Canva Templates across your social media, website, and marketing materials, your brand starts to look more cohesive and trustworthy to your audience. People recognize your posts instantly because the colors, fonts, and style remain consistent. This kind of visual branding builds credibility over time, and it is much easier to achieve with a reliable template library than by designing everything manually.
Best Free Canva Templates for Social Media

Social media is where most people first discover the power of Canva Templates, and for good reason. Every platform has its own dimensions, style expectations, and audience behavior, and Canva has built specific designs to match each one. Below are the top categories of free Canva Templates for social media that consistently deliver the best engagement and visual appeal, along with what makes each one effective for a different type of platform and audience.
Instagram Post and Story Templates
Instagram is arguably the platform where Canva Templates shine the brightest. From quote posts to product showcases to carousel-style educational content, there is a layout for nearly every kind of Instagram post you might want to create. Free Canva Templates for Instagram Stories are especially popular because they include ready-made countdown stickers, poll layouts, and swipe-up prompts that make interactive storytelling effortless. Because Instagram rewards consistent branding, using a coordinated set of these designs helps your feed look curated and professional, even if you are managing everything solo.
Carousel posts deserve a special mention here, since they have become one of the highest-performing formats on the platform. A good carousel template keeps every slide visually connected through shared colors and fonts while still giving each slide enough breathing room to communicate one clear idea. Instead of manually recreating that structure ten times over, you can duplicate a single slide from a template, update the text, and move on to the next one, which turns what used to be a tedious task into a genuinely quick process.
Facebook Cover and Post Templates
Facebook remains one of the largest platforms for business marketing, and Canva Templates make it simple to design eye-catching cover photos, event banners, and promotional posts. A well-designed Facebook cover created from these layouts can instantly communicate your brand personality to new visitors, while templated post designs help maintain a professional appearance across your page’s timeline. Many free Canva Templates in this category are optimized for Facebook’s exact image dimensions, so you never have to worry about awkward cropping or blurry uploads.
Facebook groups and business pages also benefit from consistent event graphics, and this is another area where a ready-made design saves considerable time. Instead of recreating a banner every time you announce a sale, webinar, or community event, you can duplicate a previous design, swap out the date and headline, and publish within minutes, keeping your page active and visually consistent without the usual production delays.
Pinterest Pin Templates
Pinterest is a highly visual, search-driven platform, and Canva Templates designed specifically for Pinterest Pins tend to perform extremely well because they are built with the platform’s vertical format and bold typography style in mind. Bloggers, e-commerce brands, and content creators frequently rely on these free designs to create scroll-stopping Pins that drive traffic back to their websites. These layouts typically include large, readable text overlays and vibrant colors that stand out in a crowded Pinterest feed, which matters enormously on a platform where users scroll quickly and only pause for something that immediately catches their eye.
YouTube Thumbnail Templates
A great YouTube thumbnail can make or break your click-through rate, and this is another area where Canva Templates prove incredibly useful. Free Canva Templates for YouTube thumbnails are designed with bold fonts, contrasting colors, and clear focal points that grab attention even at a small size. Instead of guessing what design elements work best, creators can rely on these professionally structured layouts to consistently produce thumbnails that encourage more clicks and views, all while keeping a recognizable visual style from one video to the next so returning viewers instantly know the content is theirs.
TikTok and Reels Templates
Short-form video content has exploded in popularity, and Canva Templates have kept pace by offering animated templates specifically designed for TikTok and Instagram Reels. These templates often include pre-built text animations, transitions, and trending layout styles, making it easier for creators to keep up with fast-moving content trends without spending hours in a video editor.
Best Free Canva Templates for Business

Beyond social media, Canva Templates play a huge role in everyday business operations. From official documents to internal presentations, having a library of professional, ready-made layouts can save business owners and teams a significant amount of time while keeping every document on-brand. Small teams in particular benefit here, since one person can produce consistent, professional-looking materials across an entire company without needing a dedicated design department.
Business Card Templates
First impressions matter, and a well-designed business card created from free Canva Templates can leave a lasting impact on potential clients or partners. These layouts come in a wide range of styles, from minimalist and corporate to bold and creative, allowing business owners to choose a design that truly reflects their brand identity. Because these designs are fully editable, you can quickly update your business cards whenever your contact information or branding changes, without paying a printer or designer for a fresh file every time.
Resume and CV Templates
Job seekers have also discovered the value of Canva Templates when it comes to building resumes that stand out from a stack of plain text documents. Free Canva Templates for resumes are structured to highlight key information like work experience, skills, and education in a clean, easy-to-scan format. Recruiters often spend only a few seconds scanning each resume, so a visually organized layout built from a professional design can make a real difference in getting noticed, especially in creative fields where presentation itself is part of the impression you leave.
Presentation Templates
Whether you are pitching to investors, presenting to a team, or teaching a class, Canva Templates for presentations offer a huge upgrade over the default slides found in many presentation tools. These layouts include coordinated color schemes, professional typography, and pre-built sections for charts, quotes, and image galleries. Using free Canva Templates for presentations means you can focus entirely on your content and message instead of spending hours formatting slides, and switching between slide designs mid-project is as simple as picking a new theme without losing any of your existing text.
Invoice and Letterhead Templates
Administrative documents like invoices and letterheads might not be the most exciting part of running a business, but they still represent your brand every time a client receives them. Free Canva Templates make it easy to design clean, professional invoices and letterheads that include your logo, brand colors, and consistent formatting. This small attention to detail helps reinforce a trustworthy, established image for your business, and it often makes clients take payment terms and follow-up communication more seriously.
Company Profile and Proposal Templates
For businesses that regularly send proposals or company profiles to potential clients, Canva Templates offer a huge advantage. These multi-page layouts are structured to tell a compelling story about your business, complete with sections for services, testimonials, pricing, and contact information, all designed to look polished and convincing without hiring a dedicated designer. A well-organized proposal built this way can genuinely influence whether a prospective client decides to move forward with your business over a competitor’s.
Best Free Canva Templates for Marketing

Marketing materials need to grab attention quickly, communicate a clear message, and drive action, and this is exactly where Canva Templates continue to prove their value. Below are some of the most useful categories of free Canva Templates for marketing campaigns, along with what makes each format effective for reaching and converting an audience.
Flyer and Poster Templates
Flyers and posters remain a powerful marketing tool for local businesses, events, and promotions, and free Canva Templates make designing them incredibly straightforward. These layouts are built with strong visual hierarchy, meaning the most important information, like your event date, discount, or headline offer, naturally draws the eye first. With a solid starting design, even a first-time creator can produce a flyer that looks like it came from a professional print shop, ready to hand out locally or share as a digital graphic.
Email Newsletter Templates
Email marketing continues to deliver one of the highest returns on investment across all marketing channels, and Canva Templates for newsletters help brands maintain a consistent, branded look in every email they send. These layouts typically include sections for headlines, images, calls to action, and footer information, all pre-arranged in a structure that is proven to perform well with email audiences, so open rates and click-through rates tend to improve once a brand settles on one clean, repeatable format.
Digital and Print Ad Templates
Whether you are running a Google display ad, a Facebook ad, or a printed advertisement in a local magazine, Canva Templates provide ready-made structures for effective advertising. Free designs in this category are typically built with strong contrast, minimal text, and a clear call to action, all of which are proven principles for high-performing ads. Because advertising space is expensive and attention spans are short, having a tested layout to start from can meaningfully improve how well a campaign performs compared to a design built without any structure in mind.
Brochure and Menu Templates
Restaurants, service-based businesses, and retail brands often rely on brochures and menus to communicate their offerings, and Canva Templates simplify this process significantly. These layouts are structured with clear sections, pricing layouts, and space for enticing photography, helping businesses present their products and services in the most appealing way possible. A well-organized menu can even influence purchasing behavior, since items placed in certain positions on the page or highlighted with a simple box or icon tend to sell better than items buried in a long, plain list, a principle professional menu designers rely on constantly.
Banner and Website Graphic Templates
Marketing does not stop at social media and print. Free Canva Templates also cover website banners, promotional graphics, and blog headers, giving marketers a consistent visual identity across every digital touchpoint. This is especially useful for businesses running seasonal sales or limited-time promotions that need fresh visuals on short notice, since a banner that once took a full afternoon to design can now be updated and republished in under ten minutes whenever a new offer goes live.
Why These Ready-Made Layouts Actually Work So Well
It is worth pausing to explain why this style of design is so effective in the first place, rather than just listing categories. Every professionally built layout is grounded in a handful of core design principles: a clear visual hierarchy that guides the eye from the most important element to the least important, a limited and intentional color palette instead of a random mix of shades, generous white space that keeps a composition from feeling cluttered, and font pairings that are chosen for both readability and personality. When you start from a design that already applies these principles correctly, you skip the trial-and-error phase that usually eats up the most time for beginners.
Grid-based structure is another quiet advantage. Most professional layouts are built on an invisible grid that keeps text blocks, images, and icons aligned, which is exactly what makes a finished design look “clean” even if the viewer cannot articulate why. Free-form design without any underlying grid almost always looks slightly off, even to someone without design training, because our brains are naturally sensitive to misalignment and inconsistent spacing. By starting from a structured layout, you inherit that alignment automatically, and all you have to do is drop your content into the spaces that have already been planned for you.
Color psychology also plays a bigger role than most people realize. Warm colors like red and orange tend to create urgency, which is why they show up so often in sale banners and limited-time promotions, while cooler tones like blue and green are associated with trust and calm, making them common in corporate and healthcare-related designs. Professionally built layouts already account for this psychology, so even a first-time user benefits from color decisions that were made with real strategy in mind rather than guesswork.
Common Mistakes to Avoid When Customizing Free Designs
Even with a strong starting point, it is still possible to undermine a good design through a few common mistakes. One of the most frequent errors is overcrowding a layout with too much text or too many images, which defeats the entire purpose of a clean, structured composition. If a design starts to feel cramped, it is almost always better to trim the content down rather than shrink the font size until it becomes hard to read.
Another common mistake is ignoring contrast between text and background colors. A beautiful color palette can still result in an unreadable design if light gray text is placed on a white background, or if a busy photo is used behind small text without a darker overlay to improve legibility. Always double-check readability on a small screen, since a huge portion of your audience will be viewing your design on a phone rather than a desktop monitor.
Inconsistent branding across multiple pieces is a subtler but equally damaging mistake. If your Instagram posts use one color scheme, your website banner uses another, and your printed flyer uses a third, your audience never gets the chance to build strong visual recognition of your brand. Saving your official brand colors, logo, and fonts in one place and reusing them consistently across every new design you create is one of the simplest ways to look more established and trustworthy, even if your business is brand new.
How to Make the Most of a Free Template Library
Getting real value out of a large template library comes down to a bit of strategy rather than random browsing. Start by building a shortlist of five or six designs in different styles that genuinely match your brand personality, whether that is playful and colorful, minimal and corporate, or bold and editorial. Having this shortlist ready means you are never starting from zero when a new piece of content needs to go out quickly, which is especially valuable for businesses that post frequently across multiple platforms.
It is also worth exploring designs outside your immediate industry for inspiration. A restaurant might find a genuinely fresh layout idea inside a fitness or beauty category, simply because those industries tend to favor different color palettes and typography styles. Borrowing a structural idea from an unrelated category, then applying your own brand colors and imagery, is a reliable way to end up with a design that still feels original even though it started from a pre-built layout.
How to Customize Canva Templates for Your Brand
One of the best parts about Canva Templates is how easy they are to customize, even for someone with zero design experience. Once you select a template, you can change the colors to match your brand palette, swap the default fonts for your brand’s typography, and replace any placeholder images with your own photos or product shots. Canva also allows you to save your brand colors, logos, and fonts as a Brand Kit, which means every new template you use can automatically apply your branding in just a few clicks.
Customizing Canva Templates also involves adjusting the text to fit your specific message. While the layout and structure of the template stay the same, updating the headline, body copy, and call to action ensures the design speaks directly to your audience and campaign goals. Many users also like to add subtle personal touches, such as unique icons, illustrations, or textures from Canva’s element library, to make even a free design feel more original and less generic. With a bit of practice, customizing these layouts becomes a fast, almost automatic process that still results in a completely unique final design.
It also helps to think about customization as an ongoing habit rather than a one-time task. As your brand evolves, seasonal promotions change, or new products launch, you can return to the same base design and update it in minutes rather than starting the entire creative process over again. Many businesses build a small internal library of their favorite customized layouts, organized by purpose, so their team always has a trusted starting point for the next campaign, announcement, or piece of content that needs to go out quickly.
Tips for Choosing the Best Canva Templates
With thousands of options available, picking the right Canva Templates for your specific project can feel overwhelming at first. Start by clearly defining the purpose of your design, whether it is a social media post, a business document, or a marketing flyer, since this will immediately narrow down the relevant categories of designs to browse.
Pay close attention to color and font compatibility with your existing brand identity. Even the most beautifully designed Canva Templates will feel out of place if the colors clash with your logo or website. It is also worth checking whether a template offers enough flexibility for the amount of content you need to include, since some layouts are better suited for short, punchy text while others are built for longer descriptions or multiple images.
Finally, do not be afraid to combine elements from different Canva Templates to create something more unique. You can borrow a color palette from one design and a layout structure from another, giving your final result a more customized feel. Over time, as you experiment with different free layouts, you will develop a better sense of which styles work best for your brand and audience, and picking the right starting point will start to feel almost instinctive rather than overwhelming.
Industries That Benefit Most From This Design Approach
While almost any individual or business can benefit from a strong library of pre-built layouts, a few industries tend to get outsized value from this approach because of how frequently they need fresh visual content. E-commerce brands are a prime example, since product launches, seasonal sales, and promotional campaigns require a constant stream of new graphics across product pages, email campaigns, and social ads. Having a consistent set of layouts to pull from means a small e-commerce team can maintain the same visual quality as a much larger competitor without needing an in-house design department.
Real estate is another industry where this kind of design library proves especially valuable. Listing flyers, open house announcements, and social media graphics for new properties all need to go out quickly, often within hours of a listing going live, and agents rarely have time to build a design from scratch under that kind of pressure. A ready-made structure that only needs new photos and updated details lets agents move fast without sacrificing the polished look that helps a property stand out in a crowded market.
Educators and coaches have also embraced this style of design for building course materials, worksheets, social proof graphics, and promotional content for webinars or workshops. Because these professionals are often experts in their subject matter rather than trained designers, having a dependable set of layouts removes one of the biggest barriers between having valuable knowledge to share and actually packaging it in a way that looks credible and professional to a new audience.
Nonprofit organizations represent another strong use case, since many operate with extremely limited marketing budgets but still need to produce donation appeals, event graphics, volunteer recruitment materials, and social media content on a regular basis. Free, professional-looking design tools allow these organizations to put more of their actual funding toward their mission instead of spending it on design services, while still maintaining the kind of polished, trustworthy visual presence that helps attract donors and volunteers.
Even personal brands and solo content creators, from podcasters to online coaches to freelance consultants, rely heavily on this approach to maintain a professional image across every platform they use. A creator managing their own YouTube channel, Instagram account, newsletter, and website simply does not have time to design five different visual systems from scratch, so leaning on a well-organized, reusable set of layouts becomes essential to staying consistent while still producing content regularly.
Conclusion
Free Canva Templates have completely changed the way individuals and businesses approach design. Instead of spending hours learning complex design software or paying for expensive freelance work, anyone can now produce professional, on-brand visuals in a matter of minutes. From eye-catching social media posts to polished business documents and high-converting marketing materials, these ready-made layouts offer a solution for nearly every visual need. By understanding the different categories available and learning how to customize them effectively, you can build a consistent, professional brand presence without ever feeling limited by your design skills.
Whether you run a small local business, manage social accounts for a growing brand, or simply want your personal projects to look more polished, there has never been an easier or more affordable way to get there. Design is no longer reserved for people with years of formal training, and that shift is exactly what makes this such a valuable skill to build into your regular workflow. Start exploring the wide library of free Canva Templates today, and you will quickly see how much time and effort they can save across every part of your business, one project at a time.
Frequently Asked Questions
Are Canva Templates really free to use? Yes, Canva offers a large selection of free Canva Templates that anyone can use without paying anything. Canva also has premium templates available through Canva Pro, but the free library alone is more than enough for most personal and business needs.
Can I use free Canva Templates for commercial purposes? In most cases, yes. Free Canva Templates can generally be used for business and commercial projects, including marketing materials and client work, though it is always a good idea to review Canva’s specific licensing terms for certain elements, photos, or fonts included in a design.
Do I need design experience to use Canva Templates? No design experience is required. Canva Templates are built specifically for beginners, with a simple drag-and-drop editor that lets you change text, colors, and images without any technical skills.
How do I make free Canva Templates look more unique? You can customize Canva Templates by changing fonts, colors, and images, adding your own brand elements, and combining design pieces from multiple templates to create a more original final result.
Can Canva Templates be resized for different platforms? Yes, Canva makes it easy to resize any template to fit different platforms, such as converting a design from an Instagram post format to a Facebook cover or a Pinterest Pin, without losing design quality.
Where can I find the best free Canva Templates? The best free Canva Templates can be found directly inside the Canva platform by searching relevant keywords, browsing the templates tab, or exploring category-specific collections for social media, business, and marketing designs.
Can I print designs made from these free layouts? Yes, most designs can be downloaded as high-resolution PDF or image files suitable for professional printing. Just make sure to select the correct print-ready settings and check bleed and sizing requirements before sending a file to a print shop.
Do these designs work for a team or multiple collaborators? Yes, Canva allows multiple people to work on the same design at once, which makes it easy for marketing teams, small business partners, or classmates to edit, comment on, and finalize a project together without emailing files back and forth.
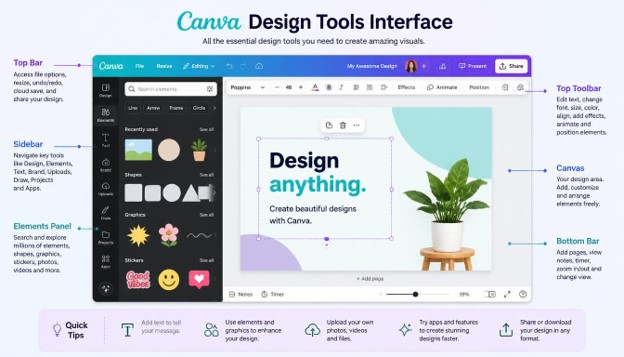
15 Hidden Canva Tips and Tricks Most Users Don’t Know About
If you have been using Canva for even a few weeks, you already know how powerful this design platform can be for creating social media posts, presentations, resumes, marketing materials, and so much more. But here is the truth: most people only scratch the surface of what Canva can actually do. In this guide, we are going to walk through 15 hidden Canva tips and tricks most users don’t know about, and by the end of this article, you will be using Canva like a true professional designer. Whether you are a small business owner, a content creator, a student, or a freelance marketer, these Canva tips and tricks will completely change the way you approach every design project from now on.
Canva has grown into one of the most popular graphic design tools in the world because it makes design accessible to everyone, regardless of skill level. But with thousands of features buried inside menus, toolbars, and settings, it is easy to miss some of the most valuable functions the platform offers. That is exactly why we put together this deep dive into lesser-known Canva tips and tricks that can save you hours of work, make your designs look more professional, and help you get more done in less time. Let’s get started.
Why Learning Canva Tips and Tricks Matters
Before we jump into the list, it’s worth understanding why learning Canva tips and tricks is so important in the first place. Canva is used by millions of people every single day, from solo entrepreneurs to massive marketing teams inside Fortune 500 companies. The difference between someone who struggles with basic design tasks and someone who produces stunning, on-brand visuals in minutes usually comes down to one thing: knowledge of the platform’s hidden features. These Canva tips and tricks are not just shortcuts; they are workflow multipliers. Once you know where to look and how to use these features correctly, your entire design process becomes faster, smarter, and far more enjoyable. So if you have ever felt like you were “doing it the long way” in Canva, this article is going to fix that for you.
1. Magic Resize: Instantly Resize Designs for Every Platform
One of the most underrated Canva tips and tricks is the Magic Resize tool, which is available to Canva Pro users. Instead of manually rebuilding your design for Instagram, Facebook, LinkedIn, YouTube thumbnails, and Pinterest separately, Magic Resize allows you to take one design and instantly convert it into dozens of different sizes with a single click. This feature alone can save content creators and social media managers hours of repetitive work every single week.

To use it, open any existing design, click on the three dots menu, select “Magic Resize,” choose the platforms or custom dimensions you need, and Canva will automatically reformat your design while trying to preserve the layout as closely as possible. Of course, you will still want to review each resized version manually because text and images do not always scale perfectly across wildly different aspect ratios, but this tool gets you 80 to 90 percent of the way there instantly. This is one of those Canva tips and tricks that pays for itself the very first time you use it, especially if you regularly repurpose content across multiple social platforms.
2. Background Remover: Clean Product Photos in Seconds
If you have ever needed to remove the background from a product photo, headshot, or logo, you already know how tedious this task can be in traditional editing software like Photoshop. Canva’s Background Remover tool changes all of that. With one click, Canva’s AI detects the subject in your image and removes the background automatically, leaving you with a clean, transparent PNG that you can layer onto any design.

This feature is available to Canva Pro subscribers and works remarkably well on people, products, animals, and objects with clear edges. To use it, simply upload your photo, click on the image to select it, and choose “Background Remover” from the toolbar. Within seconds, your image will be background-free and ready to use. This is easily one of the most practical Canva tips and tricks for e-commerce sellers, real estate agents, and anyone who regularly works with product photography or portraits.
3. Magic Write: Let AI Draft Your Copy for You
Staring at a blank text box trying to come up with the perfect caption, headline, or blog intro is something every designer and marketer struggles with. Canva’s Magic Write feature, powered by artificial intelligence, solves this problem by generating written content directly inside your design based on a simple prompt you provide.
Simply type “/magic write” inside any text box, describe what you need (a product description, a social caption, a blog outline), and Canva will generate several options for you to choose from or edit further. This tool is a huge time-saver, especially for people managing multiple brands or clients who need consistent, fast content generation. Among all the Canva tips and tricks in this article, Magic Write is one of the newest additions, and it is quickly becoming a favorite among marketers who want to speed up their content creation workflow without sacrificing quality.
4. Brand Kit: Keep Every Design Perfectly On-Brand
If you are managing a business, one of the most valuable Canva tips and tricks you can learn is how to properly set up your Brand Kit. This feature allows you to save your brand colors, fonts, and logos directly inside Canva so that every new design automatically has access to your exact brand identity, without you having to manually search for the right hex code or font every single time.

To set this up, go to your account settings, click on “Brand Kit,” and upload your logo files, input your brand color hex codes, and select your brand fonts. Once this is done, every new design you create will have a dedicated panel where you can instantly apply your brand colors and fonts with a single click. This ensures consistency across every piece of content you produce, whether it is a social post, a presentation, or a printed flyer. Brand Kit is available on Canva Pro and Canva for Teams, and it is one of those Canva tips and tricks that professional design teams simply cannot live without.
5. Curved Text: Create Eye-Catching Circular Designs
Curved text is a design trend that shows up everywhere, from logo badges to Instagram graphics to product packaging. Many Canva users assume this effect requires advanced software, but it is actually built directly into Canva’s text effects panel, and it is incredibly easy to use once you know where to find it.

To curve your text, type your text, click on it to select it, open the “Effects” panel in the toolbar, choose “Curve,” and then use the slider to adjust how much curvature you want. You can create anything from a subtle arc to a full circle. This is one of the simplest yet most visually impactful Canva tips and tricks, and it instantly makes your designs look more dynamic and professionally styled, especially for logos, badges, and stamp-style graphics.
6. Download with a Transparent Background
Many Canva users don’t realize that you can download any design element, text, or graphic with a fully transparent background instead of a solid white one. This is essential when you need to layer graphics on top of other designs, place a logo on a photo, or create overlays for video editing software.

To do this, click “Share,” then “Download,” select PNG as your file type, and check the box that says “Transparent Background.” Note that this option is only available with a Canva Pro subscription and only works for designs without a solid background color already applied. This is one of the most requested Canva tips and tricks among designers who work across multiple platforms and need flexible, layerable assets.
7. Photo Grids: Build Professional Collages in Minutes
If you regularly need to combine multiple photos into a single cohesive design, Canva’s Grid feature is a massive time-saver. Instead of manually resizing and positioning each photo, you can drag a grid layout onto your canvas and simply drop your images directly into each section.

To use this, search “grids” in the elements panel, choose a layout that fits your needs, and then drag your photos directly onto each grid cell. Canva automatically crops and aligns the images to fit perfectly. This feature is perfect for creating photo collages, before-and-after comparisons, product galleries, or portfolio spreads, and it is one of the more practical Canva tips and tricks for anyone working with a lot of visual content.
8. Canva Docs: A Hidden Word Processor Inside Canva
Most people think of Canva purely as a graphic design tool, but Canva Docs is a fully functional document editor that lives right inside the platform. It allows you to write reports, blog posts, meeting notes, and proposals while still having access to Canva’s design elements, images, and templates.

You can access this by clicking “Create a Design” and selecting “Docs” from the dropdown menu. What makes Canva Docs unique compared to something like Google Docs is that you can embed charts, videos, and visually designed elements directly into your document, and then export it as a PDF or presentation with a single click. This is one of the more surprising Canva tips and tricks because most users never even discover this feature exists.
9. Animate Your Designs for Social Media and Presentations
Static designs are great, but animated ones tend to capture far more attention on social media feeds. Canva has a built-in Animate feature that allows you to add subtle motion effects to your text, images, and entire designs without needing any video editing experience.

To animate a design, click the “Animate” button in the top toolbar, and choose from options like Rise, Fade, Pan, Breathe, or Tumble. You can animate individual elements or apply a page-level animation to your entire design. This works especially well for Instagram Stories, TikTok graphics, and animated presentation slides. Of all the Canva tips and tricks covered here, this one is particularly useful for anyone trying to stand out in a crowded social media feed without learning complex animation software.
10. Master Canva’s Keyboard Shortcuts
Speed is everything when you’re working on multiple designs, and Canva’s keyboard shortcuts can dramatically cut down your production time once you memorize a handful of the most useful ones. Most users click through menus for actions that could be done in a fraction of a second with a keyboard shortcut.
A few essential shortcuts include pressing “C” to add a comment, “T” to add a text box, “R” to add a rectangle, Ctrl+D (or Cmd+D on Mac) to duplicate an element, and Ctrl+G to group multiple elements together. Learning even five or six of these shortcuts can save you an enormous amount of clicking and scrolling. This is one of the simplest Canva tips and tricks to implement immediately, and the time savings compound the more designs you create.
11. Use the Content Planner to Schedule Social Media Posts
Many people don’t realize that Canva has a built-in content planner and scheduler, which means you can design your social media graphics and then schedule them directly to platforms like Instagram, Facebook, LinkedIn, Pinterest, and X without ever leaving Canva or using a third-party scheduling tool.

To access this, go to the “Apps” menu and search for “Content Planner,” connect your social media accounts, and then schedule your designs directly from the editor or from the planner calendar view. This is a huge workflow improvement for solo entrepreneurs and social media managers who want to consolidate their design and scheduling process into a single platform. Among all the Canva tips and tricks in this list, this one is especially valuable for saving time and reducing the number of apps you need to juggle.
12. Collaborate with Your Team in Real Time
Canva was built with collaboration in mind, and many teams still don’t take full advantage of its real-time editing and commenting features. Multiple team members can work on the same design simultaneously, leave comments on specific elements, tag teammates, and track changes, all within the same shared workspace.
To collaborate, click the “Share” button, invite team members by email, and set their permission level as either “Can View,” “Can Comment,” or “Can Edit.” You can also click directly on any element and press “C” to leave a comment for feedback. This makes Canva an excellent alternative to sending files back and forth over email. This is one of the most valuable Canva tips and tricks for agencies, marketing departments, and remote teams that need a smooth, centralized design review process.
13. Generate Custom Images with Magic Media
Sometimes stock photos just don’t capture exactly what you’re envisioning for a design. Canva’s Magic Media feature lets you generate completely original images and graphics using AI, simply by typing a text description of what you want to see.
To use this feature, search “Magic Media” in the apps panel, type a detailed description of the image you want (the more specific, the better your results), and Canva will generate several AI-created options for you to choose from. This is incredibly useful for creating unique blog graphics, concept art, or illustrations that don’t exist anywhere else. This is one of the most futuristic Canva tips and tricks available today, and it continues to improve as Canva updates its AI models.
14. Copy Style: Match Formatting Instantly
If you’ve ever spent time manually adjusting fonts, colors, and effects to match another element in your design, the Copy Style tool will save you an enormous amount of effort. This feature works like a “paint roller” for design formatting, letting you copy the exact style of one element and apply it to another with a single click.
To use it, select the element whose style you want to copy, click the paint roller icon in the toolbar (or press Ctrl+Alt+C to copy and Ctrl+Alt+V to paste the style), and then click on the element you want to apply that formatting to. This ensures perfect visual consistency across text boxes, shapes, and other elements without manually adjusting every single property. This is one of the most efficient Canva tips and tricks for anyone who values consistency and speed in their design workflow.
15. Use Frames to Instantly Mask Photos into Shapes
Frames are one of Canva’s most creative yet underused features. They allow you to instantly mask any photo into a specific shape, whether that’s a circle, star, heart, or even custom illustrated frame designs, without needing any photo editing skills.
To use this feature, search “frames” in the elements panel, drag your chosen frame shape onto the canvas, and then drag any photo directly into the frame. Canva automatically crops and fits your image inside the shape. This is perfect for creating polaroid-style photo layouts, circular profile graphics, or decorative photo collages. Of all the Canva tips and tricks on this list, Frames is one of the most fun to experiment with, especially for personal projects, scrapbooking-style designs, and social media content.
How These Canva Tips and Tricks Can Transform Your Workflow
Now that we’ve covered all 15 hidden Canva tips and tricks, it’s worth stepping back to consider how much time and effort these features can genuinely save you. Design work often feels repetitive because so many tasks, like resizing, background removal, and formatting, are done manually when they don’t need to be. By incorporating even five or six of these Canva tips and tricks into your regular workflow, you’ll notice a significant improvement in both your speed and the overall quality of your final designs.
It’s also worth mentioning that Canva regularly rolls out new features, so staying curious and occasionally exploring menus you don’t normally use is a great habit to build. Many of the best Canva tips and tricks are discovered simply by clicking around and experimenting rather than reading tutorials. That said, having a solid foundation, like the one covered in this article, gives you a massive head start compared to users who are still doing everything the long way.
Whether you’re a beginner just learning the platform or an experienced designer looking to sharpen your skills, these Canva tips and tricks are designed to be practical, easy to implement, and immediately useful. Try incorporating one or two new techniques into your next project, and you’ll quickly start to see how much more efficient and polished your designs become.
Final Thoughts on Canva Tips and Tricks
Canva continues to be one of the most accessible and powerful design tools available today, and the hidden features covered in this article represent just a portion of what the platform has to offer. From AI-powered tools like Magic Write and Magic Media to workflow boosters like Magic Resize and Copy Style, these Canva tips and tricks are meant to help you work smarter, not harder.
If there’s one takeaway from this guide, it’s that spending a little time exploring Canva’s toolbar, menus, and settings can uncover features that genuinely transform how you design. Bookmark this article, come back to it whenever you need a refresher, and don’t be afraid to experiment with new Canva tips and tricks as the platform continues to evolve. The more you practice these techniques, the more natural they will become, and before long, you’ll be designing faster and more creatively than ever before.
Frequently Asked Questions About Canva Tips and Tricks
- Are these Canva tips and tricks available on the free version of Canva? Some of these features, like keyboard shortcuts, Frames, and Photo Grids, are available on the free version. However, several of the more advanced Canva tips and tricks, such as Background Remover, Magic Resize, Brand Kit, and transparent PNG downloads, require a Canva Pro subscription.
- What is the best Canva tip for beginners to learn first? If you’re just getting started, learning keyboard shortcuts and the Copy Style tool will give you the fastest improvement in your workflow speed. These two Canva tips and tricks are simple to learn but have an immediate impact on how efficiently you design.
- Can I use these Canva tips and tricks on mobile devices? Most of these features are available on both desktop and the Canva mobile app, though some tools, like Magic Resize and Content Planner, may have a more limited interface on mobile compared to desktop.
- How often does Canva add new features? Canva updates its platform frequently, often rolling out new AI tools, templates, and design features every few months. This is why it’s a good idea to periodically explore the app menu and toolbar, since new Canva tips and tricks are constantly being added.
- Is Canva Pro worth it for these features? If you regularly use Canva for business, content creation, or client work, Canva Pro is generally worth the investment because it unlocks Background Remover, Brand Kit, Magic Resize, transparent downloads, and premium templates, all of which significantly speed up your design process.
- Where can I find more Canva tips and tricks? Canva’s official Design School offers tutorials, and many design blogs regularly publish updated guides. Following Canva’s own social media accounts and blog is also a great way to stay updated on new Canva tips and tricks as they are released.
-

 Graphics Design2 years ago
7.Exploring the Importance of Color Theory Charts
-

 Graphics Design1 year ago
Top 10 Best Graphic Design Tools for Beginners in 2025 (Free & Paid)
-

 Graphics Design1 year ago
15 Freelance Graphic Design Tips to Boost Your Career in 2025
-

 Graphics Design2 years ago
29.Retro Design Is Making a Comeback in Modern Spaces
-

 Graphics Design1 year ago
Best Laptops for Graphic Designers – 2025 Buying Guide
-

 Graphics Design2 years ago
2025 Logo Design Trends: What’s In, What’s Out?
-

 Graphics Design2 years ago
15.The Importance of Effective Flyer Design in Marketing
-

 Graphics Design1 year ago
Canva vs Adobe Photoshop – Which One is Better for Designers?
Free Temporary Email
September 25, 2024 at 7:40 am
Awesome! Its genuinely remarkable post, I have got much clear idea regarding from this post
disposable Temporary Email
September 28, 2024 at 7:39 am
naturally like your web site however you need to take a look at the spelling on several of your posts. A number of them are rife with spelling problems and I find it very bothersome to tell the truth on the other hand I will surely come again again.
Tech Learner
October 25, 2024 at 3:00 pm
Tech Learner Great information shared.. really enjoyed reading this post thank you author for sharing this post .. appreciated
Cortez Jerald
October 26, 2024 at 6:52 am
Howdy! I know this is kinda off topic but I was wondering which blog platform are you using for this site? I’m getting tired of WordPress because I’ve had issues with hackers and I’m looking at alternatives for another platform. I would be great if you could point me in the direction of a good platform.
Building reinforcement carbon plates
November 4, 2024 at 8:47 am
You have brought up a very good points, regards for the post.
Maximo Liquori
November 15, 2024 at 4:17 am
Your style is so unique compared to many other people. Thank you for publishing when you have the opportunity,Guess I will just make this bookmarked.2